Introduction to the ALS-U EPICS Environment Training Guide
Welcome
Welcome to the official training documentation for the Advanced Light Source Upgrade (ALS-U) EPICS Environment. This guide serves as the central resource for understanding, installing, using, and maintaining the standardized EPICS software environment specifically tailored for developing and deploying Input/Output Controllers (IOCs) at ALS-U.
This training is hosted on both GitHub Pages and GitLab Pages as part of a set of resources aimed at providing comprehensive guidance for the ALS-U EPICS development workflow.
Purpose of the ALS-U EPICS Environment
The ALS-U EPICS environment is maintained to support the development of robust, consistent, and maintainable IOC applications across the facility. It is typically distributed as a pre-built package (originating from repositories like https://github.com/jeonghanlee/EPICS-env and https://github.com/jeonghanlee/EPICS-env-support) and consists of:
- A specific version of EPICS Base.
- A defined set of EPICS Modules (like Asyn, StreamDevice, Calc, PVXS, etc.) built against that base version.
- Standardized IOC templates and build tools (including scripts like
generate_ioc_structure.bash) to ensure common structure and practices. - Defined procedures for development, testing, deployment, and maintenance.
The primary goals of establishing this environment are to:
- Simplify the development process for IOC engineers.
- Ensure high code quality and reliability.
- Promote consistency across all ALS-U IOC projects, making them easier to understand and manage.
- Reduce tedious and error-prone procedures often associated with manual dependency management and deployment in traditional EPICS development.
Purpose and Scope of This Training Guide
This training guide provides a step-by-step walkthrough of the ALS-U EPICS Environment, covering everything from initial setup to advanced configuration and development techniques. It aims to provide users with the knowledge and skills needed to effectively develop, test, and deploy EPICS IOCs for ALS-U.
Key topics covered include:
- Setting up and verifying the development environment.
- Developing basic and advanced IOC applications using standardized templates and tools.
- Simulating device communication for testing and development.
- Utilizing
iocshscripts and database templates for efficient and scalable configuration. - Understanding the structure and function of key IOC configuration files (
st.cmd,RELEASE,CONFIG_SITE,system.dbd). - Integrating Continuous Integration (CI) practices into the development workflow (details specific to the ALS-U internal GitLab repository).
Target Audience
This training guide is primarily intended for engineers, software developers, and scientists involved in creating, deploying, or maintaining EPICS IOCs for the ALS-U project at LBNL. While its focus is on the ALS-U implementation, much of the content is also applicable and valuable to the broader global EPICS community.
While some sections assume familiarity with EPICS core concepts and Linux environments, the initial chapters are designed to guide users new to this specific ALS-U environment through the setup and basic usage. Later chapters delve into more specific examples and advanced topics.
Training Structure (Chapters)
This guide is organized into chapters designed to lead you through the ALS-U EPICS development process:
-
Chapter 1: Environment Setup and Verification: Focuses on getting the environment operational, covering installation, initial testing, and understanding host architecture concepts like
EPICS_HOST_ARCHand OS-specific directories. -
Chapter 2: First EPICS IOC and GitLab CI: Guides you through creating and expanding your first basic EPICS IOC within the environment and integrating it with GitLab Continuous Integration (CI) pipelines.
-
Chapter 3: Second EPICS IOC and Device Simulation: Builds on basic development by demonstrating how to configure an IOC for device communication and simulating that communication using a TCP-based simulator.
-
Chapter 4: Advanced IOC Configuration and Startup: Delves into more complex configuration techniques, including working with
iocshscripts, managing multiple devices inst.cmd, using database templates and substitution, and understanding the phases of the IOC startup sequence. Includes development of more advanced simulators. -
Chapter 5: Understanding IOC Application Configuration: Provides a deep dive into the critical configuration files that define an IOC’s behavior, such as the style of
st.cmd,configure/RELEASE,configure/CONFIG_SITE, andsystem.dbd.
Note: This structure reflects the current organization of the training guide and may evolve over time.
How to Use This Training Guide
-
New Users: Start with Chapter 1 (Installation, Testing) and proceed through Chapter 2 (First IOC) to build a foundational understanding.
-
Experienced Users: You may jump directly to relevant sections based on your needs, such as advanced configuration (Chapter 4) or detailed file explanations (Chapter 5).
Online Version
The latest official version of this training guide is always available online at the ALS-U internal Gitlab Pages site:
https://jeonglee.pages.als.lbl.gov/epics-trainings/
The latest mirror version of this training guide is always available online at the GitHub Pages site:
https://jeonghanlee.github.io/epics-trainings/
General Prerequisites
Most sections assume you are working in a Linux environment (like Debian 12 or Rocky 8) and have basic familiarity with shell commands, text editors (like nano, vi, emacs), and version control with git. Specific EPICS version requirements are detailed in the installation section.
We hope this training guide serves as a valuable resource for your EPICS development work at ALS-U and at any EPICS facilities as well!
Chapter 1: Environment Setup and Verification
Welcome to the ALS-U EPICS Environment documentation. This first chapter focuses on getting the environment operational. It covers the installation procedure and the essential steps to test your setup.
This chapter covers the following topics:
- Installation: Provides detailed steps to set up the ALS-U EPICS Environment.
- Test Environment: Outlines how to launch and run tests to ensure the environment is functioning correctly after installation.
- Host Architecture and OS-Specific folder: Explains the environment’s approach to host architecture support, focusing on
EPICS_HOST_ARCH, thelinux-x86_64standard, and the role of OS-specific directories.
1.1 EPICS Environment Configuration and Installation
This section covers the essential first steps for setting up the ALS-U EPICS environment locally. You will clone the central environment repository using git from the ALS GitLab server or its GitHub mirror, and then learn how to activate a specific version (e.g., for Debian 12 or Rocky 8) by sourcing the appropriate setEpicsEnv.bash script in your terminal session. Basic verification steps are also included.
Lesson Overview
In this lesson, you will learn how to do the following:
- Clone the ALS-U EPICS environment repository using git
- Configure the ALS-U EPICS environment locally
- Test the cloned EPICS environment with a few EPICS command line tools
- Activate a specific version of the EPICS environment within a terminal session
Get the ALS-U EPICS environment
Clone the ALS-U EPICS repository using Git.
Clone the ALS-U EPICS environment by using git clone
Users may need to have SSH access to the ALS GitLab repository to clone the following repositories.
# Example for the ALS-U Internal Gitlab (Official)
$ git clone --depth 1 ssh://git@git-local.als.lbl.gov:8022/alsu/epics/alsu-epics-environment.git ~/epics
# or
# Example for the Mirror site on GitHub
$ git clone --depth 1 https://github.com/jeonghanlee/EPICS-env-distribution.git ~/epics
By cloning the repository, you have the environment at the ${HOME}/epics folder. In most cases, you are ready to use it.
Configure the ALS-U EPICS enviornment
The ALS-U EPICS environment supports multiple operating system versions and EPICS versions. Please note that the pre-built binaries included in this environment currently target the Linux x86_64 architecture exclusively.
To select and activate a specific environment version in your current terminal session, you need to source the appropriate setEpicsEnv.bash script. The path will include the specific version number, which may change over time.
First, find the available versions by listing the directory contents:
$ ls ~/epics/
Then, use the version you found to source the script for your operating system and desired EPICS version:
# Example for EPICS 7.0.7 on Debian 12 (x86_64)
source ~/epics/1.1.2/debian-12/7.0.7/setEpicsEnv.bash
# or
# Example for EPICS 7.0.7 on Rocky 8.10 (x86_64)
source ~/epics/1.1.2/rocky-8.10/7.0.7/setEpicsEnv.bash
Sourcing the script sets up necessary environment variables like EPICS_BASE, PATH, and LD_LIBRARY_PATH. The output should resemble this (user and specific paths will vary):
Set the EPICS Environment as follows:
THIS Source NAME    : setEpicsEnv.bash
THIS Source PATH    : /home/jeonglee/epics/1.1.2/debian-12/7.0.7
EPICS_BASE          : /home/jeonglee/epics/1.1.2/debian-12/7.0.7/base
EPICS_HOST_ARCH     : linux-x86_64  # <-- Note the architecture
EPICS_MODULES       : /home/jeonglee/epics/1.1.2/debian-12/7.0.7/modules
PATH                : ......................
LD_LIBRARY_PATH     : ......................

Enjoy Everlasting EPICS!
Note how the EPICS_HOST_ARCH variable and the paths explicitly mention linux-x86_64.
Testing the Environment
Once the environment is sourced, verify that the EPICS command-line tools are accessible in your PATH:
# Check help output for an EPICS command-line tool (e.g., caput)
$ caput -h

# Verify the location of an EPICS command-line tool (e.g., caget)
$ which caget
If these commands run successfully and show help/path information, you have successfully configured the ALS-U EPICS environment in your current terminal session.
Alternative Environment for Other Linux Distributions (Training Contingency)
This training and ALS-U Controls officially supports Debian 12 and Rocky 8.10 on the Linux x86_64 architecture, using the primary ALS-U EPICS environment repository cloned into ~/epics as described in the main [Get the ALS-U environment](01.01.installation.md##Get the ALS-U EPICS environment) section.
Important Considerations:
- This alternative repository provides builds that are functional for the training but may not be the latest official ALS-U EPICS environment production versions.
- It is not the recommended environment for actual development or deployment work at ALS-U Controls System.
- Using this path requires adjusting subsequent commands (like
source) and potentially other paths mentioned in the training materials.
Summary
In this section, you learned the fundamental steps to get started with the ALS-U EPICS environment on your local Linux x86_64 machine. You successfully cloned the environment repository using git and learned how to activate a specific version by sourcing the corresponding setEpicsEnv.bash script. Finally, you verified the setup by confirming that essential EPICS command-line tools are available in your path. You are now ready to use this configured environment for running IOCs and developing EPICS applications.
1.2 Your First Running EPICS IOC
In this section, you will run your very first EPICS Input/Output Controller (IOC) using the standard softIocPVX executable included in the environment. You will create a minimal database file defining a single Process Variable (PV) and then use essential EPICS command-line tools like caget, caput, and pvxget to interact with this PV over the network, demonstrating both Channel Access (CA) and the newer PV Access (PVA) protocols.
Lesson Overview
In this lesson, you will learn how to do the following:
- Create a minimal EPICS database (
.db) file. - Run a simple IOC using
softIocPVX. - List PVs within the running IOC using
dbl. - Interact with PVs using
cagetandpvxget(Read). - Interact with PVs using
caputandpvxput(Write). - Perform basic connection troubleshooting for CA and PVA.
Make an EPICS Database file
Please create the following EPICS database (.db) file with the name as water.db. This file defines a single Process Variable (PV).
record(ao, "temperature:water")
{
    field(DESC, "Water temperature Setpoint") # Description
    field( EGU, "degC")                       # Engineering Units
    field( VAL, "0")                          # Initial Value
}
This file defines a record instance named temperature:water.
ao: Specifies the record type is Analog Output.DESC: Stands for Description (a text string).EGU: Defines the Engineering Units for the value.VAL: Holds the current value (and initial value) of the record.
Save this content as water.db.
Run your first softioc
Now we start the softIocPVX executable (a generic IOC program included with EPICS base) using the database file we just created.
- Open your first terminal window.
- Ensure your EPICS enviornment is sourced:
# # In Terminal 1 (IOC)
$ source ~/epics/1.1.1/debian-12/7.0.7/setEpicsEnv.bash
- Run
softIocPVX, telling it to load (-d) your database file (water.db). Make sure you run this in the same directory where you savedwater.db.
# In Terminal 1 (IOC)
$ softIocPVX -d water.db
# Expected Output (will vary slightly):
INFO: PVXS QSRV2 is loaded, permitted, and ENABLED.
Starting iocInit
############################################################################
## EPICS R7.0.7-github.com/jeonghanlee/EPICS-env
## Rev. R7.0.7-dirty
## Rev. Date Git: 2022-09-07 13:50:35 -0500
############################################################################
iocRun: All initialization complete
7.0.7 >
Leave this terminal running.
- At the IOC shell prompt (
7.0.7 >), typedbl(database list) and press Enter to see the PVs loaded:
# In Terminal 1 (IOC)
7.0.7 > dbl
temperature:water # Should list the PV you defined
7.0.7 >
Play with EPICS command line tools
Now, let’s interact with the running IOC from a different terminal.
- Open a new, separate terminal window, which we call it
Terminal 2 - Source the ALS-U EPICS environment with
disableoption, which suppress output messages in this new terminal as well:
# In Terminal 2 (CA/PVA Clients)
$ source ~/epics/1.1.1/debian-12/7.0.7/setEpicsEnv.bash "disable"
- Try reading the initial value and description using Channel Access (
caget) and PV Access (pvxget), then write new values using caput (CA) and pvxput (PVA), and read them back:
# In Terminal 2 (CA/PVA Clients)
$ caget temperature:water      # Reads the VAL field (e.g., 0) using CA
$ caget temperature:water.DESC # Reads the DESC field using CA (e.g., "Water temperature Setpoint")
$ pvxget temperature:water     # Reads the value using PVA (shows structure, e.g., { "value": 0.0 })

# Write value 24 using CA
$ caput temperature:water 24
# Read back using CA and PVA
$ caget temperature:water      # Should show 24
$ pvxget temperature:water     # Should show { "value": 24.0 }

# Write value 44 using PVA
$ pvxput temperature:water 44
# Read back using CA
$ caget temperature:water      # Should show 44
The commands caget, pvxget, and caput are simple EPICS command-line clients. caget and caput use the CA (Channel Access) network protocol, while pvxget (and pvxput) use the newer PVA (PV Access) protocol available in EPICS 7+. These network protocols are fundamental to how different EPICS components (IOCs, clients, services) communicate.
Troubleshooting
If your caput or caget commands fail with a message like Channel connect timed out: PVNAME not found., it means the CA client tools cannot find your running IOC over the network.
# Example Error:
$ caget caget temperature:water
Channel connect timed out: 'caget temperature:water' not found.
When running the IOC and CA clients on the same machine (like localhost), this often happens because the default CA broadcast mechanism isn’t sufficient or is blocked. You need to explicitly tell the CA clients where to find the IOC server using an environment variable:
- Set
EPICS_CA_ADDR_LIST: In the terminal where you runcaput/caget(Terminal 2), set this variable to point to the machine running the IOC (in this case, localhost).
# In Terminal 2 (CA Clients)
$ export EPICS_CA_ADDR_LIST=localhost
- Retry the command:
# In Terminal 2 (CA Clients)
$ caget temperature:water
# Expected output (should now work, showing the current value):
temperature:water    44
- If you would like to evaluate the PVA protocol, you also have to define the following EPICS environment variable
EPICS_PVA_ADDR_LISTfor PVA (Process Variable Access) protocol. We will cover PVA protocol for more advanced lesson later.
# In Terminal 2 (PVA Clients)
$ export EPICS_PVA_ADDR_LIST=localhost
$ pvxget temperature:water
# Expected output (should now work, showing structure):
# ...
# { "value": 44.0 }
# ...
Rocky or Redhat Variant Firewall
Rocky Linux (Redhat Variant) has its own firewalld service running by default. It blocks the CA and PVA communication needed for EPICS. Thus, one should stop and disable the service for this training overall.
# Run these commands with administrator privileges (e.g., using sudo)
sudo systemctl stop firewalld      # stop the firewalld service
sudo systemctl disable firewalld   # unmarks the firewalld for autostart
sudo systemctl mask firewalld      # prevent the firewalld from being started
Note that you can edit the firewalld configuration to allow specific ports, but this is out-of-scope of this introductory training.
Summary
In this lesson, you successfully performed the essential first steps in working with an EPICS IOC:
- Created a minimal database file (
water.db) containing an Analog Output (ao) record namedtemperature:water. - Ran a basic IOC using the
softIocPVXexecutable, loading your database file. - Verified the loaded PV using the dbl command in the IOC shell.
- Used command-line tools (
caget,caput,pvxget,pvxput) to interact with the PV over the network using both Channel Access (CA) and PV Access (PVA) protocols. - Learned basic troubleshooting steps for network connectivity issues involving
EPICS_CA_ADDR_LIST,EPICS_PVA_ADDR_LIST, and system firewalls (firewalld).
1.3 ALS-U EPICS Environment Design Principles (linux-x86_64 + OS-Specific Folders)
Note: This section discusses the underlying design choices for the EPICS environment’s architecture and cross-distribution support. While important for a deep understanding, some concepts related to build systems, EPICS_HOST_ARCH, operating system specifics, library compatibility (like glibc), and Application Binary Interfaces (ABIs) may be considered advanced. A full grasp of these details is not required for basic environment usage if following standard procedures.
Introduction
This section covers the in-depth design principles and fundamental reasons why the ALS-U EPICS environment standardizes on EPICS_HOST_ARCH=linux-x86_64 for building core EPICS and its modules, while simultaneously utilizing OS-specific folders (e.g., debian-12, rocky-8.10) to manage distribution-level differences. This combined approach addresses the significant challenge of ensuring consistent EPICS operation across different Linux distributions and their various versions, which inherently vary in system libraries, package managers, and configurations. It leverages industry standards while ensuring adaptability across supported operating systems.
Principle One: Adherence to Linux Architecture Standards (linux-x86_64)
A core principle is to align with broader Linux ecosystem standards. The use of architecture names like linux-x86_64 (instead of distribution-specific names like rocky8-x86_64) is rooted in historical conventions, standardization, and practical considerations within the Linux world. The EPICS_HOST_ARCH variable is central to the EPICS build system, guiding the selection of compiler flags, linker options, and determining the output directories for compiled binaries and libraries (e.g., bin/linux-x86_64, lib/linux-x86_64).
Historical Context
In the early days of Linux, standardized names (i386, alpha, sparc) were crucial for distinguishing builds for different CPU architectures. With the advent of 64-bit x86 architecture around 2003 (AMD64/Intel64), x86_64 quickly became the vendor-neutral standard adopted by major distributions (Debian, Red Hat, etc.). EPICS adopted these conventions for its EPICS_HOST_ARCH variable to identify build targets.
Cross-Distribution Compatibility
A common architecture name (x86_64, arm64) allows upstream projects (including EPICS itself and many modules) and developers to create builds that are fundamentally compatible at the CPU instruction set level across various Linux distributions running on that hardware.
Separation of Concerns
x86_64 describes the hardware architecture, while the distribution version (Debian 12, Rocky 8) describes the software stack (specific library versions like glibc, kernel, tools). Keeping these separate avoids confusion and simplifies compatibility reasoning, particularly concerning critical system library differences and potential ABI incompatibilities between distributions.
Stability and Longevity
Architecture names are stable, while distribution versions change frequently. Tying architecture names to distribution versions would create an unstable and cumbersome naming scheme.
Upstream and Tooling Standards
Build tools (GCC, Autotools, Make) and package managers (APT, RPM/DNF) rely on these standardized architecture names, simplifying development, builds, and packaging.
Historical Convention and Community Adoption
The standard was adopted early and changing it would cause disruption without significant benefit.
Principle Two: Avoiding Unnecessary Build Complexity
A related principle is to minimize redundant effort and complexity. Using distribution-specific architecture names like rocky8-x86_64 for EPICS_HOST_ARCH was rejected because it would lead to significant inefficiencies and risks:
- Massive Duplication of Effort: Requiring separate, nearly identical EPICS Base/module builds for every supported OS version, wasting significant build time.
- Increased Complexity and Maintenance Burden: Fragmenting build artifacts across numerous directories (e.g.,
bin/debian12-x86_64,lib/rocky8-x86_64) and multiplying the effort required for updates, patches, and testing across all targets. - Potential for Inconsistencies: Increasing the risk of subtle, unintended differences creeping into builds for different OS versions over time.
Furthermore, this structure simplifies the process of adding support for new OS versions; it typically involves creating a new OS-specific folder to manage its unique dependencies and configurations, while leveraging the existing linux-x86_64 core components.
Principle Three: Managing Distribution-Specific Variations (debian-12, rocky-8.10 Folders)
While standardizing on EPICS_HOST_ARCH=linux-x86_64 ensures architectural compatibility for the core EPICS build, it’s recognized that critical differences exist between the distributions themselves. Therefore, a key principle is to manage these variations explicitly using OS-specific folders.
Even when running on the same x86_64 hardware, distributions like Debian 12 and Rocky Linux 8 differ in:
- System Library Versions: Versions of core libraries like
glibc,libstdc++,OpenSSL,readline, etc., can vary, potentially leading to runtime errors if a binary built against a newer library is run on a system with an older one. - Package Management: Different tools (
aptvs.dnf) and package naming conventions require distinct procedures for installing prerequisites. - Filesystem Layout: Standard locations for libraries, headers, or configuration files might differ slightly, requiring path adjustments.
- Available Dependencies: Specific versions or availability of required third-party tools and libraries (e.g., compilers, Python versions, specific development packages like
libreadline-devvsreadline-devel) can vary.
The OS-specific folders (debian-12, rocky-8.10, etc.) within the ALS-U EPICS environment are designed according to the principle of isolating and managing these distribution-level variations. They act as adapters, providing the necessary “glue” for the standardized linux-x86_64 binaries to function correctly on each specific OS. Their purpose typically includes:
- Managing OS Dependencies: Providing manifests or scripts listing required OS packages (e.g., specific library versions, tools) to be installed via the native package manager (
aptordnf). - Providing Wrapper Scripts: Using scripts to handle differences in paths (e.g., adjusting
PATH) or setting necessary environment variables (likeLD_LIBRARY_PATH, used carefully) needed for tools on a specific OS. - Hosting Pre-compiled Dependencies (If Necessary): In some cases, they might contain specific external libraries or tools pre-compiled for that particular OS version if they cannot be easily managed otherwise.
- Symbolic Links: Pointing to the correct version or location of system libraries if needed to resolve path or version conflicts.
- Configuration Overrides: Potentially working with EPICS build system overrides (like
CONFIG_SITE.*files) to define distribution-specific library paths or compiler flags needed when building applications against the core EPICS installation on that OS.
This allows the core EPICS components (Base, support modules, IOC applications), built once for the common linux-x86_64 architecture, to function correctly by resolving distribution-specific needs through these dedicated folders.
A Combined Approach for Robustness, Adaptability, and Long-Term Simplicity
The ALS-U EPICS environment design principles culminate in a strategic combination:
- Follow Standards: Adhere to the stable, standardized
linux-x86_64architecture identifier (viaEPICS_HOST_ARCH) for building core EPICS components, maximizing compatibility and following widespread Linux/EPICS conventions. - Isolate and Manage Variation: Utilize OS-specific folders (e.g., debian-12, rocky-8.10) to effectively manage the unavoidable differences in dependencies, paths, and configurations between specific Linux distributions.
This hybrid approach results in an environment that is not only robust and adaptable but also significantly simpler for long-term maintenance. It benefits from architectural standardization while precisely accommodating the nuances of supported operating systems. Crucially, it avoids the significant inefficiencies and maintenance overhead associated with building and managing separate, nearly identical EPICS cores for each OS version.
Furthermore, this clear separation simplifies lifecycle management. This is especially critical considering the typical lifecycle mismatch: operating systems often have support lifetimes of only 5-10 years, whereas accelerator control systems must remain operational and maintainable for potentially 25 years or more. By building the core EPICS components against the stable linux-x86_64 architecture, we decouple them from specific, transient OS versions.
The OS-specific folders then act as an adaptable layer, allowing the long-lived core system to integrate with whichever operating systems are current during its extended lifespan. Adding support for a new OS version primarily involves creating its specific folder, while decommissioning support for an end-of-life OS becomes a straightforward task of removing its folder.
This approach ensures the control system’s long-term viability and simplifies OS migration paths over decades, without requiring fundamental re-engineering of the core components within EPICS base and its IOC applications overall. This focus on a standardized core with isolated adaptations is key to maintaining a manageable and sustainable EPICS environment over its required operational lifetime.
Chapter 2: First EPICS IOC and GitLab CI
Now that your environment is set up, this chapter walks you through creating your first EPICS Input/Output Controller (IOC) within the ALS-U EPICS Environment. You will also learn how to integrate it with GitLab Continuous Integration (CI) for automated testing and development workflows.
This chapter covers the following topics:
- First EPICS IOC: Building a basic EPICS IOC from scratch.
- Expand the First IOC: Adding more functionality to your initial IOC.
- Continuous Integration: Setting up GitLab CI pipelines for your IOC project.
2.1 Your First ALS-U EPICS IOC
This section provides your first hands-on experience creating an Input/Output Controller (IOC) using the standardized ALS-U EPICS environment tools. You will clone the template generator repository, use the generate_ioc_structure.bash script to create a basic IOC skeleton based on a name and location, explore the fundamental configuration files found in the configure and mouseApp directories (specifically RELEASE and Makefile), and learn the essential commands (make, ./st.cmd) to build and execute your first simple IOC instance.
Lesson Overview
In this lesson, you will learn how to:
- Generate and execute the IOC using the ALS-U IOC template generator
- Understand the purpose of key generated folders (
configure,iocBoot,mouseApp). - Understand the role of two important files (
configure/RELEASE,mouseApp/src/Makefile) and their relationship. - Understand basic EPICS IOC build and execution commands (
make,st.cmd,make clean,make distclean).
Introduction to Using the Template Generator
To build an EPICS Input Output Controller (IOC), there are plenty of ways to do so. However, within ALS-U, we aim for a consistent method for building our EPICS IOCs using a standardized template. This consistency makes it much easier to understand, maintain, and collaborate on IOCs developed by different team members.
Remembering all the necessary database definition (.dbd) files and dependent library links required to build even a simple IOC can be cumbersome and error-prone. To address this, we use the ALS-U EPICS template generator (found in the tools repository on the ALS GitLab server), which automates the creation of a standard IOC structure with correctly configured Makefiles.
Prerequisites
- SSH Access: Users need SSH access to the ALS GitLab repository to clone the tools repository. Contact the controls group if you need access.
- EPICS Environment: A working ALS-U EPICS environment (as set up in Chapter 1) must be available and sourced in your terminal.
- Basic Linux Skills: Familiarity with basic commands like
cd,ls,mkdir,source,bash. - Text Editor: Access to a text editor (nano, vi, emacs, etc.) for examining files.
Download the tools into your local machine
First, ensure you have the template generator tools. Clone the tools repository from the ALS GitLab server into a suitable location (e.g., your home directory or a development workspace). You only need to do this once.
# Example: Clone into your home directory
# Example for the ALS-U Internal Gitlab (Official)
$ cd ~
$ git clone ssh://git@git-local.als.lbl.gov:8022/alsu/tools.git
# or
# Example for the Mirror site on GitHub
$ git clone https://github.com/jeonghanlee/EPICS-IOC-template-tools.git tools
This will create a tools directory containing the generator script.
The generate_ioc_structure.bash Script
Located within the tools repository, this script automates the creation of the standard ALS-U IOC directory structure, significantly reducing the manual workflow potentially outlined in older development guides.
It requires two mandatory options:
-p<APPNAME>: The Device Name or primary application name for your IOC (e.g.,mouse).-l<LOCATION>: The location identifier for your IOC (e.g.,home). These names must be chosen according to the official IOC Name Naming Convention document to maintain consistency across ALS-U.
First example: Creating, Building, and Running the mouse IOC
Let’s create a very simple example IOC using the generator. We will use mouse as the APPNAME and home as LOCATION. Note that we use the following assumption that the APPNAME is the same as an IOC application name. However, in the reality, sometime, it is difficult to keep that assumption consistently. We will cover that case later.
- Ensure Environment is Active: Open a terminal and source the desired ALS-U EPICS environment setup script:
# Use the correct path for your setup
$ source ~/epics/1.1.1/debian-12/7.0.7/setEpicsEnv.bash
- Generate the IOC Structure: Run the script from the directory containing the tools directory (or provide the full path to the script).
# Assuming 'tools' directory is in your current path"s parent or provide full path
$ bash tools/generate_ioc_structure.bash -l home -p mouse
# This will create a new directory named 'mouse'
- Navigate into the IOC Directory:
$ cd mouse
- Build the IOC: Use the make command. This invokes the EPICS build system, which reads the Makefiles, compiles necessary components (like support for standard records), links libraries, and installs the runtime files.
mouse $ make
Watch for any error messages during the build.
- Navigate to the Boot Directory: The runnable IOC instance files are placed in a specific subdirectory within iocBoot. The naming convention is typically
ioc<LOCATION>-<APPNAME>.
mouse $ cd iocBoot/iochome-mouse
- Run the IOC: Execute the startup script st.cmd. This script contains commands interpreted by the EPICS IOC shell to load configurations, databases (if any), start background processes, and initialize the IOC.
# Prompt shows you are inside the boot directory
iochome-mouse $ ./st.cmd
You should see EPICS startup messages, version information, and finally the IOC shell prompt (e.g., 7.0.7 >), indicating the IOC is running. To stop it later, press Ctrl+C or type exit at the prompt.
(The tools script supports more complex scenarios, but this covers the fundamental generate-build-run cycle.)
Exploring the Generated Folders
After running the generator and make, several directories are created. Let’s examine the three most important ones for developers:configure, iocBoot, and mouseApp.
A Configuration Files Folder (configure)
This folder contains several predefined configuration files that work well within the standard EPICS building system.
In configure, RELEASE and CONFIG_SITE are the files most often opened and updated. Please open configure/CONFIG_SITE first to review its contents.
With the ALS-U EPICS environment and how to deploy the EPICS IOC within the ALS-U production environment, we rarely update the CONFIG_SITE.
In this folder, you will primarily care about the RELEASE file, as the template-generated configuration files will likely not need modification.
Please open the RELEASE file. You will see the following templated generated content:
...
# Variables and paths to dependent modules:
MODULES = $(EPICS_BASE)/../modules
#MYMODULE = $(MODULES)/my-module

# If using the sequencer, point SNCSEQ at its top directory:

#ALS_IOCSH = $(MODULES)/iocsh

#ASYN = $(MODULES)/asyn
#SNCSEQ = $(MODULES)/seq
#MODBUS = $(MODULES)/modbus
#SNMP = $(MODULES)/snmp
#STD = $(MODULES)/std
#CALC = $(MODULES)/calc
#AUTOSAVE = $(MODULES)/autosave
#RECCASTER = $(MODULES)/recsync
#### STREAM = $(MODULES)/stream
# ALS-U use "StreamDevice" as a directory name
# STREAM = $(MODULES)/StreamDevice
#RETOOLS = $(MODULES)/retools
#CAPUTLOG = $(MODULES)/caPutLog
#### devIocStats : EPICS community iocStats
#### STREAM = $(MODULES)/stream
# ALS-U use "StreamDevice" as a directory name
# STREAM = $(MODULES)/StreamDevice
#RETOOLS = $(MODULES)/retools
#CAPUTLOG = $(MODULES)/caPutLog
#### devIocStats : EPICS community iocStats
#devIocStats = $(MODULES)/iocStats
#### IOCSTATS : ALS specific iocStats
#IOCSTATS = $(MODULES)/iocStatsALS
#MEASCOMP = $(MODULES)/measComp
#SSCAN=$(MODULES)/sscan
#BUSY=$(MODULES)/busy
#SCALER=$(MODULES)/scaler
#MCA=$(MODULES)/mca
#ETHER_IP=$(MODULES)/ether_ip
#
### ALS-U Site Specific Modules
### VACUUM Modules
#RGAMV2=$(MODULES)/rgamv2
#UNIDRV=$(MODULES)/unidrv
#QPC=$(MODULES)/qpc
### Instrumentation
#EVENTGENERATORSUP=$(MODULES)/eventGeneratorSup
#BPMSUP=$(MODULES)/bpmSup
### FEED for LLRF
#FEED=$(MODULES)/feed
### PSC Modules
#PSCDRV=$(MODULES)/pscdrv
### MOTION Modules
#PMAC=$(MODULES)/pmac
#

### ALS-U Default Module
PVXS=$(MODULES)/pvxs

# EPICS_BASE should appear last so earlier modules can override stuff:
EPICS_BASE = /home/jeonglee/epics/1.1.1/debian-12/7.0.7/base
...
This file contains EPICS module dependencies. You only need to remove the # symbol before the required modules for your own IOC application. The EPICS_BASE environment variable (set when you sourced the environment) takes precedence over the value in this file during the generation of your ioc structure by a template generator. Therefore, for this workflow, you typically don’t need to modify the EPICS_BASE line here. We will revisit this file with a practical exercise later in the guidebook.
IOC Startup Folder (iocBoot/iochome-mouse)
This directory contains the files required to run a specific configured instance of your IOC application. The subdirectory name (iochome-mouse) combines the location (home) and application name (mouse).
-
st.cmd(Startup Script): This is the main file executed to start the IOC. It’s a script containing commands for the EPICS IOC shell. Its primary responsibilities include:- Loading the compiled database definitions (
dbLoadDatabase). - Registering device and record support (
*registerRecordDeviceDriver). - Loading specific Process Variable instances from database files (
dbLoadRecords- none in this simple example). - Configuring hardware communication (none in this example).
- Performing final initialization and starting IOC processing (
iocInit). The template generator creates a basicst.cmdfile that handles the essentials for starting a simple IOC. You will modify this file frequently as you add databases and hardware support.
- Loading the compiled database definitions (
Application Source Folder (mouseApp/src)
This directory and its subdirectories (Db, src) contain the source code specific to your IOC application (mouse in this case).
mouseApp/Db/: The conventional location for your database files (.db,.proto,.template,.substitutions). (We will add files here in later lessons).mouseApp/src/: The conventional location for your C/C++ source code files, if you write custom device support, sequence programs, or other code.mouseApp/src/Makefile: This Makefile handles compiling your custom C/C++ code (if any) and linking it with EPICS Base and required module libraries. It works closely withconfigure/RELEASE.
Examine the mouseApp/src/Makefile. Note the ifneq blocks:
TOP=../..

include $(TOP)/configure/CONFIG
#----------------------------------------
#  ADD MACRO DEFINITIONS AFTER THIS LINE
#=============================

#=============================
# Build the IOC application

PROD_IOC = mouse
# mouse.dbd will be created and installed
DBD += mouse.dbd

Common_DBDs += base.dbd
Common_DBDs += system.dbd

Common_SRCs +=

ifneq ($(ASYN),)
Common_DBDs += asyn.dbd
Common_DBDs += drvAsynIPPort.dbd
Common_DBDs += drvAsynSerialPort.dbd
Common_LIBs += asyn
endif

ifneq ($(MODBUS),)
Common_DBDs += modbusSupport.dbd
Common_LIBs += modbus
endif

ifneq ($(SNMP),)
Common_DBDs += devSnmp.dbd
Common_LIBs += devSnmp
SYS_PROD_LIBS += netsnmp
endif

...
- Automatic Dependencies: Similar to the overview step, these
ifneq ($(MODULE),)blocks automatically include the necessary database definition files (.dbd) and link the required module libraries only if you have uncommented the correspondingMODULEvariable inconfigure/RELEASE. This significantly simplifies managing build dependencies. For this first basic IOC, you don’t need to modify this file because you haven’t added any dependencies inRELEASEor any custom C code inCommon_SRCs.
A Few Useful Build Commands
Here are essential make commands used for building and cleaning EPICS IOCs, typically run from the top-level IOC directory (e.g., mouse):
make: (Default target) Compiles changed source files, processes database definitions, links libraries, and installs the executable and runtime files intobin/,lib/,dbd/,db/. This is the command you use most often to build or update your IOC.make clean: Removes intermediate files generated during the build (like.oobject files, dependency files). It generally leaves the final installed files inbin/,lib/,db/,dbd/. Use this when you want to force recompilation of source files.make distclean: Performs a much more thorough cleanup. It removes almost everything created bymakeandmake clean, including thebin,lib,dbddirectories and installed files indb. It aims to return the directory tree closer to its state immediately after generation or cloning. Usedistcleanif you suspect build problems caused by leftover files or want a completely fresh build from scratch.
You can observe the effects of these commands by examining the contents of your IOC folder (e.g., using ls -lR or tree) before and after running them.
2.2 Expanding Your First IOC: Adding Another IOC
Building upon your first IOC, this section demonstrates how the ALS-U environment facilitates managing multiple, related IOC instances from a single, centralized codebase repository (identified by a unique APPNAME). You will learn to use different options (-l LOCATION, -d device name, -f FOLDER) of the generate_ioc_structure.bash tool to add new IOC configurations (creating new subdirectories within iocBoot) while reusing the core application code found in <APPNAME>App. The script’s validation logic (like enforcing case-sensitivity for APPNAME) and the benefits of this shared codebase approach for maintenance and collaboration are highlighted through practical examples.
Lesson Overview
In this lesson, you will learn how to:
- Add a new IOC application with a different
LOCATIONto the existingAPPNAME(device name). - Add a new IOC application with a different “application name” (a unique identifier for this new IOC instance) and
LOCATION, while still using the sameAPPNAME(device name). - Add a new IOC application with a different “application name”,
LOCATION, and a git clone folder name (repository name), while still using the sameAPPNAME(device name)
Case 1: Your IOC Application name does match with the IOC repository APPNAME
This is the most common and preferred case. We start with the step of cloning tools and mouse from scratch.
# Example for the ALS-U Internal Gitlab (Official)
# You can use the mirror site instead.
$ git clone ssh://git@git-local.als.lbl.gov:8022/alsu/tools.git
$ git clone ssh://git@git-local.als.lbl.gov:8022/alsu/sandbox/jeonglee-mouse.git mouse   # note that we have to use `mouse` folder name here, as this will be the `APPNAME` used in the subsequent `generate_ioc_structure.bash` command.
Now we would like to create an IOC with mouse as the APPNAME and park as LOCATION with the same git folder or repository name mouse.
$ bash tools/generate_ioc_structure.bash -l park -p mouse
Your Location ---park--- was NOT defined in the predefined ALS/ALS-U locations
----> gtl ln ltb inj br bts lnrf brrf srrf arrf bl acc als cr ar01 ar02 ar03 ar04 ar05 ar06 ar07 ar08 ar09 ar10 ar11 ar12 sr01 sr02 sr03 sr04 sr05 sr06 sr07 sr08 sr09 sr10 sr11 sr12 bl01 bl02 bl03 bl04 bl05 bl06 bl07 bl08 bl09 bl10 bl11 bl12 fe01 fe02 fe03 fe04 fe05 fe06 fe07 fe08 fe09 fe10 fe11 fe12 alsu bta ats sta lab testlab
>>
>>
>> Do you want to continue (Y/n)? Y
>> We are moving forward .

>> We are now creating a folder with >>> mouse <<<
>> If the folder is exist, we can go into mouse
>> in the >>> /home/jeonglee/AAATemps/sandbox <<<
>> Entering into /home/jeonglee/AAATemps/sandbox/mouse
>> makeBaseApp.pl -t ioc
mouse exists, not modified.
>>> Making IOC application with IOCNAME park-mouse and IOC iocpark-mouse
>>>
>> makeBaseApp.pl -i -t ioc -p mouse
>> makeBaseApp.pl -i -t ioc -p park-mouse
Using target architecture linux-x86_64 (only one available)
>>>

>>> IOCNAME : park-mouse
>>> IOC     : iocpark-mouse
>>> iocBoot IOC path /home/jeonglee/AAATemps/sandbox/mouse/iocBoot/iocpark-mouse

Exist : .gitlab-ci.yml
Exist : .gitignore
Exist : .gitattributes
>> leaving from /home/jeonglee/AAATemps/sandbox/mouse
>> We are in /home/jeonglee/AAATemps/sandbox
Please enter mouse folder, and execute tree command
$ cd mouse/
mouse $  tree --charset=ascii -L 2
.
|-- configure
|   |-- CONFIG
|   |-- CONFIG_IOCSH
|   |-- CONFIG_SITE
|   |-- Makefile
|   |-- RELEASE
|   |-- RULES
|   |-- RULES_ALSU
|   |-- RULES_DIRS
|   |-- RULES.ioc
|   `-- RULES_TOP
|-- docs
|   |-- README_autosave.md
|   `-- SoftwareRequirementsSpecification.md
|-- iocBoot
|   |-- iochome-mouse
|   |-- iocpark-mouse
|   `-- Makefile
|-- Makefile
|-- mouseApp
|   |-- Db
|   |-- iocsh
|   |-- Makefile
|   `-- src
`-- README.md

10 directories, 16 files
Now, you can see there are two folders, iochome-mouse and iocpark-mouse, in the iocBoot folder. These two folders represent your different IOC applications based on the same mouse EPICS IOC code repository.
Case 2: Your IOC Application name does not match with the IOC APPNAME
This happens frequently when you work in the existing IOC application. We start with the step of cloning tools and mouse from scratch.
# Example for the ALS-U Internal Gitlab (Official)
# You can use the mirror site instead.
$ git clone ssh://git@git-local.als.lbl.gov:8022/alsu/tools.git
$ git clone ssh://git@git-local.als.lbl.gov:8022/alsu/sandbox/jeonglee-mouse.git mouse  # note that we have to use `mouse` folder name here, as this corresponds to the `APPNAME` we will use in the next step, even though the IOC application name will be different.
Now we would like to create an IOC with woodmouse as the IOC application name (using the -d option), park as LOCATION, within the same Git repository named mouse based on the APPNAME as mouse.
$ bash tools/generate_ioc_structure.bash -l park -p mouse -d woodmouse
Your Location ---park--- was NOT defined in the predefined ALS/ALS-U locations
----> gtl ln ltb inj br bts lnrf brrf srrf arrf bl acc als cr ar01 ar02 ar03 ar04 ar05 ar06 ar07 ar08 ar09 ar10 ar11 ar12 sr01 sr02 sr03 sr04 sr05 sr06 sr07 sr08 sr09 sr10 sr11 sr12 bl01 bl02 bl03 bl04 bl05 bl06 bl07 bl08 bl09 bl10 bl11 bl12 fe01 fe02 fe03 fe04 fe05 fe06 fe07 fe08 fe09 fe10 fe11 fe12 alsu bta ats sta lab testlab
>>
>>
>> Do you want to continue (Y/n)?
>> We are moving forward .

>> We are now creating a folder with >>> mouse <<<
>> If the folder is exist, we can go into mouse
>> in the >>> /home/jeonglee/AAATemps/sandbox <<<
>> Entering into /home/jeonglee/AAATemps/sandbox/mouse
>> makeBaseApp.pl -t ioc
mouse exists, not modified.
>>> Making IOC application with IOCNAME park-woodmouse and IOC iocpark-woodmouse
>>>
>> makeBaseApp.pl -i -t ioc -p mouse
>> makeBaseApp.pl -i -t ioc -p park-woodmouse
Using target architecture linux-x86_64 (only one available)
>>>

>>> IOCNAME : park-woodmouse
>>> IOC     : iocpark-woodmouse
>>> iocBoot IOC path /home/jeonglee/AAATemps/sandbox/mouse/iocBoot/iocpark-woodmouse

Exist : .gitlab-ci.yml
Exist : .gitignore
Exist : .gitattributes
>> leaving from /home/jeonglee/AAATemps/sandbox/mouse
>> We are in /home/jeonglee/AAATemps/sandbox
You can see the iocBoot/iocpark-woodmouse folder, and we also have the same mouseApp folder.
$ tree --charset=ascii -L 2 mouse/
mouse/
|-- configure
|   |-- CONFIG
|   |-- CONFIG_IOCSH
|   |-- CONFIG_SITE
|   |-- Makefile
|   |-- RELEASE
|   |-- RULES
|   |-- RULES_ALSU
|   |-- RULES_DIRS
|   |-- RULES.ioc
|   `-- RULES_TOP
|-- docs
|   |-- README_autosave.md
|   `-- SoftwareRequirementsSpecification.md
|-- iocBoot
|   |-- iochome-mouse
|   |-- iocpark-mouse
|   |-- iocpark-woodmouse
|   `-- Makefile
|-- Makefile
|-- mouseApp
|   |-- Db
|   |-- iocsh
|   |-- Makefile
|   `-- src
`-- README.md

11 directories, 16 files
Now, we can revisit the folders iochome-mouse, iocpark-mouse, and iocpark-woodmouse shortly. Please check the difference among iochome-mouse, iocpark-mouse, and iocpark-woodmouse. You can do this with a generic Linux command-line tool, such as diff.
iocBoot $ diff iochome-mouse/st.cmd iocpark-mouse/st.cmd
35,36c35,36
< epicsEnvSet("IOCNAME", "home-mouse")
< epicsEnvSet("IOC", "iochome-mouse")
---
> epicsEnvSet("IOCNAME", "park-mouse")
> epicsEnvSet("IOC", "iocpark-mouse")
64c64
< #--asSetFilename("$(DB_TOP)/access_securityhome-mouse.acf")
---
> #--asSetFilename("$(DB_TOP)/access_securitypark-mouse.acf")
iocBoot $ diff iochome-mouse/st.cmd iocpark-woodmouse/st.cmd
35,36c35,36
< epicsEnvSet("IOCNAME", "home-mouse")
< epicsEnvSet("IOC", "iochome-mouse")
---
> epicsEnvSet("IOCNAME", "park-woodmouse")
> epicsEnvSet("IOC", "iocpark-woodmouse")
64c64
< #--asSetFilename("$(DB_TOP)/access_securityhome-mouse.acf")
---
> #--asSetFilename("$(DB_TOP)/access_securitypark-woodmouse.acf")
Historically, the variables IOC and IOCNAME have been a source of confusion. Therefore, we want to define them clearly from the outset, as these variables are used extensively to identify your IOC in the production environment.
Case 3: Your clone folder name does not match with the IOC APPNAME (directory)
In practice, developers may encounter situations where the name of the cloned Git repository folder differs from the IOC’s APPNAME (device name). The recommended practice within the ALS-U EPICS environment is to ensure that the Git repository name matches the primary APPNAME (device name) of the IOC it contains, especially at the beginning of the development workflow. However, we also need to accommodate existing IOC applications and provide developers with a more flexible solution for their Git workflow (clone, branch, or fork).
# Example for the ALS-U Internal Gitlab (Official)
# You can use the mirror site instead.
$ git clone ssh://git@git-local.als.lbl.gov:8022/alsu/tools.git
$ git clone ssh://git@git-local.als.lbl.gov:8022/alsu/sandbox/jeonglee-mouse.git
Here we use bts, which is case-sensitive and defined in our predefined location list, as LOCATION.
$ bash tools/generate_ioc_structure.bash -l bts -p mouse -f jeonglee-mouse
The following ALS / ALS-U locations are defined.
----> gtl ln ltb inj br bts lnrf brrf srrf arrf bl acc als cr ar01 ar02 ar03 ar04 ar05 ar06 ar07 ar08 ar09 ar10 ar11 ar12 sr01 sr02 sr03 sr04 sr05 sr06 sr07 sr08 sr09 sr10 sr11 sr12 bl01 bl02 bl03 bl04 bl05 bl06 bl07 bl08 bl09 bl10 bl11 bl12 fe01 fe02 fe03 fe04 fe05 fe06 fe07 fe08 fe09 fe10 fe11 fe12 alsu bta ats sta lab testlab
Your Location ---bts--- was defined within the predefined list.

>> We are now creating a folder with >>> jeonglee-mouse <<<
>> If the folder is exist, we can go into jeonglee-mouse
>> in the >>> /home/jeonglee/AAATemps/sandbox <<<
>> Entering into /home/jeonglee/AAATemps/sandbox/jeonglee-mouse
>> makeBaseApp.pl -t ioc
mouse exists, not modified.
>>> Making IOC application with IOCNAME bts-mouse and IOC iocbts-mouse
>>>
>> makeBaseApp.pl -i -t ioc -p mouse
>> makeBaseApp.pl -i -t ioc -p bts-mouse
Using target architecture linux-x86_64 (only one available)
>>>

>>> IOCNAME : bts-mouse
>>> IOC     : iocbts-mouse
>>> iocBoot IOC path /home/jeonglee/AAATemps/sandbox/jeonglee-mouse/iocBoot/iocbts-mouse

Exist : .gitlab-ci.yml
Exist : .gitignore
Exist : .gitattributes
>> leaving from /home/jeonglee/AAATemps/sandbox/jeonglee-mouse
>> We are in /home/jeonglee/AAATemps/sandbox
$ tree --charset=ascii -L 2 jeonglee-mouse/
jeonglee-mouse/
|-- configure
|   |-- CONFIG
|   |-- CONFIG_IOCSH
|   |-- CONFIG_SITE
|   |-- Makefile
|   |-- RELEASE
|   |-- RULES
|   |-- RULES_ALSU
|   |-- RULES_DIRS
|   |-- RULES.ioc
|   `-- RULES_TOP
|-- docs
|   |-- README_autosave.md
|   `-- SoftwareRequirementsSpecification.md
|-- iocBoot
|   |-- iocbts-mouse
|   |-- iochome-mouse
|   `-- Makefile
|-- Makefile
|-- mouseApp
|   |-- Db
|   |-- iocsh
|   |-- Makefile
|   `-- src
`-- README.md

10 directories, 16 files
The -f option allows us to specify the existing top-level folder (jeonglee-mouse in this case) where the IOC application structure should be created. This is useful when the cloned repository name does not match the desired APPNAME for the IOC.
Case 4: Your clone folder name does not match with the IOC APPNAME (directory) and you use the wrong application name.
# Example for the ALS-U Internal Gitlab (Official)
# You can use the mirror site instead.
$ git clone ssh://git@git-local.als.lbl.gov:8022/alsu/tools.git
$ git clone ssh://git@git-local.als.lbl.gov:8022/alsu/sandbox/jeonglee-mouse.git
Here we use ar05, which is case-sensitive and defined in our predefined location list, as LOCATION. However, we use the wrong application name mOuse with incorrect casing.
$ tools/generate_ioc_structure.bash -l ar05 -p mOuse -f jeonglee-mouse
The following ALS / ALS-U locations are defined.
----> gtl ln ltb inj br bts lnrf brrf srrf arrf bl acc als cr ar01 ar02 ar03 ar04 ar05 ar06 ar07 ar08 ar09 ar10 ar11 ar12 sr01 sr02 sr03 sr04 sr05 sr06 sr07 sr08 sr09 sr10 sr11 sr12 bl01 bl02 bl03 bl04 bl05 bl06 bl07 bl08 bl09 bl10 bl11 bl12 fe01 fe02 fe03 fe04 fe05 fe06 fe07 fe08 fe09 fe10 fe11 fe12 alsu bta ats sta lab testlab
Your Location ---ar05--- was defined within the predefined list.

>> We are now creating a folder with >>> jeonglee-mouse <<<
>> If the folder is exist, we can go into jeonglee-mouse
>> in the >>> /home/jeonglee/AAATemps/sandbox <<<
>> Entering into /home/jeonglee/AAATemps/sandbox/jeonglee-mouse

>> We detected the APPNAME is the different lower-and uppercases APPNAME.
>> APPNAME : mOuse should use the same as the existing one : mouse.
>> Please use the CASE-SENSITIVITY APPNAME to match the existing APPNAME

Usage    : tools/generate_ioc_structure.bash [-l LOCATION] [-d DEVICE] [-p APPNAME] [-f FOLDER] <-a>

              -l : LOCATION - Standard ALS IOC location name with a strict list. Beware if you ignore the standard list!
              -p : APPNAME - Case-Sensitivity
              -d : DEVICE - Optional device name for the IOC. If specified, IOCNAME=LOCATION-DEVICE. Otherwise, IOCNAME=LOCATION-APPNAME
              -f : FOLDER - repository, If not defined, APPNAME will be used

 bash tools/generate_ioc_structure.bash -p APPNAME -l Location -d Device
 bash tools/generate_ioc_structure.bash -p APPNAME -l Location -d Device -f Folder
In this case, the template generator will provide an explanation and will not proceed with the creation of a new IOC application. This is to enforce consistency in the APPNAME casing within the repository, aligning with the principle of keeping similar IOC codes together for better maintenance and collaboration.
Assignments
-
Compile and Run Your IOC Applications: Navigate into the top-level directory of your IOC repository (e.g., mouse or jeonglee-mouse). For each of the IOC applications you created (e.g.,
iocpark-mouse,iocpark-woodmouse,iocbts-mouse), compile the code using the make command in the top-level directory. Then, navigate into the respective iocBoot subdirectory (e.g.,iocBoot/iocpark-mouse) and run the IOC using the./st.cmdcommand. -
Push Your Local Changes: Ensure you have added all your changes using
git add .and committed them with a descriptive message usinggit commit -m "Your commit message". Then, push your local changes to your sandbox repository on GitLab.
2.3 GitLab Continuous Integration for IOC Development
This section details the Continuous Integration (CI) process implemented within the ALS-U GitLab environment, designed to standardize the building and testing of EPICS IOCs. You will learn how IOC projects include configuration from a central CI project (alsu/ci), understand the standard pipeline stages (like build and test), and crucially, discover how to conditionally incorporate necessary ALS-U site-specific modules into your CI builds using a simple .sitemodules trigger file. A hands-on walkthrough demonstrates pushing your IOC code to GitLab and observing the CI pipeline behavior both before and after enabling site module support.
Lesson Overview
In this documentation, you will learn how to do the following:
- Understand how ALS-U GitLab CI configuration is applied to your IOC project.
- Conditionally add site-specific modules to CI builds using the
.sitemodulesfile. - Create a GitLab repository for an IOC and observe the CI pipeline execution.
Key Features
- Centralized CI Configuration: Includes and extends the CI from
alsu/cifor consistent ALS-U IOC development. - Modular Design: Allows customization based on specific IOC needs.
- Multi-OS Support: Specific configurations for Debian 12, Rocky Linux 8, and Rocky Linux 9 for EPICS.
- Defined Stages: CI process includes
buildandteststages.
Quick Start: Integrating CI into Your IOC Project
The ALS-U IOC template generator (tools/generate_ioc_structure.bash) automatically creates a .gitlab-ci.yml file in your IOC’s root directory. This file enables CI integration by referencing configurations from the central alsu/ci project. You typically do not need to create or manually edit the file, however understanding its components is helpful.
include:
  # Reference files from the 'alsu/ci' project, using the 'master' branch
  # A specific tag/commit could be used instead of 'master' for long-term stability
  - project: alsu/ci
    ref: master
    file:
      # Core workflow rules and variables
      - 'workflow.yml'
      - 'alsu-vars.yml'
      # Defines jobs related to site module handling
      - 'env-sitemodules.yml'
      # Defines EPICS build/test jobs for different OS targets
      - 'debian12-epics.yml'
      - 'rocky8-epics.yml'
      - 'rocky9-epics.yml'
      # --- Optional references (uncomment if needed) ---
      # - 'debian12-analyzers.yml'
      # - 'rocky8-analyzers.yml'
      # - 'rocky9-analyzers.yml'

stages:
  - build
  - test
  # - analyzers # Uncomment if analyzer stage jobs are referenced above
  # - deploy  # Uncomment if deploy stage jobs are referenced (if implemented in alsu/ci)
Understanding the Included Files
The include: section references several YAML files from the central alsu/ci project. Here’s a brief overview of their purpose:
workflow.yml: Defines the simple rules for all CI workflow.alsu-vars.yml: Contains common variables (like default EPICS versions, paths), configurations, and default settings used across various ALS-U CI jobs.env-sitemodules.yml: Handles environment setup and site module inclusion via.sitemodules.debian12-epics.yml,rocky8-epics.yml,rocky9-epics.yml: Define build/test for EPICS IOCs on respective OS.debian12-analyzers.yml,rocky8-analyzers.yml,rocky9-analyzers.yml: (Commented out by default) Provide template jobs for running static code analysis; users must implement the actual tool invocation commands within their project’s.gitlab-ci.ymlif they uncomment these references.
Conditional Inclusion of Site Modules using .sitemodules
The standard GitLab runners (Docker images with an OS and the default ALS-U EPICS environment) do not contain pre-built ALS-U site-specific EPICS modules, such as:
- Vacuum
dev-mks-mv2 - Vacuum
dev-mks937b-unidrv - Vacuum
dev-gamma-pctrl - Instrumentation
dev-evg-support - Instrumentation
dev-bpm-support - RF
dev-feed-support
If your IOC requires one or more of these site-specific modules, you need to signal this to the CI pipeline. This is done by creating a file named .sitemodules in the top-level directory of your IOC repository.
The CI pipeline (specifically jobs defined in env-sitemodules.yml) detects the presence of this file. If .sitemodules exists, the CI will automatically add a predefined set of common site modules to the build environment (by cloning them) before compiling your IOC. Based on the example walkthrough below, simply creating a .sitemodules file seems sufficient to trigger this. (Verify this mechanism if your requirements differ or if specific modules need to be listed within the file in some cases).
CI Stages Explaned
The stages section in your .gitlab-ci.yml defines the different phases of your CI pipeline. The current configuration includes:
build: Compiles your IOC application code against the target EPICS environment (potentially augmented with site modules if.sitemodulesis present).test: Intended for running automated tests. Currently, the default jobs referenced might only execute basic checks or serve as placeholders for user-defined tests. The following stages are often available via the central CI project but commented out by default in the template:analyzers: Reserved for jobs that perform static code analysis. Users need to configure the specific tools and commands if they reference the corresponding analyzer files.deploy: Could contain jobs for deploying build artifacts, documentation, or tagging releases.
Let’s do this! (Hands-On Example)
This walkthrough shows how to push the mouse IOC (created in a previous lesson) to a new GitLab repository and observe the CI pipeline.
Create Your First Repository on GitLab
- Go to the ALS-U GitLab instance and navigate to a suitable group, like your personal sandbox area or a project group (e.g.,
alsu/sandbox). ClickNew project.
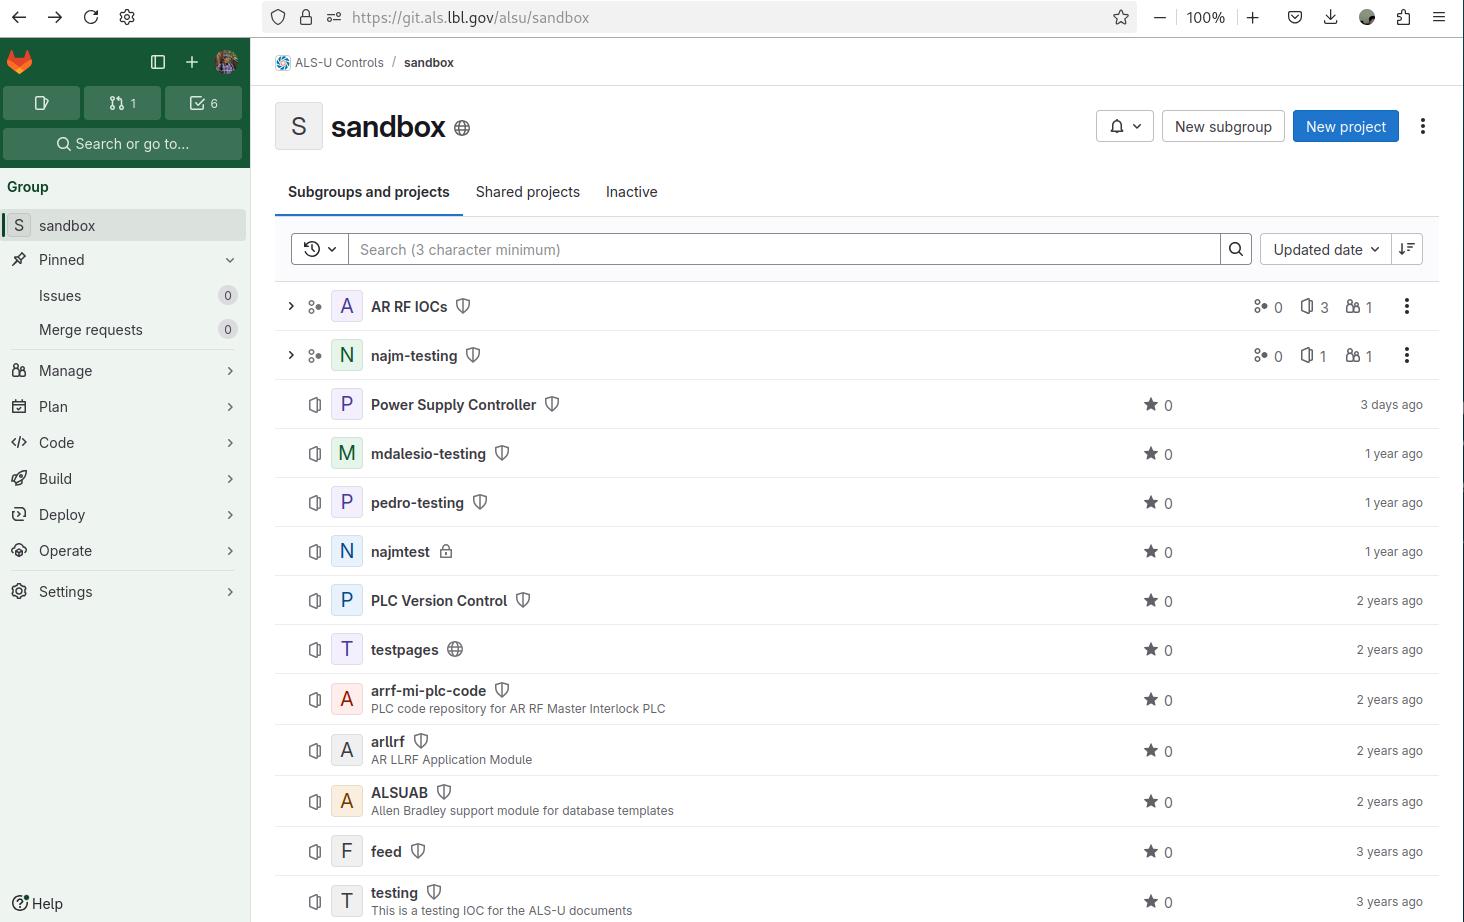 |
|---|
| Figure 1 ALS-U GitLab Sandbox |
- Select
Create blank project
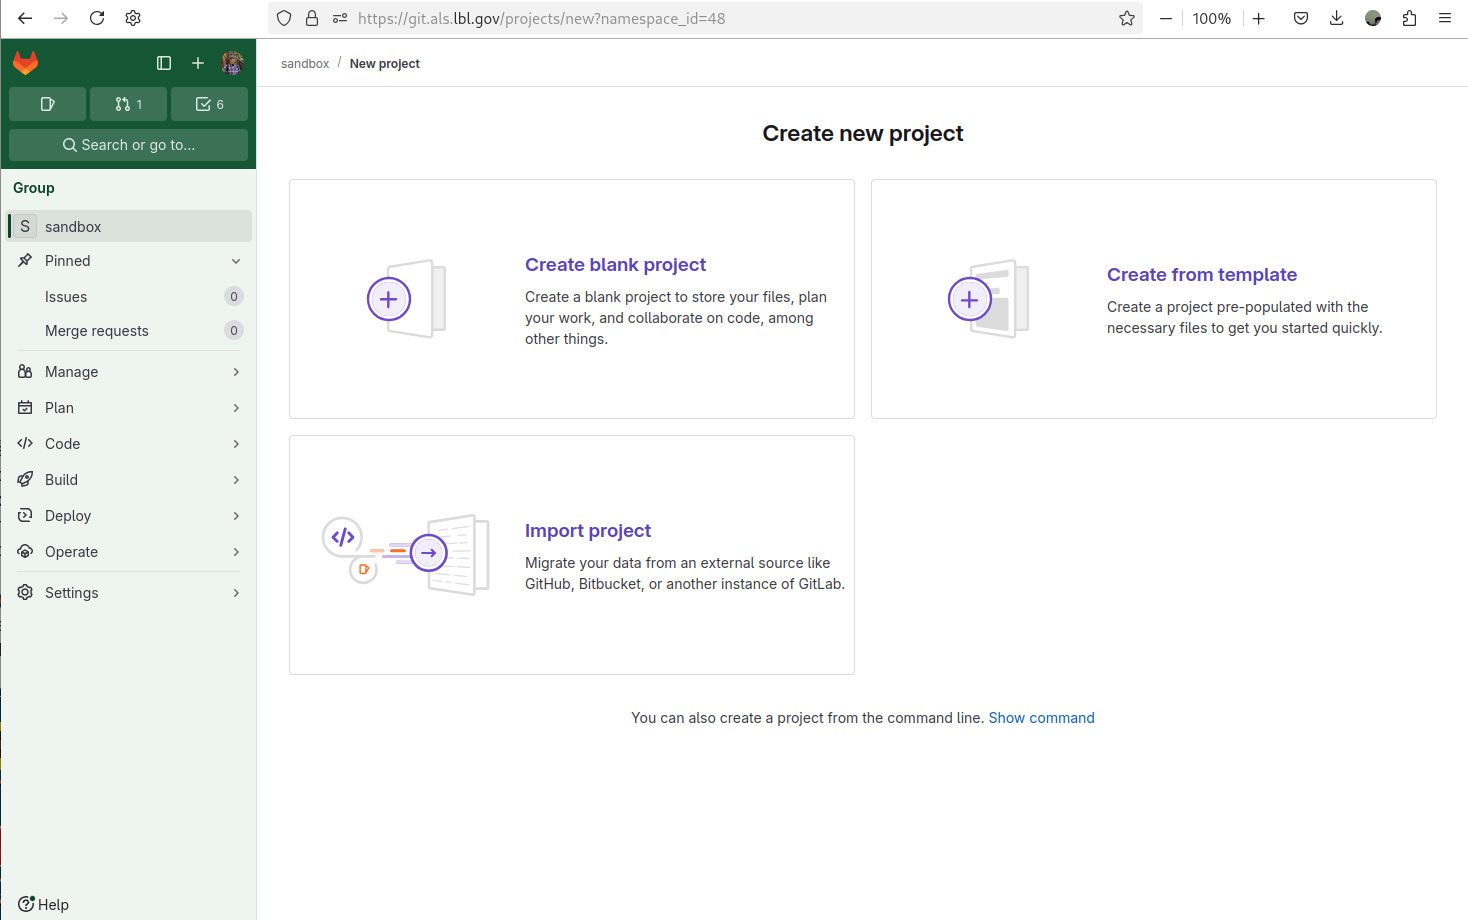 |
|---|
| Figure 2 ALS-U GitLab Sandbox - Create new project |
-
Define your own name and Hit the
Create projectProject name: your user accout +mouse, for exmaple,jeonglee-mouseVisibility Level: SelectInternalProject Configuration: UncheckInitialize repository with a README
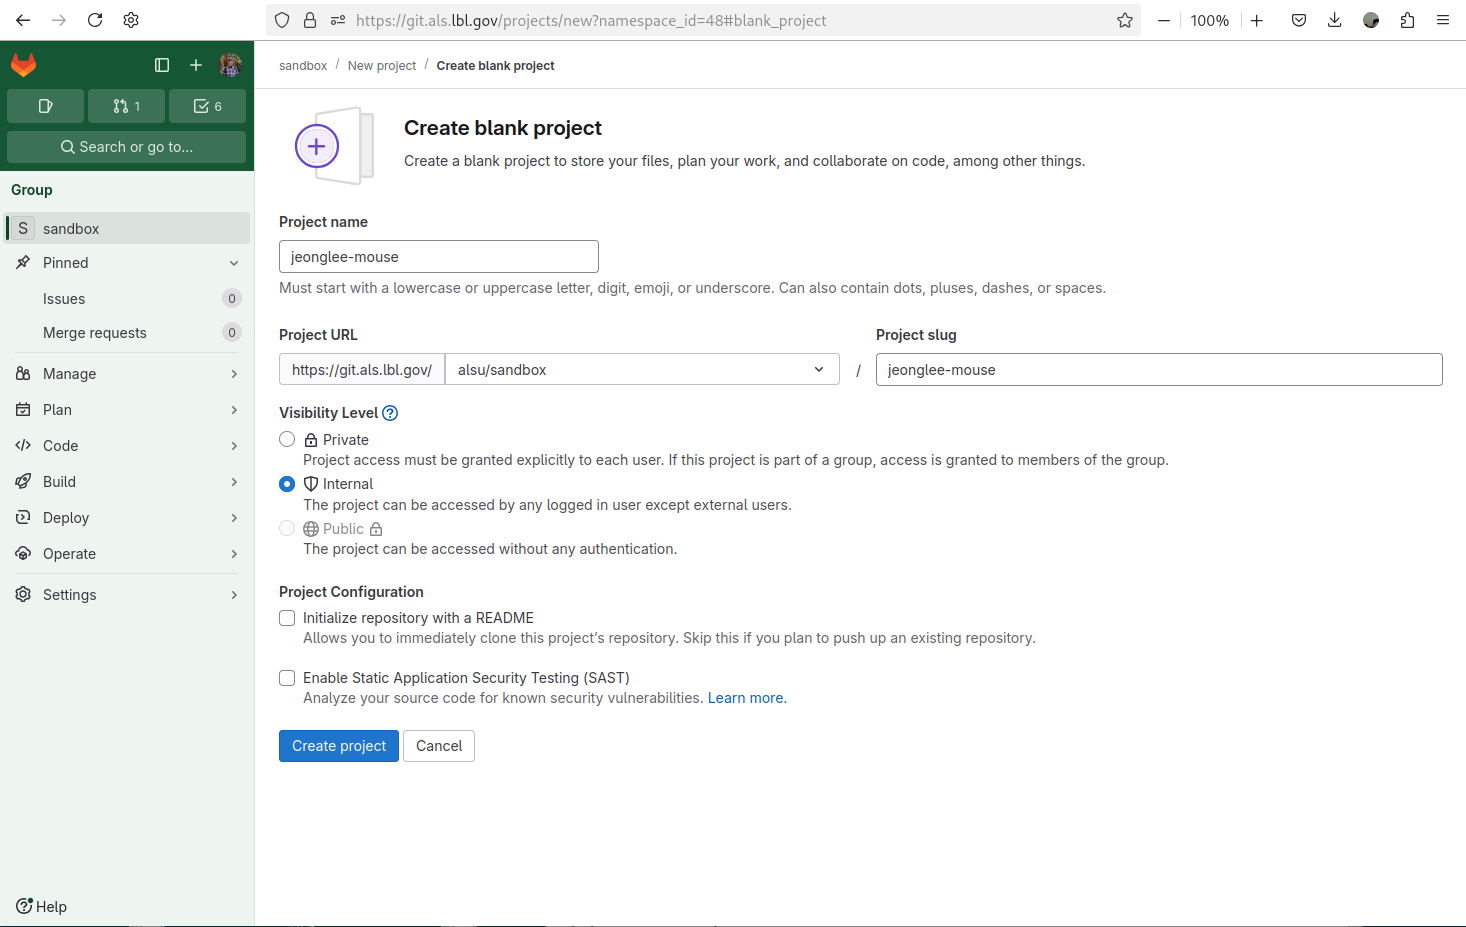 |
|---|
| Figure 3 ALS-U GitLab Sandbox - Create blank project with default selections |
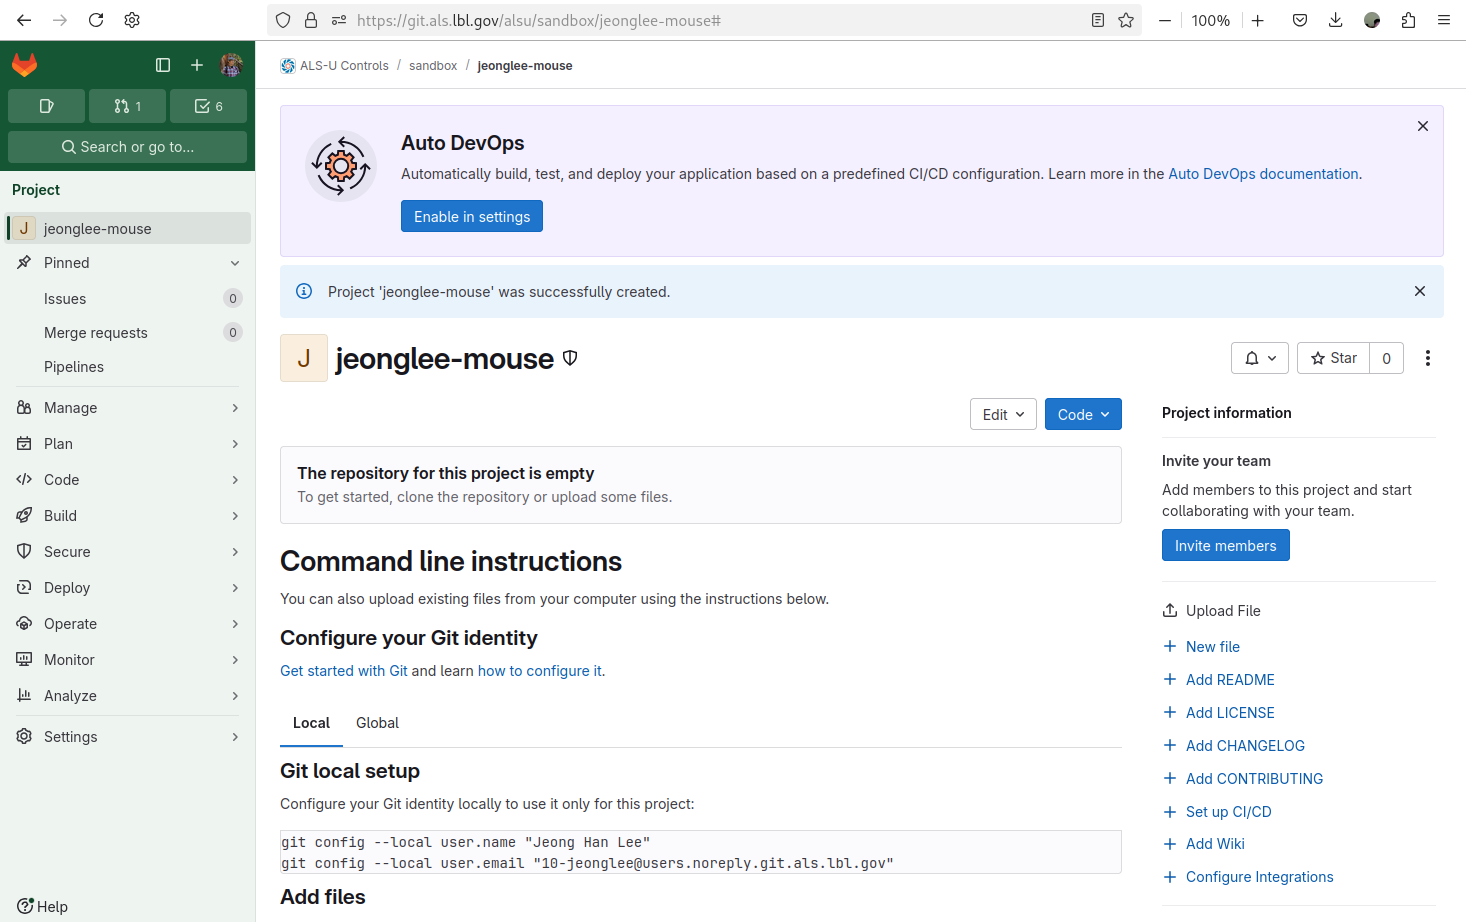 |
|---|
Figure 4 ALS-U GitLab Sandbox - Your gitlab repo jeonglee-mouse |
Push mouse to your repository
Now you are ready to push your code into the git repository you just create, for example, jeonglee-mouse.
Please go your created IOC folder, mouse and do the following commands
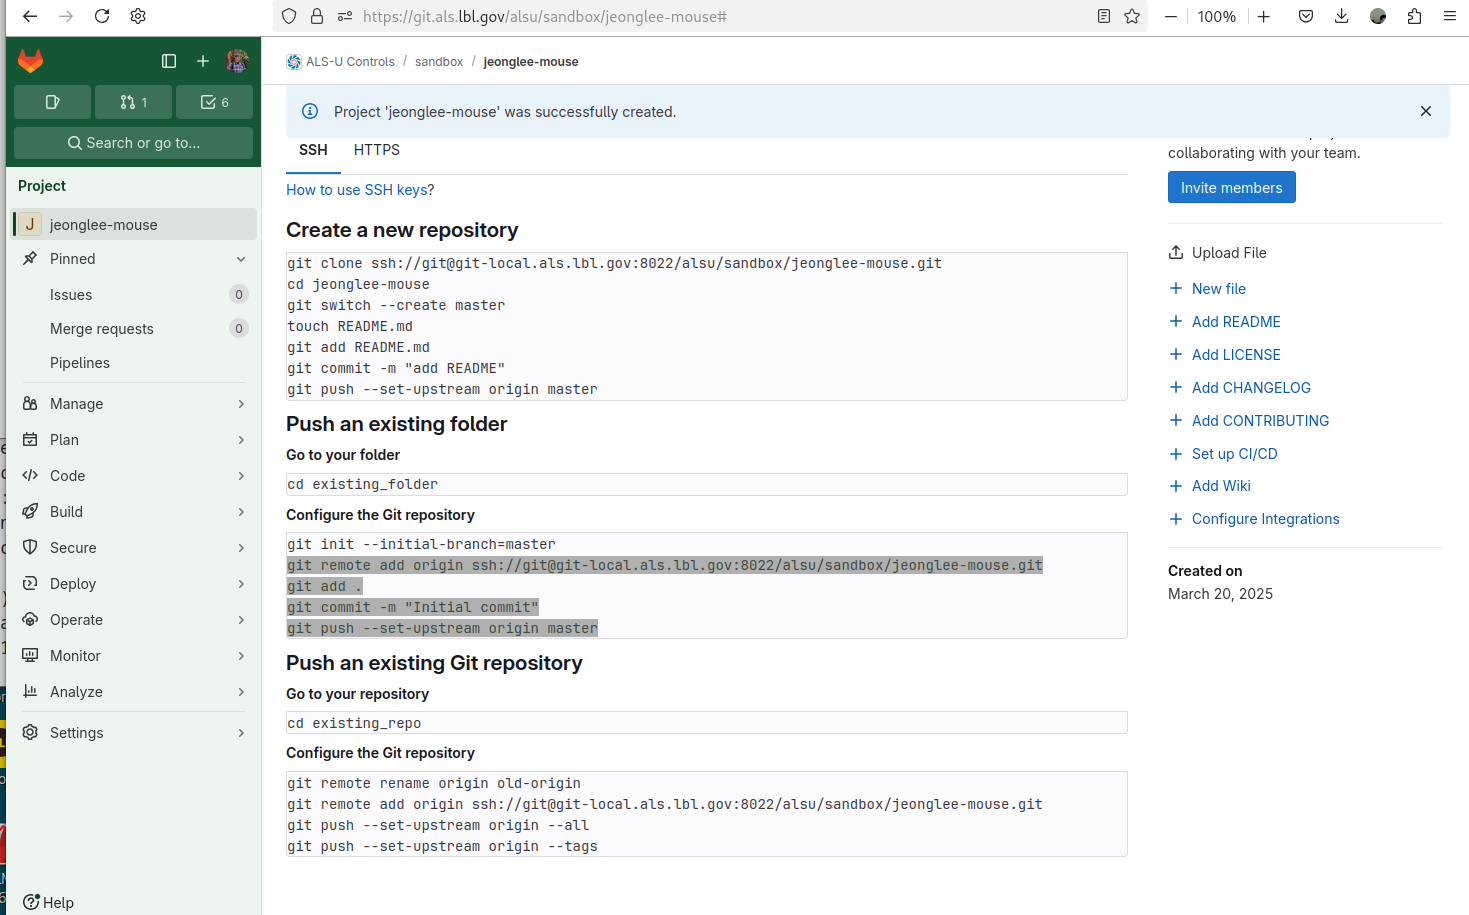 |
|---|
Figure 5 ALS-U GitLab Sandbox - Pushing the existing folder to your gitlab repo jeonglee-mouse |
mouse $ git remote add origin ssh://git@git-local.als.lbl.gov:8022/alsu/sandbox/jeonglee-mouse.git
mouse $ git add .
mouse $ git commit -m "Initial commit"
mouse $ git push --set-upstream origin master
Check the CI Process
- Go to the gitlab web site, and Select
Pipelines
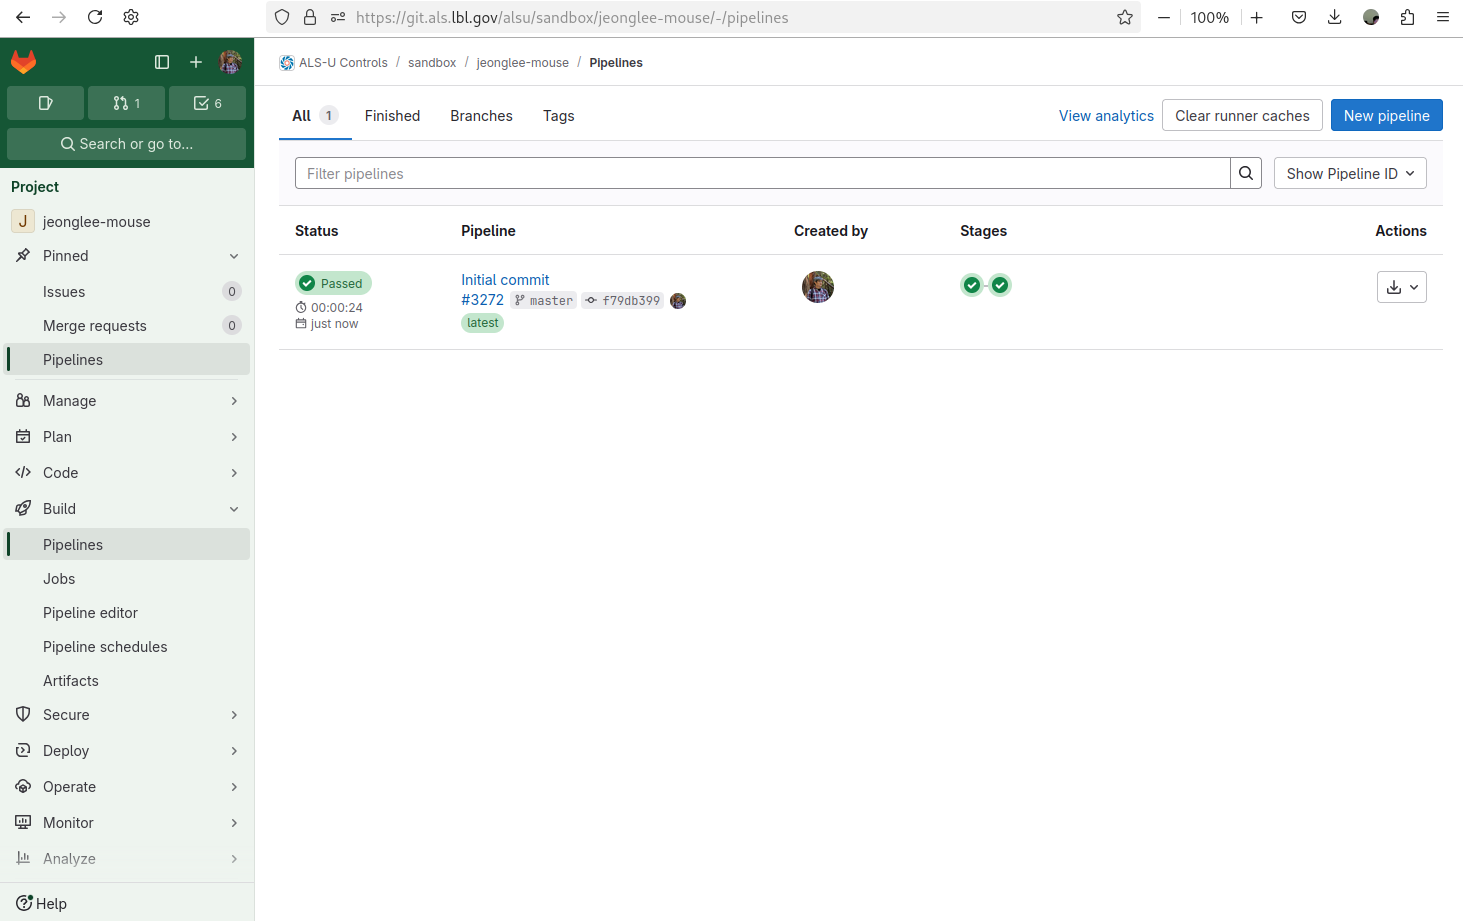 |
|---|
| Figure 6 ALS-U GitLab Sandbox - CI Pipelines |
- Select
Jobs
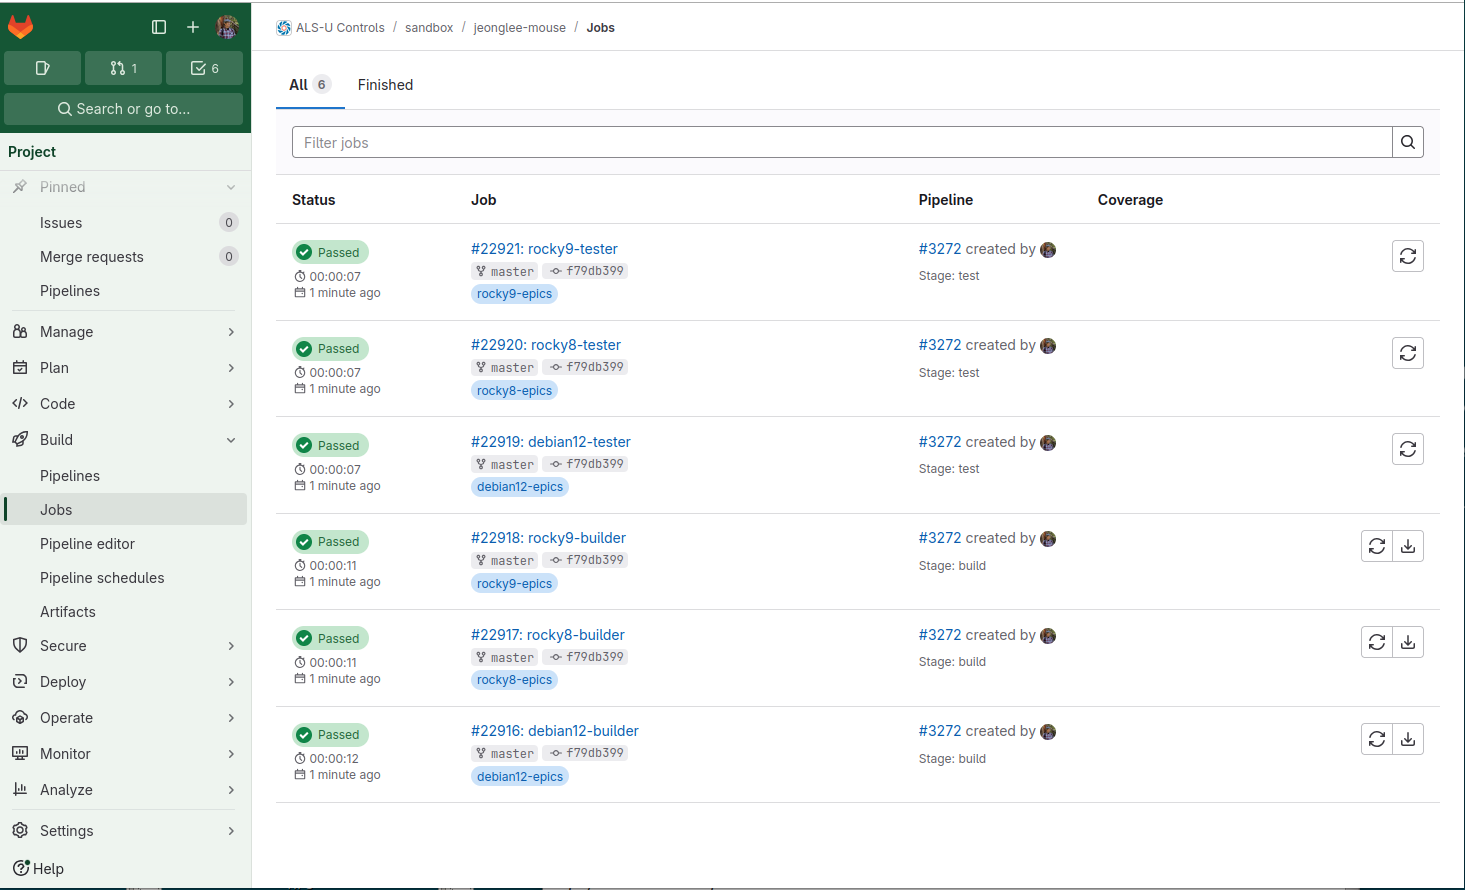 |
|---|
| Figure 7 ALS-U GitLab Sandbox - CI Jobs |
- Select
debian12-builderwithinJobs
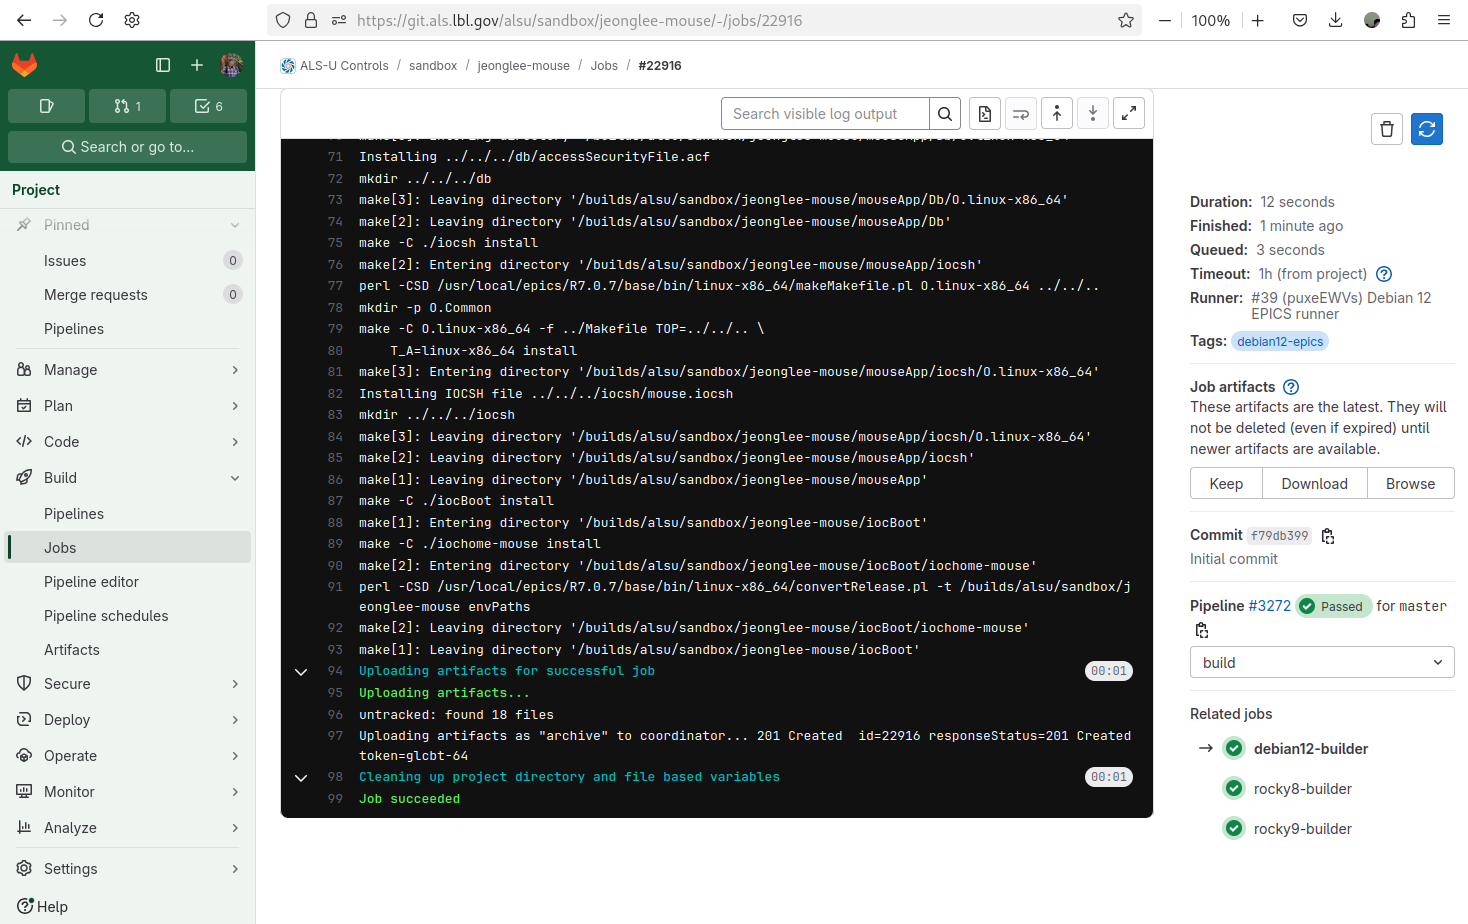 |
|---|
| Figure 8 ALS-U GitLab Sandbox - debian12-builder |
Congratulations! Your IOC building is done sucessfully! Now before moving forward the next step, please scroll up debian12-builder screen to see the process of the beginning. Note that Enjoy Everlasting EPICS! line is the starting point.
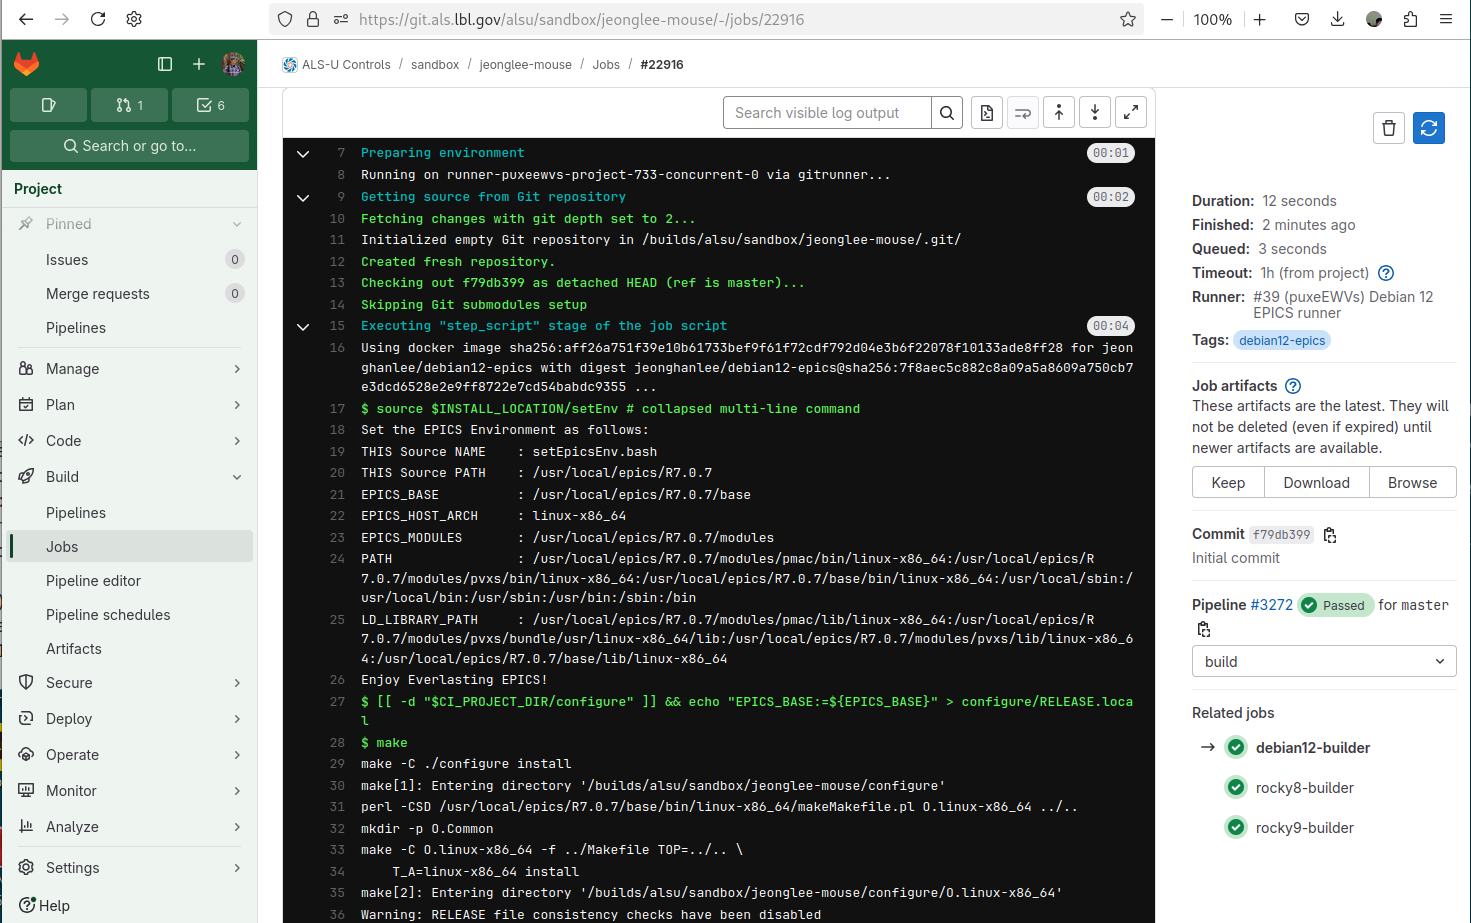 |
|---|
Figure 9 ALS-U GitLab Sandbox - debian12-builder - no .sitemodule |
Add .sitemodules dependency
If your IOC requires the site specific modules, you must add .sitemodules file into the top of your IOC.
Please go your IOC, and add .sitemodules file.
mouse (master)$ echo ".sitemodules" > .sitemodules
mouse (master)$ git add .sitemodules
mouse (master)$ git commit -m "add .sitemodules"
mouse (master)$ git push
Check the CI Process
Please check line 38 where you can find Enjoy Everlasting EPICS!. After this line, you can see the new log for Cloning into 'site-modules'....
If you see that message, it indicates that you have configured the .sitemodules file correctly. Your entire CI process requires more time to compile these modules.
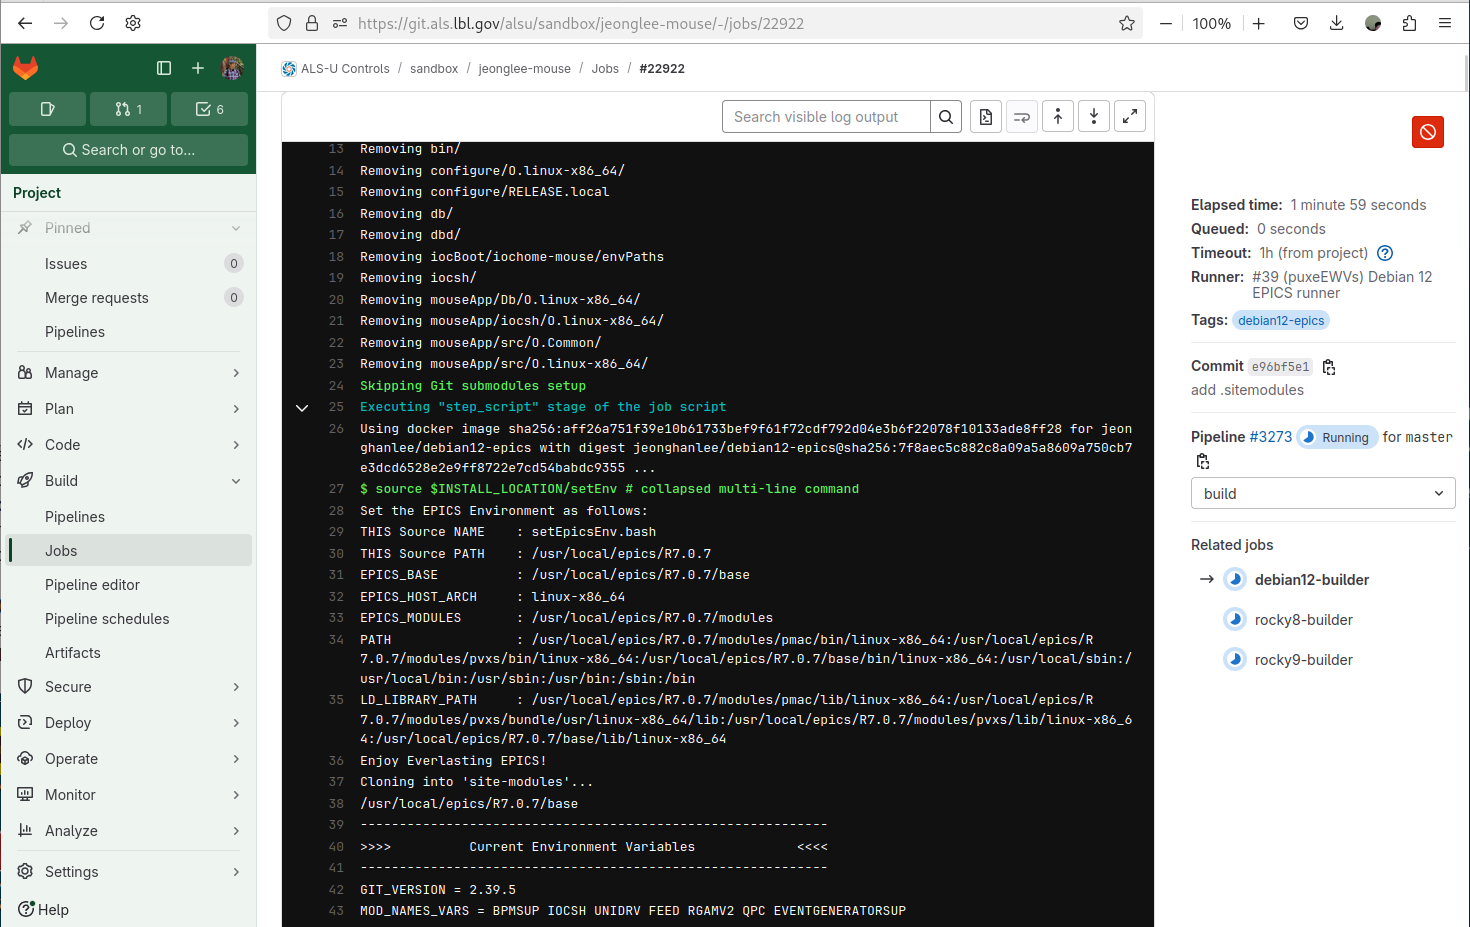 |
|---|
Figure 10 ALS-U GitLab Sandbox - debian12-builder - .sitemodule |
Please scroll down more, you can see detailed information about your sitemodules.
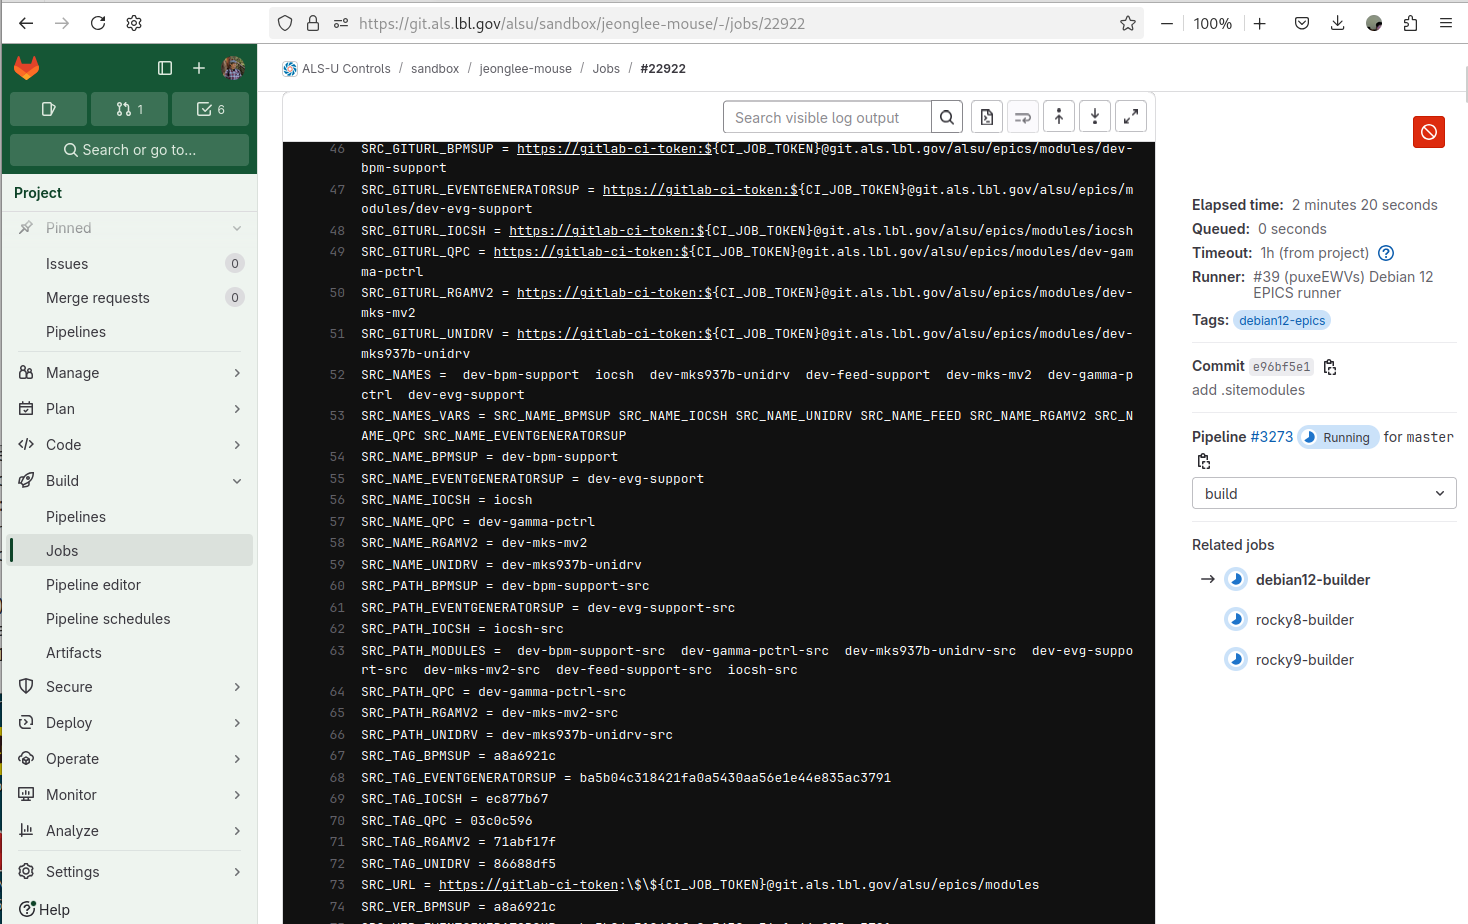 |
|---|
Figure 11 ALS-U GitLab Sandbox - debian12-builder - .sitemodule |
Chapter 3: Second EPICS IOC and Device Simulation
This chapter builds on the previous examples by guiding you through configuring a second EPICS IOC. A key focus is simulating device communication – specifically using a TCP-based simulator to mimic interactions often performed over serial interfaces. You will learn to set up this simulation and test the communication between the IOC and the simulator.
This chapter covers the following topics:
- Configure the Second IOC: Setting up and configuring a second IOC application, potentially introducing device support relevant for external communication.
- Create the TCP Simulator: Developing a simple TCP server application to simulate responses from a hardware device (like one communicating over serial).
- Test IOC-Simulator Communication: Testing the interaction between your second IOC and the device simulator.
3.1 Your Second ALS-U EPICS IOC
In the previous lesson, you created a basic IOC structure. Now, we’ll add functionality to communicate with external hardware, specifically a device connected via a serial communication (serial over TCP/IP). We’ll use two most popular EPICS modules:
- Asyn: Provides a generic, layered approach to hardware communication (serial, GPIB, IP, etc.). We’ll use it to manage the serial port itself.
- StreamDevice: Builds on Asyn to allow communication with text-based (ASCII) command/response devices using simple protocol files, avoiding the need to write custom C/C++ device support for many common cases.
We will later simulate the serial device using a TCP listening utility (like socat, or tcpsvd), allowing you to test the IOC without needing physical hardware that speaks TCP/IP.
Lesson Overview
In this lesson, you will learn to:
- Add and configure EPICS modules for device communication (e.g.,
Asyn,StreamDevice). - Define and implement device interaction logic using
StreamDeviceprotocol file (proto) and database records file (db). - Modify IOC build (
RELEASE,Makefile) and startup (st.cmd) configurations for the device communication - Build the IOC and examine its results.
Step 1: Generate the IOC Structure
First, ensure your EPICS environment is set up, then use the template generator script to create a new IOC structure. We’ll use jeonglee-Demo for the APPNAME and B46-182 for the LOCATION in this example. Replace jeonglee-Demo with your preferred name if desired.
# 1. Set up the EPICS environment
$ source ~/epics/1.1.1/debian-12/7.0.7/setEpicsEnv.bash

# 2. Run the generator script
#    (Ensure you are NOT inside the previous 'mouse' or 'tools' directories)
$ bash tools/generate_ioc_structure.bash -l B46-182 -p jeonglee-Demo

# 3. Change into the newly created IOC directory
$ cd jeonglee-Demo

# 4. (Optional) View the top-level directory structure
jeonglee-Demo $ tree --charset=ascii -L 1
.
|-- configure
|-- docs
|-- iocBoot
|-- iocsh
|-- jeonglee-DemoApp
|-- Makefile
`-- README.md

# Note: bin, lib, db, dbd directories will be created after building.
Step 2: Configure Dependencies (configure/RELEASE)
We need to tell the build system that our IOC depends on Asyn, Calc, and StreamDevice. Edit the configure/RELEASE file using your preferred text editor. With the ALS-U EPICS Environment, StreamDevice was built with support for sCalcout record, so you need to add Calc module dependency in your IOC.
jeonglee-Demo $ nano configure/RELEASE # Or vi configure/RELEASE
Find the module definitions section and uncomment the lines for ASYN, CALC, and STREAM by removing the leading #:
# Snippet from configure/RELEASE
...
ASYN = $(MODULES)/asyn             # <-- UNCOMMENTED
...
CALC = $(MODULES)/calc             # <-- UNCOMMENTED
...
STREAM = $(MODULES)/StreamDevice   # <-- UNCOMMENTED
...
Save and close the configure/RELEASE file.
Please note that there should be no trailing whitespace or additional characters after these variables. If there is anything, you may see the following error:
# Error Example for ASYN path with tailing whitespace
make: *** /home/jeonglee/epics/1.1.1/debian-12/7.0.7/base/../modules/asyn: Is a directory.  Stop.
Step 3: Understanding Dependency Handling in jeonglee-DemoApp/src/Makefile
After defining module dependencies in configure/RELEASE (Step 2), the EPICS build system uses Makefiles like <APPNAME>App/src/Makefile to determine which components to include when building the final IOC application.
You can examine this file to see how standard dependencies, like the ones you just uncommented, are typically handled automatically by the template generator.
Let’s examine the jeonglee-DemoApp/src/Makefile:
jeonglee-Demo $ less jeonglee-DemoApp/src/Makefile
Inside this file, you will find standard conditional logic, often using ifneq blocks (meaning “if not equal” - essentially checking if the variable is defined/non-empty), similar to the snippet below:
# Snippet from jeonglee-DemoApp/src/Makefile showing standard conditional inclusion

PROD_IOC = jeonglee-Demo
# jeonglee-Demo.dbd will be created and installed
DBD += jeonglee-Demo.dbd

Common_DBDs += base.dbd
Common_DBDs += system.dbd # Specific additions may exist

# Add custom C/C++ source files here if needed
Common_SRCs +=

# --- Automatic inclusion based on configure/RELEASE ---
ifneq ($(ASYN),)                       # If ASYN was defined (uncommented) in RELEASE
Common_DBDs += asyn.dbd                # include Asyn's dbd files
Common_DBDs += drvAsynIPPort.dbd
Common_DBDs += drvAsynSerialPort.dbd   # Note: Both IP and Serial DBDs be included by default
Common_LIBs += asyn                    #       and link against the Asyn library
endif

ifneq ($(CALC),)                       # If CALC was defined in RELEASE
Common_DBDs += calcSupport.dbd         #    include its dbd
Common_LIBs += calc                    #    and link its library
endif

ifneq ($(STREAM),)                     # If STREAM was defined in RELEASE
Common_DBDs += stream.dbd              #    include its dbd
Common_LIBs += stream                  #    and link its library
endif

...
Because of these standard ifneq blocks within Makefile, the necessary database definitions (Common_DBDs) and libraries (Common_LIBs) for modules like ASYN, CALC, and STREAM are included automatically by the build system when you uncomment them in configure/RELEASE.
Therefore, no manual editing of jeonglee-DemoApp/src/Makefile is required just to include these standard module dependencies configured in Step 2. You would typically only edit this file if you were adding your own C/C++ source code files to Common_SRCs or needed to link other non-standard libraries manually.
Step 4: Create StreamDevice and EPICS Database Files (jeonglee-DemoApp/Db)
Define the communication protocol and the EPICS records database:
- Create the Protocol File (
training.proto)
jeonglee-Demo $ nano jeonglee-DemoApp/Db/training.proto
Add the following content:
# Protocol definition for basic command/query

sendRawQuery {
  ExtraInput = Ignore; # Standard setting for processing record output
  out "%s";            # Format to send: output the string from the record's OUT field
  in "%(\$1)40c";      # Format to read: read up to 40 chars (%40c) into the PV name passed as argument $1
}
Save and close the training.proto file.
- Create the EPICS Database File (
training.db)
jeonglee-Demo $ emacs jeonglee-DemoApp/Db/training.db
Add the following record definitions:
# Database file for StreamDevice TCP communication example

# Record to send the query string via StreamDevice
record(stringout, "$(P)$(R)Cmd")
{
    field(DESC, "Raw Query")      # Description of the record
    field(SCAN, "Passive")        # Record only processes when explicitly written to
    field(DTYP, "stream")         # Use StreamDevice device support
    field( OUT, "@training.proto sendRawQuery($(P)$(R)Cmd-RB.VAL) $(PORT)")
	  # Specify protocol file, protocol name, target PV for reply ($1), and Asyn Port name
}

# Record to receive the reply string read by StreamDevice
record(stringin, "$(P)$(R)Cmd-RB")
{
    field(DESC, "Raw Query Readback")  # Description
    field(SCAN, "Passive")             # Value is written by StreamDevice, not by scanning
    field(DTYP, "Soft Channel")        # Standard software record type
}
Save and close the training.db file.
Step 5: Check the Makefile (jeonglee-DemoApp/Db/Makefile)
Now that you’ve placed your StreamDevice source files (training.proto, training.db) in the jeonglee-DemoApp/Db directory (Step 4), let’s look at how the build system includes them. Following EPICS conventions, the Makefile located within this same directory (jeonglee-DemoApp/Db/Makefile) is usually responsible for handling these types of files.
Often, this Db/Makefile is set up to automatically find and include any database (.db) and protocol (.proto) files placed within the jeonglee-DemoApp/Db directory. This means you usually don’t need to manually edit this Makefile every time you add a new .db or .proto file. We will cover the different scenario in a more advanced topic for a separate lesson.
Furthermore, the build process takes these source files found via the Db/Makefile and installs them into the standard runtime database directory. By default, for development builds, this location is $(TOP)/db, where $(TOP) refers to the top-level directory of your IOC source code. (The st.cmd script in Step 6 correctly uses a path relative to this runtime $(TOP)).
Important Note on Installation Paths: Be aware that for production deployments, the final installation location of the IOC (including its db directory) can be controlled by setting the INSTALL_LOCATION variable, done in the configure/CONFIG_SITE file. If INSTALL_LOCATION is used during the build, the runtime TOP directory (where the IOC executable runs from and finds its db folder) may be different from your source TOP directory. How to manage INSTALL_LOCATION is a more advanced topic for a separate lesson, but it’s useful to know that the runtime path isn’t always the same as the source path, although it defaults to that for simple builds.
Let’s examine the jeonglee-DemoApp/Db/Makefile:
jeonglee-Demo $ less jeonglee-DemoApp/Db/Makefile # Use less or your editor
Inside, you might find rules similar to the following (confirmed accurate for the ALS-U template), which use functions like wildcard and patsubst to achieve the automatic inclusion:
# Snippet from jeonglee-DemoApp/Db/Makefile showing automatic inclusion mechanism
# (This specific syntax uses wildcard/patsubst to find files in parent dir and adjust path)
...
# Example mechanism (details may vary but result is automatic inclusion):
DB += $(patsubst ../%, %, $(wildcard ../*.db))
DB += $(patsubst ../%, %, $(wildcard ../*.proto))
...
Because the template’s Db/Makefile is designed to automatically find .db and .proto files in the jeonglee-DemoApp/Db directory, no changes are needed in this Makefile for the training.db and training.proto files you created in Step 4. The build system automatically incorporates these files into the build process and handles their installation (by default to $(TOP)/db). This automation significantly simplifies the development workflow, especially for developers newer to EPICS or when creating less complex IOCs.
Step 6: Configure Startup Script (iocBoot/iocB46-182-jeonglee-Demo/st.cmd)
Now, we need to configure the IOC’s startup script (st.cmd). This script runs when the IOC starts and is responsible for setting up communication, loading database records, and initializing the system. We will modify it to:
- Define the macros (
$(P),$(R),$(PORT)) used in our database (training.db). - Configure an Asyn IP Port to connect to our simulated TCP device.
- Set the correct path for StreamDevice protocol files.
- Load the database records using the defined macros.
- Initialize the IOC.
Navigate to the IOC boot directory and edit the st.cmd file using your preferred text editor (e.g., vi, nano, emacs):
jeonglee-Demo $ cd iocBoot/iocB46-182-jeonglee-Demo
iocB46-182-jeonglee-Demo $ vi st.cmd # Or nano st.cmd
Modify the file to include the necessary configurations, similar to the example below. Pay close attention to the sections marked with comments like #-- --- Define Macros --- or #-- --- Asyn IP Port Configuration ---.
#!../../bin/linux-x86_64/jeonglee-Demo

#-- Load environment paths (sets TOP, EPICS_BASE etc.)
#-- It will be generated during the building process.
< envPaths

#-- Set a variable for the top-level db directory where .db and .proto files reside during runtime
#-- Note that this is the installed $(TOP)/db folder, not the source <APPNAME>App/Db folder.
epicsEnvSet("DB_TOP", "$(TOP)/db")
#-- Set the path where StreamDevice should look for protocol (.proto) files
epicsEnvSet("STREAM_PROTOCOL_PATH", "$(DB_TOP)")

#-- --- Define Macros for dbLoadRecords ---
#-- Define the Prefix macro value (substituted for $(P) in .db files)
epicsEnvSet("PREFIX_MACRO", "jeonglee:")
#-- Define the Record/Device macro value (substituted for $(R) in .db files)
epicsEnvSet("DEVICE_MACRO", "myoffice:")
#-- --- End Macros ---

#-- Standard IOCNAME and IOC settings
#-- These EPICS IOC variables were defined by the template generator,
#-- since these two variables are out-standing badly confusing variables
#-- through EPICS history, please don't change if you have the very specific reasons
#-- if your IOC within the ALS-U Controls Production Enviornment.
epicsEnvSet("IOCNAME", "B46-182-jeonglee-Demo")
epicsEnvSet("IOC", "iocB46-182-jeonglee-Demo")

#-- Load the compiled database definitions (.dbd file generated by build)
#-- Path is relative to TOP directory.
dbLoadDatabase "$(TOP)/dbd/jeonglee-Demo.dbd"
#-- Register device and driver support compiled into the IOC application
jeonglee_Demo_registerRecordDeviceDriver pdbbase

#-- Change directory to the IOC's specific boot directory (standard practice before iocInit)
cd "${TOP}/iocBoot/${IOC}"

#-- --- Asyn IP Port Configuration ---
#-- Define connection parameters for the Asyn port we will create
epicsEnvSet("ASYN_PORT_NAME", "LocalTCPServer") # Logical name for this Asyn port
epicsEnvSet("TARGET_HOST",    "127.0.0.1")      # IP address of the target device/simulator
epicsEnvSet("TARGET_PORT",    "9399")           # TCP port of the target device/simulator

#-- Configure the Asyn IP port using the parameters defined above
#-- drvAsynIPPortConfigure("portName", "host:port", priority, noAutoConnect, noProcessEos)
#-- priority=0 (default), noAutoConnect=0 (connect immediately), noProcessEos=0 (use Asyn default EOS processing)
drvAsynIPPortConfigure("$(ASYN_PORT_NAME)", "$(TARGET_HOST):$(TARGET_PORT)", 0, 0, 0)

#-- Configure End-of-String (EOS) terminators for the Asyn port layer
#-- These define how messages are delimited when reading from/writing to the port.
#-- Ensure these match the actual device/simulator protocol! (\n = newline, \r = carriage return)
#-- NOTE: While EOS can sometimes be defined within the StreamDevice protocol file (.proto),
#-- for long-term maintenance, it is often considered best practice to define port-specific
#-- behavior like EOS explicitly in the st.cmd file using Asyn commands.

#-- Input EOS (what character(s) mark the end of a message *received from* the device)
asynOctetSetInputEos("$(ASYN_PORT_NAME)", 0, "\n") # Using newline
#-- Output EOS (what character(s) should be *appended to* messages *sent to* the device)
asynOctetSetOutputEos("$(ASYN_PORT_NAME)", 0, "\n") # Using newline (Ensure simulator/device expects this!)
#-- --- End Asyn Config ---

#-- --- Load Database Records ---
#-- Load the record instances from our .db file (path relative to TOP via DB_TOP)
#-- Substitute the macros within the .db file using the values defined above:
#-- $(P) will become "jeonglee:"
#-- $(R) will become "myoffice:"
#-- $(PORT) will become "LocalTCPServer"
dbLoadRecords("$(DB_TOP)/training.db", "P=$(PREFIX_MACRO),R=$(DEVICE_MACRO),PORT=$(ASYN_PORT_NAME)")
#-- --- End Record Load ---

#-- Initialize the IOC
#-- This command starts record processing, enables Channel Access connections, etc.
#-- It MUST come *after* all hardware (Asyn port) configuration and record loading.
iocInit

#-- --- Optional Post-Initialization Commands ---
#-- Add any commands to run after the IOC is fully initialized, for example:
ClockTime_Report # Example site-specific utility
#-- --- End Post-Init ---

#-- --- st.cmd Comment ---
#-- st.cmd comment to suppress outputs when we run st.cmd, so you cannot see this comment
# st.cmd Not comment to print out everything you write here, so you can see this comment.
# "How are you doing?"
Key Points Reminder:
- Variables: Using
epicsEnvSetmakes the script easier to read and modify. - Paths:
DB_TOPandSTREAM_PROTOCOL_PATHpoint to the runtime location of database/protocol files. - Macros:
PREFIX_MACRO $(P)andDEVICE_MACRO $(R)are defined and passed to dbLoadRecords. - Asyn Config:
drvAsynIPPortConfigureconnects to the host/port.asynOctetSetInput(Output)Eosdefines message terminators (set to\nhere). - iocInit: Must be called after configuration and record loading.
- Comments: Lines starting with
#--are comments ignored by the IOC shell during the runtime; they are used inst.cmdfor explanation.
After editing and saving the st.cmd file, return to the top-level IOC directory to prepare for the next steps:
# Command executed from: iocBoot/iocB46-182-jeonglee-Demo
iocB46-182-jeonglee-Demo $ cd ../..

# Now back in the top-level directory
jeonglee-Demo $ pwd
/path/to/your/jeonglee-Demo # Should show the top-level directory
Step 7: Build the IOC and Check Structure
With the source files (.proto, .db) created and the configuration files (RELEASE, st.cmd, Makefiles checked/understood) in place, you can now build the IOC application executable.
The EPICS build system, invoked using the make command from the top-level IOC directory, orchestrates this process. It compiles necessary code, processes database definitions (.dbd), links required libraries (EPICS Base, Asyn, Calc, StreamDevice, PVXS, etc. based on your RELEASE file), and installs the resulting executable and related runtime files into standard subdirectories (bin, lib, dbd, db) respect to the runtime ${TOP} path.
Build the IOC:
Ensure you are in the top-level directory of your IOC (e.g., /path/to/your/jeonglee-Demo) and execute the make command:
# Prompt should show your top-level IOC directory
jeonglee-Demo $ make
You will see various compilation and linking messages scroll by. This might take a moment, especially the first time you build or after significant changes. Pay close attention to the end of the output to ensure there are no error messages.
Verify Build Output and Directory Structure:
A successful build creates several important directories and files. It’s crucial to verify they exist as expected.
- Check Key Directories: After make finishes, list the contents of your top-level directory. You should now see
bin,db,dbd, and lib directories alongside the source directories (configure,jeonglee-DemoApp,iocBoot, etc.). There is theiocshfolder, which we will cover that subject in a advanced lesson later.
$ tree -L 1 --charset=ascii
.
|-- bin         #<--- Executables installed here
|-- configure
|-- db          #<--- Runtime DB/PROTO files installed here
|-- dbd         #<--- Runtime DBD files installed here
|-- iocBoot     # Contains source st.cmd script (runtime copy might be elsewhere or same)
|-- iocsh       # Source location for iocsh scripts (if any)
|-- jeonglee-DemoApp
|-- lib         #<--- Libraries (if any) installed here
|-- Makefile    # Top-level makefile
`-- README.md   # Basic readme
- Explicitly check if the IOC executable was created:
jeonglee-Demo $ ls -l bin/linux-x86_64/jeonglee-Demo
-r-xr-xr-x 1 jeonglee jeonglee ... ... bin/linux-x86_64/jeonglee-Demo
- Check for Installed Runtime Files: Verify the files created in Step 4 were installed by the build system into the top-level db directory, and the application DBD was generated in dbd.
# Check for .db and .proto files in the runtime 'db' directory
jeonglee-Demo $ ls -l db/training.*
# Expected output should list: db/training.db and db/training.proto

# Check for the final application DBD file
jeonglee-Demo $ ls -l dbd/jeonglee-Demo.dbd
# Expected output should list: dbd/jeonglee-Demo.dbd
- Check Library Dependencies (Optional):
On Linux systems, the ldd command shows the shared libraries an executable is linked against. This is a good way to verify that the dependencies you uncommented in configure/RELEASE (Asyn, Calc, StreamDevice) were correctly linked into your IOC executable.
jeonglee-Demo $ ldd bin/linux-x86_64/jeonglee-Demo
Scan the output list for libasyn.so, libcalc.so, and libstream.so (along with Base and PVXS libraries):
...
libasyn.so => /path/to/epics/modules/asyn/lib/linux-x86_64/libasyn.so (...)
libcalc.so => /path/to/epics/modules/calc/lib/linux-x86_64/libcalc.so (...)
libstream.so => /path/to/epics/modules/StreamDevice/lib/linux-x86_64/libstream.so (...)
# You'll also see libraries from EPICS Base (libCom, libdbCore, etc.)
# and potentially default modules like PVXS (libpvxs.so and libpvxsIoc.so)
...
Seeing these libraries confirms that Step 2 (editing RELEASE) and the Makefiles worked correctly to include the necessary code.
Troubleshooting: If make fails with errors:
- Read the error messages carefully. They often point to the specific file and line number causing the issue.
- Common errors include:
- Typos in
configure/RELEASEorMakefiles. - Syntax errors in
.dbor.protofiles. - Missing module dependencies (forgetting to uncomment in
RELEASE). - Problems with the EPICS environment setup (
source setEpicsEnv.bash).
- Typos in
- Go back through the previous steps, double-check your edits, and try running make again. You can use make clean first to remove intermediate files if you suspect an inconsistent build state.
This step covers the build process and essential checks to ensure the IOC application is ready for the next steps (simulation and testing).
3.2 A Simple TCP/IP Serial Server
The simple TCP server is designed to simulate a basic serial device communicating over TCP/IP. When a client sends a text message (typically ending with a newline) to this server, the server will simply return the exact same message back to the client. This “echo” functionality provides a fundamental interaction model and is incredibly useful for:
- EPICS IOC Development Training: It allows you to develop and test the TCP/IP communication parts of your EPICS IOC (using Asyn and StreamDevice) without needing actual physical hardware.
- Debugging: You can use this server to verify that your IOC is correctly sending commands and receiving expected (or echoed) data over a TCP/IP connection.
- Simulation: It provides a controllable and predictable endpoint for practicing network communication concepts within the EPICS environment.
Lesson Overview
In this lesson, you will learn to:
- Create simple bash scripts to simulate a TCP/IP echo server.
- Run the simulator using common Linux utilities (
tcpsvdorsocat). - Test the simulator using
socat.
Requirements
To run this server, you will need one or both of the following command-line utilities installed on your Linux system:
socat: Recommand A versatile data relay utility capable of acting as a TCP server.tcpsvd: A lightweight TCP/IP service daemon that creates, binds, and listens on a socket. We saw that WSL2 system based Linux distribution has non-identified issues.
These tools are often available via your distribution’s package manager.
- Debian and its variant Linux Example:
apt update && sudo apt install ipsvd socat - Rocky and Redhat variant Linux Note: The
ipsvdpackage (providingtcpsvd) is not available; usingsocat(which should be installable viadnf) is the recommended alternative in that case.
Build server scripts
We will create two small bash scripts: one to launch the server (tcpserver.bash) and one to handle individual client connections (connection_handler.sh).
Recommendation: Create these scripts in a dedicated simulator subdirectory within your main IOC project directory (e.g., jeonglee-Demo/simulator/) to keep things organized. Navigate into that directory before creating the files.
# Example: Create and enter the simulator directory
# Ensure you are in your main IOC project directory first (e.g., jeonglee-Demo)
$ mkdir simulator
$ cd simulator
- Create tcpserver.bash
Use your preferred text editor (vi, nano, emacs, etc.) to create the main server script:
simulator$ vi tcpserver.bash
Add the following content. This script checks for socat first, then falls back to tcpsvd, listening on port 9399. It robustly finds the handler script in its own directory.
#!/usr/bin/env bash
#
#  The program is free software: you can redistribute
#  it and/or modify it under the terms of the GNU General Public License
#  as published by the Free Software Foundation, either version 2 of the
#  License, or any newer version.
#
#  This program is distributed in the hope that it will be useful, but WITHOUT
#  ANY WARRANTY; without even the implied warranty of MERCHANTABILITY or
#  FITNESS FOR A PARTICULAR PURPOSE.  See the GNU General Public License for
#  more details.
#
#  You should have received a copy of the GNU General Public License along with
#  this program. If not, see https://www.gnu.org/licenses/gpl-2.0.txt
#
#  Simple TCP Echo Server Launcher
#  Tries tcpsvd first, then socat. Listens on localhost:PORT.
#  Executes connection_handler.sh for each connection.
#
#  - author : Jeong Han Lee, Dr.rer.nat.
#  - email  : jeonglee@lbl.gov

PORT="$1"  # Port matching the IOC configuration in st.cmd

if [ -z "$PORT" ]; then
    PORT=9399
fi

# Determine the directory where this script resides to reliably find the handler script
SCRIPT_DIR=$( cd -- "$( dirname -- "${BASH_SOURCE[0]}" )" &> /dev/null && pwd )
HANDLER_SCRIPT="${SCRIPT_DIR}/connection_handler.sh"

# Check if the handler script exists
if [[ ! -f "$HANDLER_SCRIPT" ]]; then
    echo "Error: Cannot find connection_handler.sh in the script directory: ${SCRIPT_DIR}"
    exit 1
fi
# Check if the handler script is executable
if [[ ! -x "$HANDLER_SCRIPT" ]]; then
    echo "Error: connection_handler.sh is not executable. Please run: chmod +x ${HANDLER_SCRIPT}"
    exit 1
fi


if command -v socat >/dev/null 2>&1; then
    # socat: TCP-LISTEN listens on the port
    # reuseaddr allows quick restarts if the port was recently used
    # fork handles each connection in a new process
    # SYSTEM executes the handler script, passing connection via stdin/stdout
    printf "Attempting to start socat echo server on port %s...\n" "$PORT"
    socat TCP-LISTEN:${PORT},reuseaddr,fork SYSTEM:"'$HANDLER_SCRIPT'"
    printf "socat server exited.\n"
elif command -v tcpsvd > /dev/null 2>&1; then
    # tcpsvd: -c 1 limits to 1 concurrent connection (simulates some serial devices)
    # -vvE logs verbose messages and errors to stderr
    printf "Attempting to start tcpsvd echo server on 127.0.0.1:%s...\n" "$PORT"
    tcpsvd -c 1 -vvE 127.0.0.1 "$PORT" "$HANDLER_SCRIPT"
    printf "tcpsvd server exited.\n"

else
    # Error if neither required tool is found
    echo "Error: Neither socat nor tcpsvd found. Please install socat."
    exit 1
fi
Save and close the tcpserver.bash file. Then, make it executable:
# Allow the system to execute this script
simulator$ chmod +x tcpserver.bash
- Create
connection_handler.sh
Create the script that handles the actual echo logic for each individual client connection:
$ vi connection_handler.sh
Add the following content. This script reads input line by line using read -r for safety and echoes each line back using printf.
#!/usr/bin/env bash
#
#  The program is free software: you can redistribute
#  it and/or modify it under the terms of the GNU General Public License
#  as published by the Free Software Foundation, either version 2 of the
#  License, or any newer version.
#
#  This program is distributed in the hope that it will be useful, but WITHOUT
#  ANY WARRANTY; without even the implied warranty of MERCHANTABILITY or
#  FITNESS FOR A PARTICULAR PURPOSE.  See the GNU General Public License for
#  more details.
#
#  You should have received a copy of the GNU General Public License along with
#  this program. If not, see https://www.gnu.org/licenses/gpl-2.0.txt
#
#  Connection Handler for TCP Echo Server
#  Reads lines from client (stdin) and echoes them back (stdout).
#
#  - author : Jeong Han Lee, Dr.rer.nat.
#  - email  : jeonglee@lbl.gov

# Loop indefinitely while reading lines from the client connection (stdin)
# 'IFS=' prevents stripping leading/trailing whitespace
# '-r' prevents backslash interpretation
while IFS= read -r received_text; do
  # Echo the received line back to the client (stdout), followed by a newline
  # Using printf is generally safer than echo for arbitrary data
  printf "%s\n" "$received_text"
done

# Note: This script inherently handles text terminated by a newline (\n),
# as 'read' waits for a newline by default. This matches the '\n'
# Input/Output EOS settings configured in the EPICS IOC's st.cmd.
Save and close the connection_handler.sh file. And change it to be executable.
# Allow the system (tcpsvd/socat) to execute this script
simulator$ chmod +x connection_handler.sh
How the Server Works
The tcpserver.bash script acts as a launcher. It uses either socat or tcpsvd to listen for incoming TCP connections on the specified port (9399) only on the local machine (127.0.0.1).
When a client connects, the listener (tcpsvd or socat) executes the connection_handler.sh script, redirecting the client’s connection to the script’s standard input and standard output. The handler script then enters a loop:
- It waits using read to receive a complete line of text (ending in a newline) sent by the client via standard input.
- It uses
printfto send that exact line of text back to the client via standard output, adding a newline character. - It loops back to wait for the next line from the client.
This creates a simple line-based echo server. It mimics a device that might acknowledge commands or data by simply repeating them back, line by line, which is useful for testing basic communication loops.
Running the Server
To start the simulator, you need to execute the tcpserver.bash script you created.
- Open a new terminal window.
- Navigate (
cd) to the directory where you savedtcpserver.bashandconnection_handler.sh(e.g., the simulator subdirectory within your IOC project). - Execute the server script using
./(which tells the shell to run the script in the current directory)
simulator$ ./tcpserver.bash
-
The script will print a message indicating which tool (
socatortcpsvd) it is using and confirming it’s listening on the port (e.g., “Attempting to start tcpsvd echo server on 127.0.0.1:9399…”). -
Leave this terminal window running. The server process needs to remain active in this terminal to accept connections. To stop the server later, you typically press
Ctrl+Cin this terminal window.
Testing the Server with Socat
Client Console
Before connecting your IOC, you can verify the server works using socat itself as a client. Open another new terminal window (leaving the server running in its own window). Use socat to connect standard input/output (-) to the server’s TCP port:
$ socat - TCP:localhost:9399
Once connected, the cursor will wait. Type any line of text and press Enter:
# Example socat client interaction
$ socat - TCP:localhost:9399
First!        <-- You type this and press Enter
First!        <-- Server echoes it back
123456        <-- You type this and press Enter
123456        <-- Server echoes it back
ByeBye!       <-- You type this and press Enter
ByeBye!       <-- Server echoes it back
The server should immediately send the same line of text back via the socat connection, and it will appear on the next line in your terminal. To disconnect the socat client, press Ctrl+C or Ctrl+D.
Server Console
While the client is connected and interacting, observe the terminal where the server (./tcpserver.bash) is running. You should see log messages (especially if tcpsvd is used) indicating connections starting and ending:
# Example Output (using tcpsvd)
simulator (master)$ bash tcpserver.bash
Attempting to start tcpsvd echo server on 127.0.0.1:9399...
tcpsvd: info: listening on 127.0.0.1:9399, starting.

# (Client connects...)
tcpsvd: info: status 1/1
tcpsvd: info: pid 14092 from 127.0.0.1
tcpsvd: info: start 14092 localhost:127.0.0.1 ::127.0.0.1:52042

# (Client sends 'First!', '123456', 'ByeBye!', handler echoes)

# (Client disconnects...)
tcpsvd: info: end 14092 exit 0
tcpsvd: info: status 0/1
This confirms your echo server is working correctly and is ready to receive connections from your EPICS IOC in the next stage.
3.3 Your Second ALS-U EPICS IOC: Testing Device Communication
We will simulate the serial device using the simulator scripts created in the previous lesson, allowing you to test the IOC without needing physical hardware that speaks TCP/IP. This final step involves running both the IOC and the simulator concurrently and using EPICS Channel Access tools to verify communication.
Lesson Overview
In this lesson, you will learn to:
- Start the TCP echo server simulator.
- Start the EPICS IOC configured for TCP communication.
- Verify the IOC connects to the simulator.
- Use caput to send commands/queries through the IOC to the simulator.
- Use caget to read back the echoed responses received by the IOC.
- Confirm end-to-end communication via Asyn and StreamDevice.
Prerequisites
Before starting this lesson, ensure you have:
- Successfully Built IOC: The
jeonglee-DemoIOC application from the previous lesson must be built successfully (result of Step 7 in that lesson). - Simulator Scripts: The
tcpserver.bashandconnection_handler.shscripts (from the “Simple TCP/IP Serial Server” lesson) must be created and made executable, preferably in a known location (e.g., asimulatorsubdirectory). - Required Tools:
socatortcpsvdinstalled (for the server script).- EPICS Base setup correctly sourced (via
setEpicsEnv.bash) so that Channel Access client tools (caput,caget) are available in your path.
- Terminal Windows: You will need three separate terminal windows for this lesson: one for the simulator, one for the IOC, and one for running CA client commands.
Step 1: Run the TCP Simulator
First, start the echo server simulator. It needs to be running before the IOC starts so the IOC can connect to it.
- Open your first terminal window.
- Navigate (
cd) to the directory containingtcpserver.bashandconnection_handler.sh(e.g., thesimulatorsubdirectory). - Execute the server script:
# In Terminal 1 (Simulator):
simulator$ ./tcpserver.bash
- You should see a message indicating the server is listening (e.g., “Attempting to start tcpsvd echo server on 127.0.0.1:9399…”).
- Leave this terminal running. Do not close it or stop the script.
Step 2: Run the EPICS IOC
Next, start the jeonglee-Demo IOC application.
- Open your second terminal window.
- Make sure your EPICS environment is sourced:
# In Terminal 2 (IOC):
$ source ~/epics/1.1.1/debian-12/7.0.7/setEpicsEnv.bash # Use your correct path
- Navigate (
cd) to the IOC’s top-level directory, optionally run make to ensure it’s up-to-date, then navigate into the IOC’s specific boot directory:
# In Terminal 2 (IOC):
$ cd /path/to/your/jeonglee-Demo
# (Replace /path/to/your/ with the actual path)
$ make # Optional, but ensures the build is current
$ cd iocBoot/iocB46-182-jeonglee-Demo # <-- CRITICAL: Must change into boot directory
- Execute the startup script (
st.cmd) from within the boot directory:
# In Terminal 2 (IOC):
iocB46-182-jeonglee-Demo$ ./st.cmd
-
Watch the IOC startup messages. Note that the IOC shell might proceed even if there are errors during
st.cmdexecution (like failing to connect the Asyn port). It is best practice to carefully examine the startup messages for any errors or warnings, especially after changingst.cmd,.dbfiles, or.protofiles. -
Check Terminal 1 (Simulator): When the IOC successfully connects, you should see a connection message appear in the simulator’s terminal window (e.g., tcpsvd: info: pid … from 127.0.0.1).
-
The IOC terminal should eventually show a prompt indicating the EPICS base version (e.g., 7.0.7>), signifying the IOC is running and ready. Leave this terminal running.
Step 3: Test Communication with Channel Access
Now, with both the simulator and the IOC running and connected, we can use Channel Access (CA) client tools (caput, caget) to interact with the PVs defined in training.db and test the communication loop.
Recall the PVs created (using P=jeonglee: and R=myoffice: from st.cmd):
jeonglee:myoffice:Cmd(stringout): Writing to this PV sends the string via StreamDevice’s sendRawQuery protocol to the simulator (localhost:9399).jeonglee:myoffice:Cmd-RB(stringin): StreamDevice updates this PV with the reply received from the simulator (which is just an echo).
You can list all available PVs directly from the running IOC’s console using the dbl (database list) command:
# In Terminal 2 (IOC)
7.0.7> dbl
jeonglee:myoffice:Cmd
jeonglee:myoffice:Cmd-RB
# (Other PVs might also be listed)
7.0.7>
Now, let’s test using the CA clients:
- Open your third terminal window.
- Make sure your EPICS environment is sourced here as well, so
caputandcagetare available:
# In Terminal 3 (CA Clients):
$ source ~/epics/1.1.1/debian-12/7.0.7/setEpicsEnv.bash # Use your correct path
- Send a Query: Use
caputto write a string to the command PV. Let’s query for an ID.
# In Terminal 3 (CA Clients):
$ caput jeonglee:myoffice:Cmd "DEVICE_ID?"
# Expected output:
Old : jeonglee:myoffice:Cmd
New : jeonglee:myoffice:Cmd          DEVICE_ID?
- Read the Echoed Reply: The simulator echoes “DEVICE_ID?” back. StreamDevice (using the in “%($1)40c” part of the sendRawQuery protocol) should read this reply and write it to the
Cmd-RBPV. Usecagetto read this PV:
# In Terminal 3 (CA Clients):
$ caget jeonglee:myoffice:Cmd-RB
# Expected output:
jeonglee:myoffice:Cmd-RB       DEVICE_ID?
-
Seeing the same string you sent confirms the entire communication loop:
caput-> IOC Record (Cmd) -> StreamDevice out -> Asyn IP -> TCP -> Simulator -> TCP -> Asyn IP -> StreamDevice in -> IOC Record (Cmd-RB) ->caget. -
Try Another Query: Send a different string.
# In Terminal 3 (CA Clients):
$ caput jeonglee:myoffice:Cmd "STATUS?"

# Read back the echo using caget
$ caget jeonglee:myoffice:Cmd-RB
# Expected output:
# jeonglee:myoffice:Cmd-RB     STATUS?
Success! You have verified end-to-end communication between your IOC and the TCP simulator using Asyn and StreamDevice.
Troubleshooting
If your caput or caget commands fail with a message like Channel connect timed out: ‘PVNAME’ not found., it means the CA client tools cannot find your running IOC over the network.
# Example Error:
$ caget jeonglee:myoffice:Cmd-RB
Channel connect timed out: 'jeonglee:myoffice:Cmd-RB' not found.
When running the IOC and CA clients on the same machine (like localhost), this often happens because the default CA broadcast mechanism isn’t sufficient or is blocked. You need to explicitly tell the CA clients where to find the IOC server using an environment variable:
- Set
EPICS_CA_ADDR_LIST: In the terminal where you runcaput/caget(Terminal 3), set this variable to point to the machine running the IOC (in this case, localhost).
# In Terminal 3 (CA Clients):
$ export EPICS_CA_ADDR_LIST=localhost
Retry the command:
# In Terminal 3 (CA Clients):
$ caget jeonglee:myoffice:Cmd-RB
# Expected output (should now work):
# jeonglee:myoffice:Cmd-RB     STATUS?
If you would like to evaluate the PVA protocol, you also have to define the following EPICS environment variable EPICS_PVA_ADDR_LIST for PVA (Process Variable Access) protocol. We will cover PVA protocol for more advanced lesson later.
$ export EPICS_PVA_ADDR_LIST=localhost
$ pvxget jeonglee:myoffice:Cmd-RB
Summary
In this lesson, you successfully:
- Ran the TCP echo server simulator.
- Ran the EPICS IOC (
jeonglee-Demo), ensuring it connected to the simulator. - Verified PV discoverability using
dblin the IOC shell. - Used caput to send data from the IOC to the simulator via Asyn/StreamDevice over TCP.
- Used caget to read back the echoed data received by the IOC via StreamDevice.
- Troubleshot basic Channel Access connectivity issues using
EPICS_CA_ADDR_LIST.
This confirms your IOC’s basic communication infrastructure configured with Asyn and StreamDevice is working correctly. You can now stop the IOC (press Ctrl+C or type exit at the 7.0.7> prompt in Terminal 2) and the simulator (Ctrl+C in Terminal 1). This provides a solid foundation for interacting with real TCP-based devices using similar techniques.
Chapter 4: Advanced IOC Configuration and Startup
This chapter significantly expands on IOC development by delving into advanced configuration techniques and the details of the IOC runtime environment. You will learn how to develop effectively an iocsh file and master database templating for scalable configurations. You will then apply these techniques to efficiently manage multiple similar devices within the IOC startup script (st.cmd), and finally explore the details of the different phases within that script.
This chapter covers the following topics:
-
Working with
iocsh: Script Files and Commands: Developing startup script snippets (*.iocshfiles) and understanding interactive shell usage. -
Update the TCP Simulator: Developing the TCP simulator to handle multiple simulated device instances.
-
Managing Multiple Devices in
st.cmd: Applying templates andiocshcommands in the startup script for efficient configuration of multiple device connections. -
A TC-32 Temperature Monitoring Device Simulator: Develop and understand the TC-32 temperature monitoring device simulator, which continuously streams data for 32 channels, illustrating the need for more efficient configuration methods for the EPICS record database.
-
Database Templates and Substitution: Using
.templateand.substitutionfiles withDb/Makefilefor reusable database definitions. -
IOC Startup Sequence (
st.cmdPhases): Learning about commands executed before and afteriocInit().- Advanced
iocInit(): Seperated AdvancediocInitdescription.
- Advanced
4.1 Working with iocsh: Script Files and Commands
In previous chapters, we configured our IOCs directly within the main startup script, typically st.cmd. While this approach is functional for simple IOCs, it can become difficult to manage as configurations grow more complex or when multiple similar devices need to be configured.
This section introduces a more modular and maintainable approach used within the ALS-U EPICS Environment: encapsulating specific configuration tasks into reusable iocsh script files (often saved with a .iocsh extension). These snippet files contain standard iocsh commands but are designed to be called from the main st.cmd using the iocshLoad command. This allows for parameterization via macros.
Motivation: Why Use Snippet Files?
Creating reusable iocsh script files offers several advantages:
- Modularity: Breaks down complex configurations into smaller, manageable units.
- Reusability: The same snippet can be used multiple times with different parameters (e.g., configuring several identical devices).
- Clarity: Keeps the main
st.cmdcleaner and focused on the overall IOC structure and loading necessary components. - Maintainability: Changes to a specific device configuration only need to be made in one snippet file, rather than potentially multiple places in a large
st.cmd. - Standardization: Encourages consistent configuration patterns across different IOCs.
Example: Refactoring st.cmd
Let’s look at the example you provided, converting a direct configuration into one using a reusable snippet.
Original Approach (st.cmd)
Here, the Asyn port configuration and database loading are done directly in the main script:
## st.cmd
...

epicsEnvSet("DB_TOP", "$(TOP)/db")

epicsEnvSet("PREFIX_MACRO", "jeonglee:")
epicsEnvSet("DEVICE_MACRO", "myoffice:")

epicsEnvSet("ASYN_PORT_NAME", "LocalTCPServer")
epicsEnvSet("TARGET_HOST",    "127.0.0.1")
epicsEnvSet("TARGET_PORT",    "9399")
...
drvAsynIPPortConfigure("$(ASYN_PORT_NAME)", "$(TARGET_HOST):$(TARGET_PORT)", 0, 0, 0)
...
asynOctetSetInputEos("$(ASYN_PORT_NAME)", 0, "\n")
asynOctetSetOutputEos("$(ASYN_PORT_NAME)", 0, "\n")
...
dbLoadRecords("$(DB_TOP)/training.db", "P=$(PREFIX_MACRO),R=$(DEVICE_MACRO),PORT=$(ASYN_PORT_NAME)")

...
Refactored Approach (st2.cmd + training_device.iocsh)
Now, the main script (st2.cmd) defines some parameters and then calls a separate snippet file (training_device.iocsh) to perform the actual configuration.
st2.cmd
...
epicsEnvSet("DB_TOP", "$(TOP)/db")
epicsEnvSet("IOCSH_LOCAL_TOP",  "$(TOP)/iocsh")

epicsEnvSet("PREFIX_MACRO", "jeonglee:")
epicsEnvSet("DEVICE_MACRO", "myoffice:")
...
epicsEnvSet("ASYN_PORT_NAME",   "LocalTCPServer")

iocshLoad("$(IOCSH_LOCAL_TOP)/training_device.iocsh", "PREFIX=$(PREFIX_MACRO),DEVICE=$(DEVICE_MACRO),DATABASE_TOP=$(DB_TOP),PORT_NAME=$(ASYN_PORT_NAME)")
...
training_device.iocshinjeonglee-DemoApp/iocsh:
####################################################################################################
############ START of training_device.iocsh ########################################################
#-- PREFIX         :
#-- DEVICE         :
#-- DATABASE_TOP   :
#-- PORT_NAME      :
#-- HOST           : [Default] 127.0.0.1
#-- PORT           : [Default] 9399
#-- ASYNTRACE      : [Default] ##-
#--#################################################################################################
#--#
#--#

#-- Configure the Asyn IP port using the parameters defined above
#-- drvAsynIPPortConfigure("portName", "host:port", priority, noAutoConnect, noProcessEos)
#-- priority=0 (default), noAutoConnect=0 (connect immediately), noProcessEos=0 (use Asyn default EOS processing)
drvAsynIPPortConfigure("$(PORT_NAME)", "$(HOST=127.0.0.1):$(PORT=9399)", 0, 0, 0)

#-- Configure End-of-String (EOS) terminators for the Asyn port layer
#-- These define how messages are delimited when reading from/writing to the port.
#-- Ensure these match the actual device/simulator protocol! (\n = newline, \r = carriage return)
#-- NOTE: While EOS can sometimes be defined within the StreamDevice protocol file (.proto),
#-- for long-term maintenance, it is often considered best practice to define port-specific
#-- behavior like EOS explicitly in the st.cmd file using Asyn commands.
#-- Input EOS (what character(s) mark the end of a message *received from* the device)
asynOctetSetInputEos("$(PORT_NAME)", 0, "\n")
#-- Output EOS (what character(s) should be *appended to* messages *sent to* the device)
asynOctetSetOutputEos("$(PORT_NAME)", 0, "\n")

$(ASYNTRACE=#--)asynSetTraceMask($(PORT_NAME), -1, ERROR|FLOW|DRIVER)

#-- --- Load Database Records ---
dbLoadRecords("$(DATABASE_TOP)/training.db", "P=$(PREFIX),R=$(DEVICE),PORT=$(PORT_NAME)")
#-- --- End Record Load ---

############ END of training_device.iocsh ##########################################################
####################################################################################################
Key Concepts Explained
Let’s break down how this refactoring works:
1. Defining Snippet Location
In st2.cmd, epicsEnvSet("IOCSH_LOCAL_TOP", "$(TOP)/iocsh") defines a standard location for these reusable script files relative to the application top directory. This makes the iocshLoad paths cleaner.
2. The iocshLoad Command
This command is the core mechanism for executing commands from another file. Its basic syntax is:
iocshLoad("path/to/training_device.iocsh", "MACRO1=VALUE1,MACRO2=VALUE2,...")
- The first argument is the path to the snippet file. Using variables like
$(IOCSH_LOCAL_TOP)makes paths relative and portable. - The second argument is a comma-separated string of
MACRO=VALUEpairs. These macros ($(MACRO1),$(MACRO2), etc.) become available for substitution wherever$(MACRO)appears within the loadedsnippet.iocshfile. - The
VALUEpart can itself be a literal string, an environment variable ($(ENV_VAR)set viaepicsEnvSet), or even another macro defined earlier in the calling script. In the example,PORT_NAME=$(ASYN_PORT_NAME)uses the value of theASYN_PORT_NAMEenvironment variable to define thePORT_NAMEmacro for the snippet.
3. Snippet File (*.iocsh) Structure
-
Parameters: Uses
$(MACRO)syntax (e.g.,$(PORT_NAME),$(PREFIX)) to receive values passed via iocshLoad. -
Defaults:
$(MACRO=DEFAULT)syntax provides a fallback value if the macro isn’t passed (e.g.,$(HOST=127.0.0.1)). -
Documentation: Clear comments explaining the purpose and required/optional macros are crucial for reusability.
-
Conditional Logic: The
$(ASYNTRACE=#--)trick provides simple conditional execution – ifASYNTRACEis defined in the iocshLoad call (even if empty, likeASYNTRACE=), the line runs; otherwise, it becomes a comment. -
Consistency Note: Inside
training_device.iocsh, commands related to the Asyn port now consistently use the$(PORT_NAME)macro, which receives its value from theiocshLoadcall. This ensures the snippet correctly references the port name it’s supposed to configure.
Useful EPICS IOC shell commands
Even when using snippet files, the underlying commands are standard iocsh commands. You can still interact with the running IOC using the shell for debugging:
dbl: List loaded record types, simply EPICS PV (signal) listdbpr("recordName", interestLevel): Print record (signal) details.epicsEnvShow: Print value of an environment variable, or all variables.help: List available commands.exit: Exit the IOC shell (usually stops the IOC).
Exercise: Refactor Your Simulator Configuration
Now, apply this technique to the IOC configuration you created in Chapter 3 for the TCP simulator:
- Create Snippet File: Create a new file, for example,
$(TOP)/jeonglee-DemoApp/iocsh/training_device.iocsh. - Move Commands: Identify the
drvAsynIPPortConfigure,asynOctetSet*Eos, anddbLoadRecordscommands related to your simulator in your Chapter 3st.cmdfile and move them intotraining_device.iocsh. - Parameterize: Replace hardcoded values (like PV prefix, device name, port name, host, port) in the snippet file with
$(MACRO)variables. Add documentation comments explaining the macros. Provide defaults for host (127.0.0.1) and port (9399). - Define Location: In your main
st.cmd, ensureIOCSH_LOCAL_TOPis defined (e.g.,epicsEnvSet("IOCSH_LOCAL_TOP", "$(TOP)/iocsh")). - Modify
st.cmd: Remove the original commands you moved and add aniocshLoadcommand to call your newtraining_device.iocsh, passing the required macros (e.g.,PREFIX=$(MY_PREFIX),DEVICE=$(MY_DEVICE_NAME),PORT_NAME=$(SIM_PORT_NAME)etc., using appropriate variable names from yourst.cmd). - Build: After creating or modifying the
training_device.iocshfile in your source directory, runmakein your application’s top-level directory. This command typically copies your.iocshfile from its source location (e.g.,jeonglee-DemoApp/iocsh/) to the runtime iocsh folder (e.g.,$(TOP)/iocsh) where the IOC expects to find it via$(IOCSH_LOCAL_TOP)or a similar path during startup. - Test: Run the IOC from its runtime directory (e.g.,
iocBoot/iocB46-182-jeonglee-Demo). It should start and communicate with the simulator exactly as before, but now using the cleaner, modular structure.
An example of st2.cmd
Here is the example of the full st2.cmd.
#!../../bin/linux-x86_64/jeonglee-Demo


#-- Load environment paths (sets TOP, EPICS_BASE etc.)
#-- It will be generated during the building process.
< envPaths

#-- Set a variable for the top-level db directory where .db and .proto files reside during runtime
#-- Note that this is the installed $(TOP)/db folder, not the source <APPNAME>App/Db folder.
epicsEnvSet("DB_TOP", "$(TOP)/db")

#-- Set the path where StreamDevice should look for protocol (.proto) files
epicsEnvSet("STREAM_PROTOCOL_PATH", "$(DB_TOP)")

#-- Set a variable for the top-level iocsh directory
epicsEnvSet("IOCSH_LOCAL_TOP",      "$(TOP)/iocsh")
#-- --- Define Macros for dbLoadRecords ---
#-- Define the Prefix macro value (substituted for $(P) in .db files)
epicsEnvSet("PREFIX_MACRO", "jeonglee:")
#-- Define the Record/Device macro value (substituted for $(R) in .db files)
epicsEnvSet("DEVICE_MACRO", "myoffice:")
#-- --- End Macros ---

#-- Standard IOCNAME and IOC settings
#-- These EPICS IOC variables were defined by the template generator,
#-- since these two variables are out-standing badly confusing variables
#-- through EPICS history, please don't change if you have the very specific reasons
#-- if your IOC within the ALS-U Controls Production Enviornment.
epicsEnvSet("IOCNAME", "B46-182-jeonglee-Demo")
epicsEnvSet("IOC", "iocB46-182-jeonglee-Demo")

#-- Load the compiled database definitions (.dbd file generated by build)
#-- Path is relative to TOP directory.
dbLoadDatabase "$(TOP)/dbd/jeonglee-Demo.dbd"
#-- Register device and driver support compiled into the IOC application
jeonglee_Demo_registerRecordDeviceDriver pdbbase

#-- Change directory to the IOC's specific boot directory (standard practice before iocInit)
cd "${TOP}/iocBoot/${IOC}"

#-- --- Asyn IP Port Configuration ---
#-- Define connection parameters for the Asyn port we will create
epicsEnvSet("ASYN_PORT_NAME", "LocalTCPServer") # Logical name for this Asyn port
epicsEnvSet("TARGET_HOST",    "127.0.0.1")      # IP address of the target device/simulator
epicsEnvSet("TARGET_PORT",    "9399")           # TCP port of the target device/simulator

#-- --- iocshLoad Configuration examples ---
iocshLoad("$(IOCSH_LOCAL_TOP)/training_device.iocsh", "PREFIX=$(PREFIX_MACRO),DEVICE=$(DEVICE_MACRO),DATABASE_TOP=$(DB_TOP),PORT_NAME=$(ASYN_PORT_NAME)")
#--iocshLoad("$(IOCSH_LOCAL_TOP)/training_device.iocsh", "PREFIX=$(PREFIX_MACRO),DEVICE=$(DEVICE_MACRO),DATABASE_TOP=$(DB_TOP),PORT_NAME=$(ASYN_PORT_NAME), HOST=$(TARGET_HOST), PORT=$(TARGET_PORT)")
#--iocshLoad("$(IOCSH_LOCAL_TOP)/training_device.iocsh", "PREFIX=$(PREFIX_MACRO),DEVICE=$(DEVICE_MACRO),DATABASE_TOP=$(DB_TOP),PORT_NAME=$(ASYN_PORT_NAME), HOST=$(TARGET_HOST), PORT=$(TARGET_PORT), ASYNTRACE=")

#-- Initialize the IOC
#-- This command starts record processing, enables Channel Access connections, etc.
#-- It MUST come *after* all hardware (Asyn port) configuration and record loading.
iocInit

#-- --- Optional Post-Initialization Commands ---
#-- Add any commands to run after the IOC is fully initialized, for example:
ClockTime_Report #-- Example site-specific utility
#-- --- End Post-Init ---
Assignments or Questions for the further understanding.
- We defined
TARGET_HOSTinst2.cmd, however we never use it. Can you explain why? - In the
st2.cmd, we have three different exmaples foriocshloadusages. Please test it one by one, and see what different among them. - Complete command out
iocshloadwith#. Restart your ioc, then can you see what happens? This is a way to disableone devicecommunication withinst2.cmdeffectively. We will discuss this later with real example.
Considerations
As you noted, there are some challenges when adopting this approach, especially for beginners:
- Initial Complexity: Designing truly generic, reusable
iocshfiles that handle various device or system configurations requires careful planning and understanding of potential variations. - Variable/Macro Scope: Keeping track of variable names and macro definitions across different files (
st.cmd,*.iocshsnippets, database substitution files (.substitutions), database template files (.template)) can be challenging initially. Understanding where each variable/macro is defined and used is key. (Database templates/substitutions will be covered in Section Database Templates and Substitution).
Conclusion
Using iocshLoad and creating dedicated *.iocsh snippet files represents a best practice within the ALS-U EPICS Environment for managing IOC configurations. While it introduces some initial complexity compared to editing a single st.cmd, the long-term benefits in modularity, reusability, clarity, and maintainability are substantial, especially for complex systems. Mastering this technique is a key step towards developing robust and professional EPICS applications.
4.2 An Extended TCP/IP Serial Server
Building upon the simple echo server concept, this section introduces an enhanced version of the launcher script (tcpserver.bash) paired with a more sophisticated advanced connection handler. This combination allows simulating devices that respond specifically to certain commands (rather than just echoing) and provides the flexibility needed for more complex testing scenarios. We will also cover how to easily run multiple simulator instances using GNU Parallel.
Lesson Overview
In this lesson, you will learn to:
- Understand the enhanced argument handling and logging features of the extended
tcpserver.bashscript. - Create and understand an advanced handler script (
advanced_connection_handler.sh) that simulates specific device commands. - Run the server specifying custom ports and the advanced handler script.
- Test the specific command responses using socat.
- Use GNU Parallel to launch multiple server instances.
Requirements Recap
This section assumes you have:
- Access to a Linux environment with standard shell tools (bash).
tcpsvdORsocatinstalled.parallel(GNU Parallel) installed if you want to run multiple instances easily.- Familiarity with the concepts from the “A Simple TCP/IP Serial Server” section.
The Extended TCP/IP Server (tcpserver.bash)
The primary change is in the launcher script, tcpserver.bash. This new version intelligently parses command-line arguments to allow specifying the port, the handler script, or both, falling back to defaults if arguments are omitted.
Here is the code for the extended tcpserver.bash:
#!/usr/bin/env bash
#
#  The program is free software: you can redistribute
#  it and/or modify it under the terms of the GNU General Public License
#  as published by the Free Software Foundation, either version 2 of the
#  License, or any newer version.
#
#  This program is distributed in the hope that it will be useful, but WITHOUT
#  ANY WARRANTY; without even the implied warranty of MERCHANTABILITY or
#  FITNESS FOR A PARTICULAR PURPOSE.  See the GNU General Public License for
#  more details.
#
#  You should have received a copy of the GNU General Public License along with
#  this program. If not, see https://www.gnu.org/licenses/gpl-2.0.txt
#
#  Robust TCP Server Launcher for Parallel Execution
#  Tries tcpsvd first, then socat. Listens on localhost:PORT.
#  Executes a specified or default connection handler script for each connection.
#  Includes prefixed logging and basic signal trapping.
#
#  Usage: ./tcpserver.bash [PORT] [HANDLER_SCRIPT]
#         ./tcpserver.bash [HANDLER_SCRIPT]  (uses default port)
#         ./tcpserver.bash [PORT]            (uses default handler)
#         ./tcpserver.bash                   (uses defaults for both)
#
#  - author : Jeong Han Lee, Dr.rer.nat.
#  - email  : jeonglee@lbl.gov

# --- Defaults ---
DEFAULT_HANDLER="connection_handler.sh" # Default if no handler specified
DEFAULT_PORT="9399"                   # Default if no port specified

# --- Argument Parsing ---
PORT="$1"    # First argument
HANDLER="$2" # Second argument


if [[ "$PORT" == *handler.sh ]]; then
    HANDLER="$PORT"
    PORT="" # Will be set to default later if empty
fi

# Apply defaults if arguments were not provided or shifted
if [ -z "$PORT" ]; then
  PORT="$DEFAULT_PORT"
fi

if [ -z "$HANDLER" ]; then
  HANDLER="$DEFAULT_HANDLER"
fi

# --- Logging Prefix (Defined after PORT is finalized) ---
LOG_PREFIX="[Server $PORT PID $$]:"

# --- Signal Handling ---
cleanup() {
    printf "%s Exiting on signal.\n" "$LOG_PREFIX"
    # Add any specific cleanup needed here, if necessary
    exit 1 # Indicate non-standard exit
}
trap cleanup INT TERM QUIT # Catch Ctrl+C, kill, etc.

# --- Find and Validate Handler Script ---
# Determine the directory where this launcher script resides
SCRIPT_DIR=$( cd -- "$( dirname -- "${BASH_SOURCE[0]}" )" &> /dev/null && pwd )
HANDLER_SCRIPT="${SCRIPT_DIR}/${HANDLER}"

printf -- "#--------------------------------------------------\n"
printf -- "# %s Starting TCP Server:\n" "$LOG_PREFIX"
printf -- "#   Port   : %s\n" "$PORT"
printf -- "#   Handler: %s\n" "$HANDLER_SCRIPT"
printf -- "#--------------------------------------------------\n"

# Check if the handler script exists
if [[ ! -f "$HANDLER_SCRIPT" ]]; then
    printf "%s Error: Cannot find handler script '%s' in the script directory: %s\n" "$LOG_PREFIX" "$HANDLER" "$SCRIPT_DIR"
    exit 1
fi
# Check if the handler script is executable
if [[ ! -x "$HANDLER_SCRIPT" ]]; then
    printf "%s Error: Handler script '%s' is not executable. Please run: chmod +x %s\n" "$LOG_PREFIX" "$HANDLER_SCRIPT" "$HANDLER_SCRIPT"
    exit 1
fi

# --- Launch Server ---
SERVER_CMD=""
if command -v socat >/dev/null 2>&1; then
    printf "%s Attempting to start using socat on port %s...\n" "$LOG_PREFIX" "$PORT"
    # socat: TCP-LISTEN, reuseaddr, fork, SYSTEM execution
    # Note the quoting for SYSTEM command with variable path
    SERVER_CMD="socat TCP-LISTEN:${PORT},reuseaddr,fork SYSTEM:'\"$HANDLER_SCRIPT\"'"
elif command -v tcpsvd > /dev/null 2>&1; then
    printf "%s Attempting to start using tcpsvd on 127.0.0.1:%s...\n" "$LOG_PREFIX" "$PORT"
    # tcpsvd: -c 1 limits concurrency, -vvE logs verbosely to stderr
    SERVER_CMD="tcpsvd -c 1 -vvE 127.0.0.1 \"$PORT\" \"$HANDLER_SCRIPT\""
else
    printf "%s Error: Neither socat nor tcpsvd found. Please install socat.\n" "$LOG_PREFIX"
    exit 1
fi

# Execute the selected server command
eval "$SERVER_CMD"
EXIT_CODE=$? # Capture exit code of tcpsvd/socat

# --- Normal Exit Logging ---
printf "%s Server command exited with code %d.\n" "$LOG_PREFIX" "$EXIT_CODE"
exit $EXIT_CODE
Make the launcher script executable:
chmod +x tcpserver.bash
Creating an Advanced Handler Script
To simulate more than just an echo, we create a handler script with specific logic. This example responds uniquely to GetID? and GetTemp? commands.
Save the following code as advanced_connection_handler.sh (e.g., in your simulator directory):
#!/usr/bin/env bash
#
#  The program is free software: you can redistribute
#  it and/or modify it under the terms of the GNU General Public License
#  as published by the Free Software Foundation, either version 2 of the
#  License, or any newer version.
#
#  This program is distributed in the hope that it will be useful, but WITHOUT
#  ANY WARRANTY; without even the implied warranty of MERCHANTABILITY or
#  FITNESS FOR A PARTICULAR PURPOSE.  See the GNU General Public License for
#  more details.
#
#  You should have received a copy of the GNU General Public License along with
#  this program. If not, see https://www.gnu.org/licenses/gpl-2.0.txt
#
#  Advanced Connection Handler for TCP Server
#  Simulates specific commands: GetID?, GetTemp?
#  Echoes back any other received commands.
#
#  - author : Jeong Han Lee, Dr.rer.nat.
#  - email  : jeonglee@lbl.gov


# Function to process received commands
function sub_cmds
{
    local cmd="$1"; shift
    local response=""

    # Check the command and prepare a specific response
    if [[ "$cmd" == "GetID?" ]]; then
        # Respond with the Process ID of this handler instance
        response="$$"
    elif [[ "$cmd" == "GetTemp?" ]]; then
        # Respond with a random integer between 0 and 100
        response=$((RANDOM % 101))
    else
        # For any other command, just echo it back
        response="$cmd"
    fi

    # Send the response back to the client, followed by a newline
    printf "%s\n" "$response"
}

# Main loop: Read lines from client (stdin) and process them
# 'IFS=' prevents stripping leading/trailing whitespace
# '-r' prevents backslash interpretation
while IFS= read -r received_text; do
  # Call the function to handle the received command/text
  sub_cmds "$received_text"
done

# Note: This script inherently handles text terminated by a newline (\n),
# matching typical IOC EOS settings.
Save and close the file and make it executable:
simulator$ chmod +x advanced_connection_handler.sh
How this Handler Works:
- It defines a function sub_cmds to check the received command.
- If the command is
GetID?, it replies with its own unique Process ID ($$). - If the command is
GetTemp?, it replies with a random number between 0 and 100. - For any other input, it simply echoes the input back.
- The main
while readloop calls this function for every line received from the client.
Running the Server
With the enhanced tcpserver.bash and potentially multiple handler scripts available (like connection_handler.sh and advanced_connection_handler.sh), you can launch the simulator in various ways. Navigate to your simulator directory in a dedicated terminal and use one of the following invocation methods:
# Option 1: Run with all defaults
# Uses default port (9399) and default handler (connection_handler.sh)
simulator$ ./tcpserver.bash

# Option 2: Specify only the port (uses default handler)
# Runs default handler on port 8888
simulator$ ./tcpserver.bash 8888

# Option 3: Specify only the handler (uses default port)
# Runs advanced handler on port 9399
simulator$ ./tcpserver.bash advanced_connection_handler.sh

# Option 4: Specify both port and handler
# Runs advanced handler on port 8888
simulator$ ./tcpserver.bash 8888 advanced_connection_handler.sh
The script will print which port and handler it is starting with, including a Process ID (PID) in the log prefix ([Server PORT PID]:). Leave the chosen server running in its terminal for testing. Use Ctrl+C to stop it (the trap should log an exit message).
Testing the Advanced Handler with Socat
Let’s test the server when running the advanced_connection_handler.sh. Open another new terminal window and use socat to connect (use the correct port if you chose one other than 9399).
# Connect to the server (assuming it's running on port 9399 with the advanced handler)
$ socat - TCP:localhost:9399

# --- Interaction ---
GetID?               <-- You type this and press Enter
16254                <-- Server responds with a Process ID (will vary)
GetTemp?             <-- You type this and press Enter
81                   <-- Server responds with a random number (0-100)
GetTemp?             <-- You type this again
33                   <-- Server responds with a different random number
WhatIsThis?          <-- You type this and press Enter
WhatIsThis?          <-- Server echoes unknown command back
Disconnect socat with Ctrl+C or Ctrl-D.
Running Multiple Simulators with GNU Parallel
GNU Parallel remains a useful tool for launching multiple instances, now with the added flexibility of specifying handlers if needed.
- Ensure parallel is installed.
- Run the command: From your simulator directory:
# Start servers on ports 9399, 9400, 9401 using the ADVANCED handler for all
simulator$ parallel ./tcpserver.bash {} advanced_connection_handler.sh ::: 9399 9400 9401
# Or, start servers using the DEFAULT echo handler for all
simulator$ parallel ./tcpserver.bash ::: 9399 9400 9401
-
Test Each Instance: Use separate socat terminals to connect to ports 9399, 9400, and 9401 as needed.
-
Stopping Parallel Servers: Use Ctrl+C in the parallel terminal. If processes linger, use
ps/pgrepandkill.
Running Multiple Simulators without GNU Parallel
-
Ensure you have to open three different terminals
-
Run the following commands in three different terminals
# Terminal 1
simulator$ ./tcpserver.bash 9399 advanced_connection_handler.sh
# Terminal 2
simulator$ ./tcpserver.bash 9400 advanced_connection_handler.sh
# Terminal 3
simulator$ ./tcpserver.bash 9401 advanced_connection_handler.sh
-
Test Each Instance: Use separate socat terminals to connect to ports 9399, 9400, and 9401 as needed.
-
Stopping Servers: Use Ctrl+C in the each terminal.
Conclusion
By separating the server launching logic (tcpserver.bash) from the connection handling logic (e.g., connection_handler.sh, advanced_connection_handler.sh), you gain significant flexibility. This allows you to easily create and test different simulated device behaviors, making the simulator a much more powerful tool for developing and debugging EPICS IOCs. The robust launcher script also facilitates running and managing multiple instances concurrently.
4.3 Managing Multiple Devices using iocshLoad
Now that we have learned how to create reusable configuration snippets using .iocsh files in Working with iocsh: Script Files and Commands and how to run multiple instances of our extended TCP simulator on different ports Update the TCP Simulator, we can combine these concepts.
This section focuses on configuring a single IOC to communicate with multiple identical devices simultaneously. We will achieve this by leveraging the .iocsh snippet file developed earlier, calling it multiple times within the main st.cmd file using iocshLoad, passing different parameters (macros) for each device instance. We will focus here on managing the communication setup (like Asyn ports) efficiently using this technique.
Recap: The Reusable .iocsh Snippet
Recall the .iocsh script file we worked with (e.g., simulator_device.iocsh or training_device.iocsh from the Section 1 exercise). It encapsulates the steps needed to configure one device connection, including setting up the Asyn port and loading associated database records. It accepts parameters via macros passed through iocshLoad, such as PREFIX, DEVICE, PORT_NAME, PORT, HOST, DATABASE_TOP. Assuming this snippet loads records like Cmd (stringout) and Cmd-RB (stringin) from a database file (like training.db), these PVs will be created relative to the PREFIX and DEVICE macros.
Configuring Multiple Instances in st3.cmd
To manage multiple devices, we simply call iocshLoad multiple times in our main st3.cmd, providing a unique set of macro values for each call.
- Define Unique Parameters: For each device instance, define a unique set of parameters. Using
epicsEnvSetcan keep this organized. We need unique PV prefixes/device parts (e.g.,SIM1:,SIM2:,SIM3:), unique Asyn port names (TCP1,TCP2,TCP3), and unique target TCP ports (9399,9400,9401) for each simulator. - Call
iocshLoadRepeatedly: Execute theiocshLoadcommand for your snippet file (training_device.iocsh) once per device instance, passing the specific macros.
Example st3.cmd Snippet (configuring 3 simulator instances):
This example shows the relevant parts of an st3.cmd file for loading three instances. Note the initial setup for paths.
# Showing the relevant loading section, you will see the full example later.
#
# Define standard locations relative to the application top ($TOP)
epicsEnvSet("DB_TOP", "$(TOP)/db")
epicsEnvSet("STREAM_PROTOCOL_PATH", "$(DB_TOP)")
epicsEnvSet("IOCSH_LOCAL_TOP",      "$(TOP)/iocsh")

# --- Configuration for Simulator Instance 1 ---
epicsEnvSet("PREFIX1",         "MYDEMO:")      # Main prefix
epicsEnvSet("DEVICE1",         "SIM1:")        # Unique device part
epicsEnvSet("ASYN_PORT_NAME1", "TCP1")         # Unique Asyn Port Name
epicsEnvSet("TARGET_PORT1",    "9399")         # TCP Port for simulator 1
# Load snippet for Instance 1
iocshLoad("$(IOCSH_LOCAL_TOP)/training_device.iocsh", "PREFIX=$(PREFIX1),DEVICE=$(DEVICE1),DATABASE_TOP=$(DB_TOP),PORT_NAME=$(ASYN_PORT_NAME1), PORT=$(TARGET_PORT1)")

# --- Configuration for Simulator Instance 2 ---
epicsEnvSet("PREFIX2",         "MYDEMO:")      # Main prefix
epicsEnvSet("DEVICE2",         "SIM2:")        # Unique device part
epicsEnvSet("ASYN_PORT_NAME2", "TCP2")         # Unique Asyn Port Name
epicsEnvSet("TARGET_PORT2",    "9400")         # TCP Port for simulator 2
# Load snippet for Instance 2
iocshLoad("$(IOCSH_LOCAL_TOP)/training_device.iocsh", "PREFIX=$(PREFIX2),DEVICE=$(DEVICE2),DATABASE_TOP=$(DB_TOP),PORT_NAME=$(ASYN_PORT_NAME2), PORT=$(TARGET_PORT2)")

# --- Configuration for Simulator Instance 3 ---
epicsEnvSet("PREFIX3",         "MYDEMO:")      # Main prefix
epicsEnvSet("DEVICE3",         "SIM3:")        # Unique device part
epicsEnvSet("ASYN_PORT_NAME3", "TCP3")         # Unique Asyn Port Name
epicsEnvSet("TARGET_PORT3",    "9401")         # TCP Port for simulator 3
# Load snippet for Instance 3
iocshLoad("$(IOCSH_LOCAL_TOP)/training_device.iocsh", "PREFIX=$(PREFIX3),DEVICE=$(DEVICE3),DATABASE_TOP=$(DB_TOP),PORT_NAME=$(ASYN_PORT_NAME3), PORT=$(TARGET_PORT3), ASYNTRACE=")
...
Run the simulator with three devices setup
After creating or modifying the st3.cmd file as shown above, follow these steps using three separate terminals to run the simulators, start the IOC, and verify communication.
Start Simulators (Terminal 1)
Use parallel (or run manually in three terminals) to start the simulators, each listening on its designated port and using a suitable handler (like advanced_connection_handler.sh from the previous section).
# Terminal 1
simulator (master)$ parallel ./tcpserver.bash {} advanced_connection_handler.sh ::: 9399 9400 9401
Leave this terminal running.
Start IOC (Terminal 2)
Navigate to the IOC boot directory, ensure the EPICS environment is sourced, and run the startup script. Observe the output log, which shows the environment setup, the loading of the DBD, the iocshLoad commands being executed, and the contents of training_device.iocsh being run for each instance with the correct macro substitutions.
# Terminal 2

iocBoot/iocB46-182-jeonglee-Demo $ ./st3.cmd
#!../../bin/linux-x86_64/jeonglee-Demo
< envPaths
epicsEnvSet("IOC","iocB46-182-jeonglee-Demo")
epicsEnvSet("TOP","/home/jeonglee/gitsrc/EPICS-IOC-demo")
epicsEnvSet("MODULES","/home/jeonglee/epics/1.1.1/debian-12/7.0.7/base/../modules")
epicsEnvSet("ASYN","/home/jeonglee/epics/1.1.1/debian-12/7.0.7/base/../modules/asyn")
epicsEnvSet("CALC","/home/jeonglee/epics/1.1.1/debian-12/7.0.7/base/../modules/calc")
epicsEnvSet("STREAM","/home/jeonglee/epics/1.1.1/debian-12/7.0.7/base/../modules/StreamDevice")
epicsEnvSet("PVXS","/home/jeonglee/epics/1.1.1/debian-12/7.0.7/base/../modules/pvxs")
epicsEnvSet("EPICS_BASE","/home/jeonglee/epics/1.1.1/debian-12/7.0.7/base")
epicsEnvSet("DB_TOP", "/home/jeonglee/gitsrc/EPICS-IOC-demo/db")
epicsEnvSet("STREAM_PROTOCOL_PATH", "/home/jeonglee/gitsrc/EPICS-IOC-demo/db")
epicsEnvSet("IOCSH_LOCAL_TOP",      "/home/jeonglee/gitsrc/EPICS-IOC-demo/iocsh")
epicsEnvSet("IOCNAME", "B46-182-jeonglee-Demo")
epicsEnvSet("IOC", "iocB46-182-jeonglee-Demo")
dbLoadDatabase "/home/jeonglee/gitsrc/EPICS-IOC-demo/dbd/jeonglee-Demo.dbd"
jeonglee_Demo_registerRecordDeviceDriver pdbbase
INFO: PVXS QSRV2 is loaded, permitted, and ENABLED.
cd "/home/jeonglee/gitsrc/EPICS-IOC-demo/iocBoot/iocB46-182-jeonglee-Demo"
# --- Configuration for Simulator Instance 1 ---
epicsEnvSet("PREFIX1",         "MYDEMO:")      # Main prefix
epicsEnvSet("DEVICE1",         "SIM1:")        # Unique device part
epicsEnvSet("ASYN_PORT_NAME1", "TCP1")         # Unique Asyn Port Name
epicsEnvSet("TARGET_PORT1",    "9399")         # TCP Port for simulator 1
# Load snippet for Instance 1
iocshLoad("/home/jeonglee/gitsrc/EPICS-IOC-demo/iocsh/training_device.iocsh", "PREFIX=MYDEMO:,DEVICE=SIM1:,DATABASE_TOP=/home/jeonglee/gitsrc/EPICS-IOC-demo/db,PORT_NAME=TCP1, PORT=9399")
####################################################################################################
############ START of training_device.iocsh ########################################################
drvAsynIPPortConfigure("TCP1", "127.0.0.1:9399", 0, 0, 0)
asynOctetSetInputEos("TCP1", 0, "\n")
asynOctetSetOutputEos("TCP1", 0, "\n")
dbLoadRecords("/home/jeonglee/gitsrc/EPICS-IOC-demo/db/training.db", "P=MYDEMO:,R=SIM1:,PORT=TCP1")
############ END of training_device.iocsh ##########################################################
####################################################################################################
# --- Configuration for Simulator Instance 2 ---
epicsEnvSet("PREFIX2",         "MYDEMO:")      # Main prefix
epicsEnvSet("DEVICE2",         "SIM2:")        # Unique device part
epicsEnvSet("ASYN_PORT_NAME2", "TCP2")         # Unique Asyn Port Name
epicsEnvSet("TARGET_PORT2",    "9400")         # TCP Port for simulator 2
# Load snippet for Instance 2
iocshLoad("/home/jeonglee/gitsrc/EPICS-IOC-demo/iocsh/training_device.iocsh", "PREFIX=MYDEMO:,DEVICE=SIM2:,DATABASE_TOP=/home/jeonglee/gitsrc/EPICS-IOC-demo/db,PORT_NAME=TCP2, PORT=9400")
####################################################################################################
############ START of training_device.iocsh ########################################################
drvAsynIPPortConfigure("TCP2", "127.0.0.1:9400", 0, 0, 0)
asynOctetSetInputEos("TCP2", 0, "\n")
asynOctetSetOutputEos("TCP2", 0, "\n")
dbLoadRecords("/home/jeonglee/gitsrc/EPICS-IOC-demo/db/training.db", "P=MYDEMO:,R=SIM2:,PORT=TCP2")
############ END of training_device.iocsh ##########################################################
####################################################################################################
# --- Configuration for Simulator Instance 3 ---
epicsEnvSet("PREFIX3",         "MYDEMO:")      # Main prefix
epicsEnvSet("DEVICE3",         "SIM3:")        # Unique device part
epicsEnvSet("ASYN_PORT_NAME3", "TCP3")         # Unique Asyn Port Name
epicsEnvSet("TARGET_PORT3",    "9401")         # TCP Port for simulator 3
# Load snippet for Instance 3
iocshLoad("/home/jeonglee/gitsrc/EPICS-IOC-demo/iocsh/training_device.iocsh", "PREFIX=MYDEMO:,DEVICE=SIM3:,DATABASE_TOP=/home/jeonglee/gitsrc/EPICS-IOC-demo/db,PORT_NAME=TCP3, PORT=9401, ASYNTRACE=")
####################################################################################################
############ START of training_device.iocsh ########################################################
drvAsynIPPortConfigure("TCP3", "127.0.0.1:9401", 0, 0, 0)
asynOctetSetInputEos("TCP3", 0, "\n")
asynOctetSetOutputEos("TCP3", 0, "\n")
asynSetTraceMask(TCP3, -1, ERROR|FLOW|DRIVER)
dbLoadRecords("/home/jeonglee/gitsrc/EPICS-IOC-demo/db/training.db", "P=MYDEMO:,R=SIM3:,PORT=TCP3")
############ END of training_device.iocsh ##########################################################
####################################################################################################
iocInit
Starting iocInit
############################################################################
## EPICS R7.0.7-github.com/jeonghanlee/EPICS-env
## Rev. R7.0.7-dirty
## Rev. Date Git: 2022-09-07 13:50:35 -0500
############################################################################
iocRun: All initialization complete
ClockTime_Report #-- Example site-specific utility
Program started at 2025-04-10 16:00:42.284773
#st.cmd Not comment to print out everything you write here, so you can see this comment. "How are you doing?"
7.0.7 >
3. Verify Operation (Terminal 3)
Use CA client tools to interact with the PVs for each instance. Ensure the EPICS environment is sourced in this terminal.
# Terminal 3
# First, check the initial values (likely empty or zero)
$ caget MYDEMO:SIM{1..3}:Cmd-RB
MYDEMO:SIM1:Cmd-RB
MYDEMO:SIM2:Cmd-RB
MYDEMO:SIM3:Cmd-RB

# Send a unique command to each instance using caput
$ caput MYDEMO:SIM1:Cmd "GetID?"
$ caput MYDEMO:SIM2:Cmd "GetID?"
$ caput MYDEMO:SIM3:Cmd "GetID?"

# Now, read back the replies using caget
# The simulator (using advanced_connection_handler.sh) should reply with its PID
$ caget MYDEMO:SIM{1..3}:Cmd-RB
MYDEMO:SIM1:Cmd-RB             1204665  # <-- Example PID reply for Sim 1
MYDEMO:SIM2:Cmd-RB             1204667  # <-- Example PID reply for Sim 2
MYDEMO:SIM3:Cmd-RB             1204669  # <-- Example PID reply for Sim 3


# Now, test the "GetTemp?" command for each instance
$ caput MYDEMO:SIM1:Cmd "GetTemp?"
$ caput MYDEMO:SIM2:Cmd "GetTemp?"
$ caput MYDEMO:SIM3:Cmd "GetTemp?"

# Read back the temperature replies
# The simulator should reply with a random number between 0 and 100
$ caget MYDEMO:SIM{1..3}:Cmd-RB
MYDEMO:SIM1:Cmd-RB             60       # <-- Example Temp reply for Sim 1
MYDEMO:SIM2:Cmd-RB             83       # <-- Example Temp reply for Sim 2
MYDEMO:SIM3:Cmd-RB             61       # <-- Example Temp reply for Sim 3
Successfully sending different commands (GetID?, GetTemp?) and receiving the expected, distinct replies for each instance confirms that the multi-device configuration loaded via st3.cmd and iocshLoad is working correctly, and the IOC is communicating independently with each simulator.
Benefits of the iocshLoad Approach
Let’s review why using iocshLoad with a reusable snippet file (training_device.iocsh) is generally more effective for managing multiple similar devices compared to writing all configuration commands directly in the main startup script (st3.cmd).
-
Reusability: The core logic for configuring one simulator connection resides in one place (
training_device.iocsh). This logic is reused three times simply by callingiocshLoadwith different parameters (port, names, etc.). -
Maintainability: If the standard way to configure this type of simulated device needs to change (e.g., adding another Asyn command, modifying the dbLoadRecords call), you only need to edit the single snippet file (
training_device.iocsh). All three instances will automatically use the updated configuration the next time the IOC starts. If configured directly inst3.cmd, you would need to find and edit the command block for all three instances, increasing effort and the risk of mistakes. -
Readability & Clarity: The
st3.cmdfile becomes much shorter and focuses on what devices are being configured (listing parameters) rather than the low-level details of how each is configured. TheiocshLoadlines clearly indicate that a standard configuration block is being loaded for each instance. -
Standardization: This method encourages defining a standard, well-documented way (the
.iocshsnippet) for configuring a specific type of device or connection, promoting consistency across potentially many IOCs within ALS-U. -
Troubleshooting & Selective Disabling: When a system with multiple devices is operational, imagine one device malfunctions. Instead of stopping the entire IOC or commenting out a large block of potentially complex direct configuration commands, you can simply add a
#character in front of the specificiocshLoadline corresponding to the faulty device inst3.cmd. This quickly and cleanly disables that single device upon IOC restart, allowing the rest of the system to function while the issue is investigated. Furthermore, for focused debugging, you can easily uncomment that same iocshLoad line (perhaps in a separate test IOC instance) and add diagnostic flags, like theASYNTRACE=option shown in the example, without altering the configuration of other devices.
While there’s a small overhead in creating the initial snippet file and understanding macro substitution, the advantages for configuring multiple similar devices, especially in terms of long-term maintenance, scalability, and operational flexibility, make the iocshLoad method a highly effective and recommended practice in the ALS-U EPICS IOC development.
Assignments or Questions for the further understanding.
- When you do
cagetorcaputin Terminal 3, can you check what kind of messages you can see inTerminal 2(the running IOC console)? Pay attention when interacting with PVs associated withSIM3:(TCP3), as Asyn trace was enabled for that instance.
4.4 Simulating a TC-32 Temperature Monitoring Device
This lesson introduces the tc32_emulator.bash script, designed to simulate the data output of a simple 32-channel temperature monitoring device. Unlike a server that waits for commands, this emulator continuously pushes simulated data over a network connection, mimicking devices that stream readings. This is valuable for testing EPICS IOCs or other clients that need to parse such a data stream and for how we can practice to build the EPICS record database by using .template and .substitutions files.
Lesson Overview
In this lesson, you will learn to:
- Understand the purpose and function of the
tc32_emulator.bashscript. - Identify the requirements and dependencies for running the script.
- Run the emulator, specifying default or custom ports.
- Observe the simulated data stream using tools like
socatornetcat. - Understand the data format and update cycle of the emulator.
- Manually run multiple instances on different ports.
Requirements Recap
This lesson assumes you have:
- Access to a Linux environment with standard shell tools (bash).
socatinstalled (for creating the TCP-PTY bridge).bcinstalled (for floating-point temperature simulation).mktempinstalled (part of coreutils, usually present).
The TC-32 Emulator Script (tc32_emulator.bash)
This script uses socat to create a network endpoint (TCP port) that emulates a serial device sending continuous temperature readings for 32 channels.
Here is the code for tc32_emulator.bash:
#!/usr/bin/env bash
#
#  The program is free software: you can redistribute
#  it and/or modify it under the terms of the GNU General Public License
#  as published by the Free Software Foundation, either version 2 of the
#  License, or any newer version.
#
#  This program is distributed in the hope that it will be useful, but WITHOUT
#  ANY WARRANTY; without even the implied warranty of MERCHANTABILITY or
#  FITNESS FOR A PARTICULAR PURPOSE.  See the GNU General Public License for
#  more details.
#
#  You should have received a copy of the GNU General Public License along with
#  this program. If not, see https://www.gnu.org/licenses/gpl-2.0.txt
#
#  Usage: ./tc_emulator.bash                (uses default port)
#         ./tc_emulator.bash --port 9399    (uses 9399 port)
#
# - author : Jeong Han Lee, Dr.rer.nat.
# - email  : jeonglee@lbl.gov
#

set -e  # Exit immediately if a command exits with a non-zero status

declare -a temps  # Declare an array to hold temperature values

# Check required commands are available
for cmd in socat bc mktemp; do
  command -v $cmd >/dev/null 2>&1 || { printf "%s is required\n" "$cmd"; exit 1; }
done

DEFAULT_PORT="9399"
PORT=""

# Parse command-line arguments for custom port
while [[ $# -gt 0 ]]; do
  case $1 in
    --port)
        if [[ -z "$2" || "$2" =~ ^-- ]]; then
            printf "Error: --port requires a value.\nUsage: %s [--port PORT]\n" "$0"
            exit 1
        fi
        PORT="$2";
        shift 2
        ;;
    *)
        printf "Unknown option: %s\nUsage: %s [--port PORT]\n" "$1" "$0";
        exit 1
        ;;
  esac
done

PORT="${PORT:-$DEFAULT_PORT}"

SOCAT_LOG=$(mktemp)

# Start socat in the background to create a PTY and listen on TCP port
socat -d -d PTY,raw,echo=0 TCP-LISTEN:$PORT,reuseaddr,fork 2>&1 | tee "$SOCAT_LOG" &
SOCAT_PID=$!  # Store the PID of the socat process

function cleanup
{
  kill "$SOCAT_PID" 2>/dev/null
  rm -f "$SOCAT_LOG"
}
trap cleanup EXIT

# Wait for the PTY device to appear (poll every second, up to 20 times)
SERIAL_DEV=""  # Initialize variable for PTY device path
for i in {1..20}; do
  SERIAL_DEV=$(grep -o '/dev/pts/[0-9]*' "$SOCAT_LOG" | tail -1)  # Search for PTY path in socat log
  [ -n "$SERIAL_DEV" ] && break  # Break if PTY device found
  sleep 1  # Wait 1 second before retrying
done

# If PTY device was not found, print error and exit
if [ -z "$SERIAL_DEV" ]; then
  printf "Failed to detect PTY device from socat.\n"
  if kill -0 "$SOCAT_PID" 2>/dev/null; then
    kill "$SOCAT_PID"
  fi
  exit 1
fi

printf "Emulator running on port %s\n" "$PORT"
printf "Serial emulated at: %s\n" "$SERIAL_DEV"

# Initialize temperature array with random values between 10 and 90
# $RANDOM generates a new random number in the range [0, 32767]
for i in $(seq 0 31); do
  temps[$i]=$(echo "scale=1; 10 + ($RANDOM/32767)*80" | bc)
done

# Function to generate a new temperature or error for a channel
function generate_temp
{
  local idx=$1  # Channel index (0-based)
  # Generate a random float between 0 and 1
  local rand=$(echo "scale=4; $RANDOM/32767" | bc)
  local change;
  local current_temp;
  local new_temp;

  # Generate a small random change between -0.75 and 0.75
  change=$(echo "scale=4; ($RANDOM/32767 - 0.5) * 1.5" | bc)
  current_temp=${temps[$idx]}
  #new temp between 10 and 90
  new_temp=$(echo "scale=1; t=$current_temp+$change; if (t<10) t=10; if (t>90) t=90; t" | bc)
  temps[$idx]=$new_temp
  printf "%s\n" "$new_temp"
}

previous_time=$(date +%s.%N)
# Main loop: update and send temperature readings forever
#
while true; do
  for i in $(seq 1 32); do
#    Each generate_temp takes around between 0.006 sec and 0.015 seconds
#    Each Channel should be updated around between 0.192 and 0.48 seconds
#    So, we expect to see that time difference will be between +0.2 and +0.5 via
#    camonitor -t sI PVNAME
#    PVNAME         +0.410798 17.5535
#    PVNAME         +0.366885 18.2611
#    PVNAME         +0.346312 17.7282
#    PVNAME         +0.413986 18.1144
#
    current_time=$(date +%s.%N)
    time_diff=$(echo "$current_time - $previous_time" | bc)
    val=$(generate_temp $((i - 1)))
    timestamp=$(date '+%Y-%m-%d %H:%M:%S')
    printf "CH%02d: %s\n" "$i" "$val" > "$SERIAL_DEV"
#    printf "Δt=%ss CH%02d: %s\n" "$time_diff" "$i" "$val" > "$SERIAL_DEV"
    previous_time=$current_time
  done
done
Make the script executable:
$ chmod +x tc32_emulator.bash
How the Emulator Works
-
TCP-PTY Bridge (
socat): The script starts socat to listen on a specific TCP port (default 9399). When a client connects, socat creates a pseudo-terminal (PTY) device (e.g.,/dev/pts/5) and connects the TCP session to it. This makes the TCP connection look like a serial port to the rest of the system. -
Temperature Simulation:
- An internal array holds 32 temperature values.
- Temperatures are initialized randomly between 10.0 and 90.0.
- In each cycle, every temperature is updated with a small random change (
±0.75), ensuring values stay within the10.0-90.0range. - We assumes that temperature unit is
degC.
- Data Streaming:
- The script enters an infinite loop.
- It iterates through channels 1 to 32.
- For each channel, it gets the latest simulated temperature.
- It formats the data as
CH<XX>: <TEMP>\n(e.g.,CH01: 45.2\n). - Crucially, it writes this string directly to the PTY device (
$SERIAL_DEV). - socat automatically forwards this data from the PTY to any connected TCP client.
- Timing: After writing all 32 channel readings, the script pauses for 2 seconds (
sleep 2) before generating and sending the next batch. - Cleanup: When you stop the script (
Ctrl+C), it automatically kills the background socat process thanks to the trap command.
Running the Emulator
Navigate to the directory containing the script in a terminal.
# Option 1: Run with default port (9399)
$ ./tc32_emulator.bash

# Option 2: Run with a custom port (e.g., 10001)
$ ./tc32_emulator.bash --port 10001
The script will print the port it’s listening on and the PTY device path (e.g., /dev/pts/X). Leave the emulator running in this terminal.
Testing / Observing the Emulator Output
Since this emulator sends data continuously, you connect to it to receive that data. Open another terminal window and use socat or netcat (nc).
Using socat:
# Connect to the emulator running on localhost:9399
$ socat - TCP:localhost:9399
Using netcat (nc):
# Connect to the emulator running on localhost:9399
nc localhost 9399
Using telnet:
# Connect to the emulator running on localhost:9399
telnet localhost 9399
You should see the stream of CHXX: TEMP data appearing in your terminal, with a new block of 32 lines appearing every 2 seconds:
CH01: 17.9643
CH02: 26.4624
CH03: 17.4912
...
CH21: 49.5205
CH22: 34.6579
CH23: 66.5088
CH24: 58.4350
...
CH30: 82.5187
CH31: 33.3783
CH32: 10.5070
...
Disconnect the client (socat or nc) with Ctrl+C. Stop the emulator itself with Ctrl+C in its own terminal.
Running Multiple Emulator Instances
While the underlying socat command uses fork (allowing multiple clients to connect and see the same data stream), the script itself manages only one stream of simulated data directed to the single PTY it detected. To simulate multiple independent TC-32 devices, you need to run multiple instances of the tc32_emulator.bash script, ensuring each uses a different TCP port.
-
Open multiple terminal windows. Navigate to the script directory in each.
-
Run the emulator in each terminal, specifying a unique port for each instance:
# Terminal 1
$ ./tc32_emulator.bash --port 9039

# Terminal 2
$ ./tc32_emulator.bash --port 9040

# Terminal 3
$ ./tc32_emulator.bash --port 9041
Or you can use parallel
$ parallel ./tc32_emulator.bash --port ::: 9399 9400 9401
- Test Each Instance: Use separate
socatorncterminals to connect to ports9039,9040, and9041respectively to observe their independent data streams.
# Terminal A
$ socat - TCP:localhost:9399

# Terminal B
$ nc localhost:9400

# Terminal C
$ telnet localhost 9401
- Stopping Emulators: Use
Ctrl+Cin each terminal where an emulator instance is running.
Conclusion
The tc32_emulator.bash script provides a convenient way to simulate a device that continuously streams data over a network connection. By using socat to bridge TCP to a PTY and having the script write simulated data to that PTY, it effectively mimics the behavior of certain types of hardware, making it a useful tool for testing and developing client applications like EPICS IOCs that need to parse specific data formats arriving periodically. Remember that unlike command-response servers, clients connect to this emulator primarily to receive its data stream.
4.5 Database Templates and Substitution
Manually defining records for multiple similar devices or channels, like the 32 channels of our TC-32 temperature simulator, quickly becomes tedious and error-prone. Imagine writing 32 identical ai records, only changing a channel number or port name! This is where EPICS database templates (.template files) and substitution files (.substitutions files) become indispensable tools.
This section will show you how to define a generic record structure once in a .template file, use a .substitutions file to specify the variations needed for each instance (like different channel numbers or PV names), and use the EPICS build system (Db/Makefile) to automatically generate a complete .db database file containing all the necessary records. This generated - expanding - .db file is then loaded by the IOC startup script (st.cmd).
By the end of this section, you will understand the workflow for using templates and substitutions to efficiently configure large numbers of similar records at build time. We will also briefly touch upon loading substitutions directly at runtime as an alternative.
Lesson Overview
In this lesson, you will learn to:
- Understand the roles of
.template,.substitutions, andDb/Makefilein the build-time generation process. - Create a StreamDevice protocol file (
.proto) for parsing a specific data format (using the TC-32 emulator as an example). - Create a reusable database template file (
.template) with macros to define a generic record structure for a single device channel. - Create a substitution file (
.substitutions) to specify the macro values needed to instantiate the template for multiple channels (e.g., all 32 channels of the TC-32). - Modify your application’s
Db/Makefileto define rules that process the template and substitution files into a single generated.dbfile. - Build your EPICS IOC application to execute the Makefile rules and generate the
.dbfile. - Update your IOC startup script (
st.cmd) to load the generated.dbfile and configure the necessary Asyn port, demonstrating the build-time approach. - Briefly understand the runtime substitution method using dbLoadTemplate.
- Verify using CA client tools that multiple channel records have been loaded correctly and are receiving data from the simulator.
Requirements Recap
This lesson assumes you have:
- Completed the previous sections, including running the TC-32 emulator.
- Access to your EPICS IOC application source directory (e.g.,
jeonglee-DemoApp) andiocBootdirectory. - Familiarity with basic EPICS build concepts (
make).
Demonstrating the Inefficient Method: Loading Templates Manually at Runtime
To understand the value of database templates and substitution files processed primarily at build time, let’s first see how tedious it would be to configure 32 channels using techniques we’ve covered so far, specifically by repeatedly loading a template file directly in the IOC startup script using the dbLoadRecords command. This is essentially performing template substitution at runtime.
Generate IOC based on the Second IOC jeonglee-Demo
While I am working on the simulator, I changed the folder and repository name as EPICS-IOC-demo. Thus this is the Case 3 example in Expanding the First IOC. Ensure your $TOP environment variable points to the root of your EPICS-IOC-demo directory (e.g., /home/jeonglee/gitsrc/EPICS-IOC-demo).
# Navigate to your gitsrc directory (or wherever you run your generation script from)
$ cd /home/jeonglee/gitsrc
$ bash tools/generate_ioc_structure.bash -l training -p jeonglee-Demo -f EPICS-IOC-demo

...
>> We are now creating a folder with >>> EPICS-IOC-demo <<<
>> If the folder is exist, we can go into EPICS-IOC-demo
>> in the >>> /home/jeonglee/gitsrc <<<
>> Entering into /home/jeonglee/gitsrc/EPICS-IOC-demo
>> makeBaseApp.pl -t ioc
jeonglee-Demo exists, not modified.
>>> Making IOC application with IOCNAME training-jeonglee-Demo and IOC ioctraining-jeonglee-Demo
>>>
>> makeBaseApp.pl -i -t ioc -p jeonglee-Demo
>> makeBaseApp.pl -i -t ioc -p training-jeonglee-Demo
Using target architecture linux-x86_64 (only one available)
>>>

>>> IOCNAME : training-jeonglee-Demo
>>> IOC     : ioctraining-jeonglee-Demo
>>> iocBoot IOC path /home/jeonglee/gitsrc/EPICS-IOC-demo/iocBoot/ioctraining-jeonglee-Demo

...

>> leaving from /home/jeonglee/gitsrc/EPICS-IOC-demo
>> We are in /home/jeonglee/gitsrc
You sucessfully create the new IOC instance based on the same IOC application.
The StreamDevice Protocol (tc32.proto)
First, we need a StreamDevice protocol file that defines how the IOC should read data from the TC-32 emulator. Based on the emulator’s output format (CHXX: <TEMP>\n), we can define a simple protocol to extract the floating-point temperature value.
Navigate to your application’s Db directory (e.g., ${TOP}/jeonglee-DemoApp/Db/).
# Navigate to your application's Db directory
$ cd ${TOP}/jeonglee-DemoApp/Db
$ vi tc32.proto
Add the following content:
# Protocol for parsing TC-32 emulator output
# The emulator sends "CHXX: <TEMP>\n"
get_temp
{
    # The 'in' directive defines the input pattern.
    # \$1 is replaced by the argument passed from the INP field (the channel number).
    # %f matches a floating-point number.
    in "CH\$1: %f";
}
- Explanation: This protocol defines a single command,
get_temp. TheinpatternCH\$1: %ftells StreamDevice to look for incoming lines that start with “CH”, followed by the argument passed to the protocol (which we will set to the channel number, e.g., “01”), a colon, a space, and then expects a floating-point number (%f). It will extract this floating-point number.
The Database Template (temperature.template)
Next, ensure you have the template file temperature.template in your application’s Db directory. This file defines the structure of a single ai record for one temperature channel, using macros as placeholders.
Create the file temperature.template in your application’s Db directory (e.g., jeonglee-DemoApp/Db/).
$ vi temperature.template
Add the following content:
# Template for a single TC-32 temperature channel record
# An Analog Input record to receive temperature data
record(ai, "$(P)$(R)CH$(CH)")
{
  field(DESC, "TC temperature at Channel $(CH)")     # Description using the channel macro
  field(DTYP, "stream")                              # Use the 'stream' device support
  field( INP, "@tc32.proto get_temp($(CH)) $(PORT)") # Reference protocol, command, args, and port
  field( EGU, "$(EGU)")                              # Units
  field(SCAN, "I/O Intr")                            # Interrupt-Driven Scan
}
- Explanation: This defines a single
airecord structure. Its PV name uses$(P),$(R), and$(CH)macros. The SCAN field set toI/O Intrmeans the record will process whenever new data arrives for its channel via StreamDevice.
Building the IOC Application (Initial Build)
Before loading these files, rebuild your IOC application. Navigate to your ${TOP} folder and run make. This ensures the build system is aware of the new .proto and .template files and copies them to the correct location (${TOP}/db). While we are demonstrating runtime loading in this section, having the files installed by the build system is still good practice.
$ make
You can check that the files were copied:
$ ls db/
# You should see tc32.proto and temperature.template listed along with other files
Update st.cmd (Manual Runtime Loading)
Now, let’s demonstrate the inefficient way to configure all 32 channels using the temperature.template. Navigate to your IOC instance’s boot directory (e.g., iocBoot/ioctraining-jeonglee-Demo/) and edit the st.cmd file.
# Navigate to your iocBoot directory
$ cd ${TOP}/iocBoot/ioctraining-jeonglee-Demo/
$ vi st.cmd
Here’s the revised st.cmd:
#!../../bin/linux-x86_64/jeonglee-Demo

< envPaths

epicsEnvSet("DB_TOP", "$(TOP)/db")

epicsEnvSet("STREAM_PROTOCOL_PATH", "$(DB_TOP)")

epicsEnvSet("PREFIX_MACRO", "MYDEMO:")
epicsEnvSet("DEVICE_MACRO", "TC32:")

epicsEnvSet("IOCNAME", "training-jeonglee-Demo")
epicsEnvSet("IOC", "ioctraining-jeonglee-Demo")

dbLoadDatabase "$(TOP)/dbd/jeonglee-Demo.dbd"
jeonglee_Demo_registerRecordDeviceDriver pdbbase

cd "${TOP}/iocBoot/${IOC}"

epicsEnvSet("ASYN_PORT_NAME", "LocalTCPServer")
epicsEnvSet("TARGET_HOST",    "127.0.0.1")
epicsEnvSet("TARGET_PORT",    "9399")
drvAsynIPPortConfigure("$(ASYN_PORT_NAME)", "$(TARGET_HOST):$(TARGET_PORT)", 0, 0, 0)

asynOctetSetInputEos("$(ASYN_PORT_NAME)",  0, "\n")
asynOctetSetOutputEos("$(ASYN_PORT_NAME)", 0, "\n")

# --- START: Manually loading the database template file for each channel ---
# This performs runtime substitution for each record instance individually.
dbLoadRecords("$(DB_TOP)/temperature.template", "P=$(PREFIX_MACRO),R=$(DEVICE_MACRO),PORT=$(ASYN_PORT_NAME),EGU=Celsius,CH=01")
dbLoadRecords("$(DB_TOP)/temperature.template", "P=$(PREFIX_MACRO),R=$(DEVICE_MACRO),PORT=$(ASYN_PORT_NAME),EGU=Celsius,CH=02")
dbLoadRecords("$(DB_TOP)/temperature.template", "P=$(PREFIX_MACRO),R=$(DEVICE_MACRO),PORT=$(ASYN_PORT_NAME),EGU=Celsius,CH=03")
dbLoadRecords("$(DB_TOP)/temperature.template", "P=$(PREFIX_MACRO),R=$(DEVICE_MACRO),PORT=$(ASYN_PORT_NAME),EGU=Celsius,CH=04")
dbLoadRecords("$(DB_TOP)/temperature.template", "P=$(PREFIX_MACRO),R=$(DEVICE_MACRO),PORT=$(ASYN_PORT_NAME),EGU=Celsius,CH=05")
dbLoadRecords("$(DB_TOP)/temperature.template", "P=$(PREFIX_MACRO),R=$(DEVICE_MACRO),PORT=$(ASYN_PORT_NAME),EGU=Celsius,CH=06")
dbLoadRecords("$(DB_TOP)/temperature.template", "P=$(PREFIX_MACRO),R=$(DEVICE_MACRO),PORT=$(ASYN_PORT_NAME),EGU=Celsius,CH=07")
dbLoadRecords("$(DB_TOP)/temperature.template", "P=$(PREFIX_MACRO),R=$(DEVICE_MACRO),PORT=$(ASYN_PORT_NAME),EGU=Celsius,CH=08")
dbLoadRecords("$(DB_TOP)/temperature.template", "P=$(PREFIX_MACRO),R=$(DEVICE_MACRO),PORT=$(ASYN_PORT_NAME),EGU=Celsius,CH=09")
dbLoadRecords("$(DB_TOP)/temperature.template", "P=$(PREFIX_MACRO),R=$(DEVICE_MACRO),PORT=$(ASYN_PORT_NAME),EGU=Celsius,CH=10")
dbLoadRecords("$(DB_TOP)/temperature.template", "P=$(PREFIX_MACRO),R=$(DEVICE_MACRO),PORT=$(ASYN_PORT_NAME),EGU=Celsius,CH=11")
dbLoadRecords("$(DB_TOP)/temperature.template", "P=$(PREFIX_MACRO),R=$(DEVICE_MACRO),PORT=$(ASYN_PORT_NAME),EGU=Celsius,CH=12")
dbLoadRecords("$(DB_TOP)/temperature.template", "P=$(PREFIX_MACRO),R=$(DEVICE_MACRO),PORT=$(ASYN_PORT_NAME),EGU=Celsius,CH=13")
dbLoadRecords("$(DB_TOP)/temperature.template", "P=$(PREFIX_MACRO),R=$(DEVICE_MACRO),PORT=$(ASYN_PORT_NAME),EGU=Celsius,CH=14")
dbLoadRecords("$(DB_TOP)/temperature.template", "P=$(PREFIX_MACRO),R=$(DEVICE_MACRO),PORT=$(ASYN_PORT_NAME),EGU=Celsius,CH=15")
dbLoadRecords("$(DB_TOP)/temperature.template", "P=$(PREFIX_MACRO),R=$(DEVICE_MACRO),PORT=$(ASYN_PORT_NAME),EGU=Celsius,CH=16")
dbLoadRecords("$(DB_TOP)/temperature.template", "P=$(PREFIX_MACRO),R=$(DEVICE_MACRO),PORT=$(ASYN_PORT_NAME),EGU=Celsius,CH=17")
dbLoadRecords("$(DB_TOP)/temperature.template", "P=$(PREFIX_MACRO),R=$(DEVICE_MACRO),PORT=$(ASYN_PORT_NAME),EGU=Celsius,CH=18")
dbLoadRecords("$(DB_TOP)/temperature.template", "P=$(PREFIX_MACRO),R=$(DEVICE_MACRO),PORT=$(ASYN_PORT_NAME),EGU=Celsius,CH=19")
dbLoadRecords("$(DB_TOP)/temperature.template", "P=$(PREFIX_MACRO),R=$(DEVICE_MACRO),PORT=$(ASYN_PORT_NAME),EGU=Celsius,CH=20")
dbLoadRecords("$(DB_TOP)/temperature.template", "P=$(PREFIX_MACRO),R=$(DEVICE_MACRO),PORT=$(ASYN_PORT_NAME),EGU=Celsius,CH=21")
dbLoadRecords("$(DB_TOP)/temperature.template", "P=$(PREFIX_MACRO),R=$(DEVICE_MACRO),PORT=$(ASYN_PORT_NAME),EGU=Celsius,CH=22")
dbLoadRecords("$(DB_TOP)/temperature.template", "P=$(PREFIX_MACRO),R=$(DEVICE_MACRO),PORT=$(ASYN_PORT_NAME),EGU=Celsius,CH=23")
dbLoadRecords("$(DB_TOP)/temperature.template", "P=$(PREFIX_MACRO),R=$(DEVICE_MACRO),PORT=$(ASYN_PORT_NAME),EGU=Celsius,CH=24")
dbLoadRecords("$(DB_TOP)/temperature.template", "P=$(PREFIX_MACRO),R=$(DEVICE_MACRO),PORT=$(ASYN_PORT_NAME),EGU=Celsius,CH=25")
dbLoadRecords("$(DB_TOP)/temperature.template", "P=$(PREFIX_MACRO),R=$(DEVICE_MACRO),PORT=$(ASYN_PORT_NAME),EGU=Celsius,CH=26")
dbLoadRecords("$(DB_TOP)/temperature.template", "P=$(PREFIX_MACRO),R=$(DEVICE_MACRO),PORT=$(ASYN_PORT_NAME),EGU=Celsius,CH=27")
dbLoadRecords("$(DB_TOP)/temperature.template", "P=$(PREFIX_MACRO),R=$(DEVICE_MACRO),PORT=$(ASYN_PORT_NAME),EGU=Celsius,CH=28")
dbLoadRecords("$(DB_TOP)/temperature.template", "P=$(PREFIX_MACRO),R=$(DEVICE_MACRO),PORT=$(ASYN_PORT_NAME),EGU=Celsius,CH=29")
dbLoadRecords("$(DB_TOP)/temperature.template", "P=$(PREFIX_MACRO),R=$(DEVICE_MACRO),PORT=$(ASYN_PORT_NAME),EGU=Celsius,CH=30")
dbLoadRecords("$(DB_TOP)/temperature.template", "P=$(PREFIX_MACRO),R=$(DEVICE_MACRO),PORT=$(ASYN_PORT_NAME),EGU=Celsius,CH=31")
dbLoadRecords("$(DB_TOP)/temperature.template", "P=$(PREFIX_MACRO),R=$(DEVICE_MACRO),PORT=$(ASYN_PORT_NAME),EGU=Celsius,CH=32")
# --- END: Manually loading the database template file ---

iocInit

ClockTime_Report
Running and Verification
Now, run the simulator and the IOC to see this configuration in action.
- Start the TC-32 Emulator: Open a terminal, navigate to your simulator directory, and start the emulator on the default port, 9399.
# Terminal 1 (Simulator)
$ cd ${TOP}/simulator  # Adjust path as needed
$ ./tc32_emulator.bash
Leave this running.
- Start the IOC: Open a new terminal, source your EPICS environment, navigate to your
iocBootdirectory, and run the updatedst.cmd.
# Terminal 2 (IOC)
$ cd ${TOP}/iocBoot/ioctraining-jeonglee-Demo/
$ ./st.cmd
Observe the IOC startup output. You should see messages indicating the Asyn port configuration and the loading of 32 records, one after another, as each dbLoadRecords command is executed. You can check the available signals via dbl.
- Monitoring PVs: Open a new terminal, source your EPICS environment, and use CA client tools like
cagetorcamonitorto verify the records were loaded and are receiving data. The PVs should be namedMYDEMO:TC32:CHXX(based on the macros used inst.cmd).
# Terminal 3 (caget, camonitor)

# Check specific channels
$ caget MYDEMO:TC32:CH10
$ caget MYDEMO:TC32:CH10.EGU
$ caget MYDEMO:TC32:CH10.DESC

# Monitor a few channels to see data streaming
$ camonitor MYDEMO:TC32:CH13
$ camonitor -t sI MYDEMO:TC32:CH13 # Show timestamps by CA server incremental timestamps

# Check if all 32 PVs exist
$ caget MYDEMO:TC32:CH{01..32}
$ camonitor -t sI MYDEMO:TC32:CH{01..32}
For large numbers of PVs, using brace expansion as shown (CH{01..32}) can help, but be careful with shell compatibility.
Manual Configuration is Tedious
While the above method works, it’s clear that manually adding and maintaining 32 separate dbLoadRecords lines in st.cmd for a single device like the TC-32 is highly inefficient.
This approach is unsustainable for real-world systems with hundreds or thousands of channels. It’s prone to copy-paste errors and maintenance headaches.
Fortunately, EPICS provides a robust solution to this exact problem using database templates and substitution files processed primarily at build time, allowing us to define the structure once and instantiate it many times automatically before the IOC starts. The resulting single database file is then loaded efficiently at IOC loading time with a single dbLoadRecords command.
The Efficient Method: Build-Time Database Generation
The efficient and standard EPICS method for handling configurations like the 32 channels of the TC-32 emulator involves using a .template file (which you’ve already created) in conjunction with a .substitutions file and the EPICS build system (Db/Makefile). This process allows you to define the record structure once and create many instances automatically at build time using the standard implicit rules provided by EPICS Base. The output of this process is a standard .db file ready to be loaded by the IOC.
The Substitution File (TC-32.substitutions)
The .substitutions file is where you define how the template should be instantiated at build time. It provides the build system with a list of macro value sets to use when expanding the template file.
record(ai,"$(P)$(R)CH$(CH)")
{
    field(DESC, "TC temperature at Channel $(CH)")
    field(DTYP, "stream")
    field( INP, "@tc32.proto get_temp($(CH)) $(PORT)")
    field( EGU, "$(EGU)")
    field(SCAN, "I/O Intr")
}
You can see macros P, R, CH, PORT, EGU. You can select which macros can be defined within the .substitutions file (build-time substitution) and which are left for st.cmd or .iocsh loading time.
In the .substitutions file below, you’ve chosen to define EGU as a global value that applies to all instances defined in the file, and you’ve provided specific values for the CH macro for each of the 32 channels. The P, R, and PORT macros are intentionally not given fixed values here, meaning they will remain as $(P), $(R), and $(PORT) macros in the final TC-32.db file generated by the build process. Their values will be provided later when the generated database file is loaded by the IOC at runtime using dbLoadRecords.
Create the file TC-32.substitutions in your application’s Db directory (e.g., ${TOP}/jeonglee-DemoApp/Db/).
# Navigate to your application's Db directory
$ cd ${TOP}/jeonglee-DemoApp/Db/
$ vi TC-32.substitutions
Add the following content:
# Global macros apply to all instances in this file
global {EGU="Celsius"}
# This file references the template file to expand
file "temperature.template"
{
# Define the pattern of macros expected by the template
# The order here must match the order of values provided below (only CH in this case)
pattern {CH}
# List the sets of macro values for each instance
# One line below per channel (32 lines for CH01 to CH32)
# Temperature inputs
{01}
{02}
{03}
{04}
{05}
{06}
{07}
{08}
{09}
{10}
{11}
{12}
{13}
{14}
{15}
{16}
{17}
{18}
{19}
{20}
{21}
{22}
{23}
{24}
{25}
{26}
{27}
{28}
{29}
{30}
{31}
{32}
}
-
global {EGU="Celsius"}: Sets the value of the$(EGU)macro to “Celsius” for all records instantiated using this substitution file. This substitution happens during the build process. -
file
temperature.template: This line specifies which template file the subsequent patterns and values should be applied to. -
pattern {CH}: This line defines the order of macros that will be substituted for each instance from the list below ({...}). In this case, only theCHmacro is directly substituted from the list. This substitution happens during the build process. -
{01},{02}, …,{32}: Each of these lines provides the value for theCHmacro for one instance of the template. The build tool will generate one set of records for each line here. -
The macros
P,R, andPORTfrom the template are not included in the pattern list and are not in the global block. This means they will remain as$(P),$(R), and$(PORT)macros in the finalTC-32.dbfile generated by the build process. Their values will be provided later when the.dbfile is loaded bydbLoadRecordsin thest.cmd.
Integrating with the Build System (Db/Makefile)
The EPICS build system uses the Db/Makefile to understand which database files need to be built and installed. For standard cases where a target .db file should be generated by processing a .template file using a .substitutions file with the same prefix, simply listing the target .db file in the DB variable is sufficient to trigger the automatic generation by the EPICS build rules. The build system looks for files named target.substitutions when it sees target.db in the DB variable.
You also need to list your source files (.template, .substitutions, .proto) using appropriate variables to ensure the build system is aware of them and copies them to the correct installation directory (${TOP}/db).
Edit the Db/Makefile in your application’s Db directory (e.g., ${TOP}/jeonglee-DemoApp/Db/Makefile).
DB += TC-32.db
# DB += $(patsubst ../%, %, $(wildcard ../*.template))         # <-- we don't need this
# DB += $(patsubst ../%, %, $(wildcard ../*.substitutions))    # <-- we don't need this
DB += $(patsubst ../%, %, $(wildcard ../*.proto))
-
DB += TC-32.db: This line lists the target database fileTC-32.dbin the DB variable. This informs the build system thatTC-32.dbis a file that should be built and installed. Its presence, along withTC-32.substitutionshaving the sameTC-32prefix internally, triggers the build-time processing. -
The subsequent lines using
DB += $(patsubst ../%, %, $(wildcard ...))list source and configuration files (.proto) in the DB variable. This is intended to ensure these files are also handled by the build system, likely resulting in them being copied to the final db directory. -
When you run make, the EPICS build system processes these instructions. The presence of
TC-32.dbin the DB variable, combined with the existence oftemperature.templateandTC-32.substitutions(which references the template), triggers the build system’s underlying rules to processtemperature.templateusing the substitutions inTC-32.substitutionsand generate theTC-32.dbfile.
Building the IOC Application (Build-Time Generation)
Now that you’ve created the .substitution file and updated the Db/Makefile to list the files, navigate to your application’s top-level directory and run make.
# Navigate to your application's top directory
$ make
The make command, guided by the EPICS build rules and your Db/Makefile, will perform the necessary steps to build your application and process your database files. It will specifically execute a command to process temperature.template using the substitutions in TC-32.substitutions and generate the TC-32.db file. Both the generated TC-32.db and your source file (tc32.proto) should be copied to your runtime DB directory (e.g., ${TOP}/db).
You can verify the generated file exists:
$ ls db/
# You should see TC-32.db and tc32.proto
You can also inspect the contents of TC-32.db with a text editor. You will see 32 record definitions (one for each line in your .substitutions file). Each record will have CH and EGU fields with the values “01” through “32” and “Celsius” respectively, but the INP field and the record name will still contain $(P), $(R), and $(PORT) macros, as these were not substituted by your .substitutions file’s pattern.
Update st.cmd (Loading the Generated .db File)
Now, let’s demonstrate the way to configure all 32 channels using the TC-32.db. Navigate to your IOC instance’s boot directory (e.g., iocBoot/ioctraining-jeonglee-Demo/), copy st.cmd to st2.cmd, and edit the st2.cmd
# Navigate to your iocBoot directory
$ cd iocBoot/ioctraining-jeonglee-Demo/
$ vi st2.cmd
#!../../bin/linux-x86_64/jeonglee-Demo

< envPaths

epicsEnvSet("DB_TOP", "$(TOP)/db")

epicsEnvSet("STREAM_PROTOCOL_PATH", "$(DB_TOP)")

# Define macros for the overall device/IOC
epicsEnvSet("PREFIX_MACRO", "MYDEMO:")
epicsEnvSet("DEVICE_MACRO", "TC32:")

epicsEnvSet("IOCNAME", "training-jeonglee-Demo")
epicsEnvSet("IOC", "ioctraining-jeonglee-Demo")

dbLoadDatabase "$(TOP)/dbd/jeonglee-Demo.dbd"
jeonglee_Demo_registerRecordDeviceDriver pdbbase

cd "${TOP}/iocBoot/${IOC}"

epicsEnvSet("ASYN_PORT_NAME", "LocalTCPServer")
epicsEnvSet("TARGET_HOST",    "127.0.0.1")
epicsEnvSet("TARGET_PORT",    "9399")
drvAsynIPPortConfigure("$(ASYN_PORT_NAME)", "$(TARGET_HOST):$(TARGET_PORT)", 0, 0, 0)

asynOctetSetInputEos("$(ASYN_PORT_NAME)", 0, "\n")
asynOctetSetOutputEos("$(ASYN_PORT_NAME)", 0, "\n")

# --- START: Loading the generated database file ---
# This loads the pre-substituted .db file created by the build system.
# Runtime substitution is only needed for the macros NOT substituted at build time (P, R, PORT).
dbLoadRecords("$(DB_TOP)/TC-32.db", "P=$(PREFIX_MACRO),R=$(DEVICE_MACRO),PORT=$(ASYN_PORT_NAME)")
# --- END: Loading the generated database file ---

iocInit

ClockTime_Report
Note that dbLoadRecords is still used, but now it loads the file TC-32.db which contains the 32 record definitions with CH and EGU already fixed. Only P, R, and PORT are substituted at runtime by this single command.
Running and Verification (Build-Time Method)
Now, let’s see the efficient configuration in action. You will run the simulator, start the IOC using the updated st2.cmd file, and verify that the 32 temperature channel records have been loaded and are receiving data using CA client tools.
- Start the TC-32 Emulator: Open a terminal, navigate to your simulator directory, and start the emulator on the chosen port (e.g., 9399).
# Terminal 1 (Simulator)
$ cd simulator # Adjust path as needed
$ ./tc32_emulator.bash
Leave this running.
- Start the IOC: Open a new terminal, source your EPICS environment, navigate to your IOC instance’s boot directory (e.g., iocBoot/ioctraining-jeonglee-Demo/), and run the updated
st2.cmd.
# Terminal 2 (IOC)
$ cd iocBoot/ioctraining-jeonglee-Demo/ # Adjust path as needed
$ ./st2.cmd
Observe the IOC startup output. You should see messages indicating the Asyn port configuration and then the loading of records from TC-32.db. Use dbl in the IOC shell to list the loaded PVs and confirm the MYDEMO:TC32:CHXX records are present.
- Verify Records and Data: Open a third terminal, source your EPICS environment, and use CA client tools like
cagetorcamonitorto verify the records were loaded correctly and are receiving data from the simulator. The PVs should be namedMYDEMO:TC32:CHXX(based on the macros defined inst2.cmdand the channel numbers fixed in the generated.db).
# Terminal 3 (caget, camonitor)
# Check specific channels and their fields
$ caget MYDEMO:TC32:CH10
$ caget MYDEMO:TC32:CH10.EGU # Should show "Celsius" from the global substitution
$ caget MYDEMO:TC32:CH10.DESC

# Monitor a few channels to see data streaming
$ camonitor MYDEMO:TC32:CH13
$ camonitor -t sI MYDEMO:TC32:CH13 # Show timestamps

# Check if all 32 PVs exist and monitor their values
$ caget MYDEMO:TC32:CH{01..32}
$ camonitor -t sI MYDEMO:TC32:CH{01..32}
You should see valid temperature data streaming for all 32 channels, confirming that this efficient method using templates and substitution files successfully configured all the necessary records via a single dbLoadRecords call on the generated .db file.
Alternative: Runtime Substitution with dbLoadTemplate
Build-time generation is the standard and generally preferred method for production environments due to performance and consistency. However, it is also possible to perform the template substitution at runtime using the dbLoadTemplate iocsh command.
The runtime method (dbLoadTemplate) is more flexible, but can slow IOC startup for large databases.
It is not recommended for production at ALS-U.
To use this method, create st3.cmd:
# Navigate to your iocBoot directory
$ cd iocBoot/ioctraining-jeonglee-Demo/
$ vi st3.cmd
#!../../bin/linux-x86_64/jeonglee-Demo

< envPaths

epicsEnvSet("DB_TOP", "$(TOP)/db")

epicsEnvSet("STREAM_PROTOCOL_PATH", "$(DB_TOP)")

# --- REQUIRED for dbLoadTemplate to find the .template file ---
epicsEnvSet("EPICS_DB_INCLUDE_PATH", "$(DB_TOP)")

epicsEnvSet("PREFIX_MACRO", "MYDEMO:")
epicsEnvSet("DEVICE_MACRO", "TC32:")

epicsEnvSet("IOCNAME", "training-jeonglee-Demo")
epicsEnvSet("IOC", "ioctraining-jeonglee-Demo")

dbLoadDatabase "$(TOP)/dbd/jeonglee-Demo.dbd"
jeonglee_Demo_registerRecordDeviceDriver pdbbase

cd "${TOP}/iocBoot/${IOC}"

epicsEnvSet("ASYN_PORT_NAME", "LocalTCPServer")
epicsEnvSet("TARGET_HOST",    "127.0.0.1")
epicsEnvSet("TARGET_PORT",    "9399")
drvAsynIPPortConfigure("$(ASYN_PORT_NAME)", "$(TARGET_HOST):$(TARGET_PORT)", 0, 0, 0)

asynOctetSetInputEos("$(ASYN_PORT_NAME)", 0, "\n")
asynOctetSetOutputEos("$(ASYN_PORT_NAME)", 0, "\n")

# --- START: Loading the substitution file directly at runtime ---
# This command processes TC-32.substitutions and its referenced template
# (temperature.template, found via EPICS_DB_INCLUDE_PATH) at runtime.
dbLoadTemplate("$(DB_TOP)/TC-32.substitutions", "P=$(PREFIX_MACRO),R=$(DEVICE_MACRO),PORT=$(ASYN_PORT_NAME)")
# --- END: Loading the substitution file directly at runtime ---

iocInit

ClockTime_Report
-
dbLoadTemplate("$(DB_TOP)/TC-32.substitutions", ...): This command tells the IOC to read theTC-32.substitutions file. It will then look for the file “…” directive within that file, findtemperature.template, and use the pattern and value lists to instantiate the records defined in the template. -
EPICS_DB_INCLUDE_PATH: This environment variable is essential when using dbLoadTemplate. It tells the IOC where to search for.templatefiles referenced within the.substitutionsfile being loaded.
Make sure both the .template and .substitutions files are copied to ${TOP}/db. In your Makefile, add:
DB += $(patsubst ../%, %, $(wildcard ../*.template))
DB += $(patsubst ../%, %, $(wildcard ../*.substitutions))
Benefits of Database Templates and Substitution
As demonstrated, the template and substitution file workflow provides significant advantages for configuring multiple similar records compared to purely manual methods. Whether you choose build-time generation (loading a expanded .db) or runtime substitution (dbLoadTemplate), these techniques offer improvements:
-
Scalability: Easily create hundreds or thousands of similar records by adding lines to a
.substitutionsfile or even generating the.substitutionsfile programmatically. -
Maintainability: Update the structure of the records for all instances by editing a single
.templatefile. Update common parameters (likeEGU) for all instances by editing the global block in the.substitutionsfile. -
Consistency: Ensures all instances are configured identically based on the template and substitution rules, reducing configuration errors.
-
Readability: The
st.cmdfile remains clean and short, focusing on loading database files and setting top-level macros, rather than containing repetitive record definitions. -
Build-Time Efficiency (for
.dbgeneration): Generating record instances happens during the build process (make), triggered by Makefile rules, not at IOC startup (iocInit). This leads to faster startup times for very large configurations compared to runtime substitution methods (dbLoadRecordson.templateordbLoadTemplate). -
Reduced Errors: Minimizes copy-paste errors inherent in manual methods.
While iocshLoad with snippets is excellent for encapsulating sequences of iocsh commands (like configuring an Asyn port and then loading one database file or set of records), templates and substitution files (processed at build time or runtime) are the primary methods for generating large numbers of similar database records themselves from a common definition. Often, these techniques are used together: iocshLoad might configure the device connection, and then dbLoadRecords (loading a build-time .db) is used within st.cmd or an iocsh script to load the records associated with that connection.
Questions for further understanding:
-
Modify the
temperature.templateto add a simple alarm field (e.g.,HIGHorLOLO) and rebuild the IOC using the build-time method (make and runningst2.cmd). Verify the new field appears usingcaget MYDEMO:TC32:CHXX.HIGH. -
Explore the generated
TC-32.dbfile. See how the template and substitution file were combined to create the final record definitions. -
Experiment with moving
$(P),$(R), or$(PORT)from being load-time macros (provided inst2.cmdorst3.cmd) to build-time macros (defined in the.substitutionsfile’s pattern and list, potentially using global for common values). How does the generated.dbfile look different? How would you load it inst.cmd? -
Experiment with running the IOC using
st3.cmdwhich employs thedbLoadTemplateruntime method. Compare the IOC startup time to running withst2.cmd(build-time method) for 32 channels. (Note: the difference might be very small for only 32 channels, but becomes significant for thousands). -
Create the
TC-32.iocshfile, and expand this example to cover THREE TC-32 devices.
4.6 IOC Startup Sequence (st.cmd Phases)
The startup script, conventionally named st.cmd, is the script executed when an EPICS Input/Output Controller (IOC) starts. It’s a sequence of commands interpreted by the IOC shell (iocsh) that sets up your EPICS IOC environment, loads the necessary software components and database configurations, and ultimately brings the control system to a ready and operational state. Understanding the structure and phases of the st.cmd script is fundamental to developing and debugging IOC applications.
The execution flow of the st.cmd is critically divided by a single command: iocInit(). This command marks the transition from a configuration phase to an operational phase.
Before diving into the st.cmd script itself, it’s helpful to understand the two main components that constitute an EPICS IOC application at runtime:
-
IOC Binary Files: These are the executable programs and associated libraries that contain the compiled EPICS core, module support, and your application-specific code (driver support, device support, etc.).
-
IOC Configuration Files: These are the data files that the IOC binary loads at startup to define its behavior, the process variables (PVs) it will manage, and how it interacts with hardware.
Check Binary Files
The IOC executable is the program you run to start your EPICS IOC. It’s typically found in the bin/<architecture> directory within your application’s top-level directory.
You can execute the IOC directly from the command line. Without an st.cmd file specified as an argument, it often starts in an interactive iocsh mode, where you can manually enter commands:
$ ./bin/linux-x86_64/jeonglee-Demo
7.0.7 > help
7.0.7 > dbl
7.0.7 > iocInit
This shows the IOC shell prompt (7.0.7 >) and that basic commands like help, dbl (database list), and iocInit are available. Please check what you see after each command.
You can also inspect the shared libraries that your IOC executable depends on using system tools like ldd on Linux:
$ ldd bin/linux-x86_64/jeonglee-Demo
	linux-vdso.so.1 (0x00007ffe787f1000)
	libasyn.so => /home/jeonglee/epics/1.1.1/debian-12/7.0.7/modules/asyn/lib/linux-x86_64/libasyn.so (0x00007f0dfd15b000)
	libcalc.so => /home/jeonglee/epics/1.1.1/debian-12/7.0.7/modules/calc/lib/linux-x86_64/libcalc.so (0x00007f0dfd116000)
	libstream.so => /home/jeonglee/epics/1.1.1/debian-12/7.0.7/modules/StreamDevice/lib/linux-x86_64/libstream.so (0x00007f0dfd0c5000)
	libpvxsIoc.so.1.3 => /home/jeonglee/epics/1.1.1/debian-12/7.0.7/modules/pvxs/lib/linux-x86_64/libpvxsIoc.so.1.3 (0x00007f0dfd04e000)
	libdbRecStd.so.3.22.0 => /home/jeonglee/epics/1.1.1/debian-12/7.0.7/base/lib/linux-x86_64/libdbRecStd.so.3.22.0 (0x00007f0dfd007000)
	libdbCore.so.3.22.0 => /home/jeonglee/epics/1.1.1/debian-12/7.0.7/base/lib/linux-x86_64/libdbCore.so.3.22.0 (0x00007f0dfcf70000)
	libCom.so.3.22.0 => /home/jeonglee/epics/1.1.1/debian-12/7.0.7/base/lib/linux-x86_64/libCom.so.3.22.0 (0x00007f0dfcefa000)
	libc.so.6 => /lib/x86_64-linux-gnu/libc.so.6 (0x00007f0dfccf5000)
	libtirpc.so.3 => /lib/x86_64-linux-gnu/libtirpc.so.3 (0x00007f0dfccc5000)
	libstdc++.so.6 => /lib/x86_64-linux-gnu/libstdc++.so.6 (0x00007f0dfca00000)
	libgcc_s.so.1 => /lib/x86_64-linux-gnu/libgcc_s.so.1 (0x00007f0dfcca5000)
	libsscan.so => /home/jeonglee/epics/1.1.1/debian-12/7.0.7/modules/sscan-589eac4/lib/linux-x86_64/libsscan.so (0x00007f0dfcc73000)
	libseq.so => /home/jeonglee/epics/1.1.1/debian-12/7.0.7/modules/seq-2.2.9/lib/linux-x86_64/libseq.so (0x00007f0dfcc5f000)
	libm.so.6 => /lib/x86_64-linux-gnu/libm.so.6 (0x00007f0dfc920000)
	libpvxs.so.1.3 => /home/jeonglee/epics/1.1.1/debian-12/7.0.7/modules/pvxs/lib/linux-x86_64/libpvxs.so.1.3 (0x00007f0dfc7c4000)
	/lib64/ld-linux-x86-64.so.2 (0x00007f0dfd229000)
	libca.so.4.14.2 => /home/jeonglee/epics/1.1.1/debian-12/7.0.7/base/lib/linux-x86_64/libca.so.4.14.2 (0x00007f0dfc762000)
	libreadline.so.8 => /lib/x86_64-linux-gnu/libreadline.so.8 (0x00007f0dfc70a000)
	libgssapi_krb5.so.2 => /lib/x86_64-linux-gnu/libgssapi_krb5.so.2 (0x00007f0dfc6b7000)
	libpv.so => /home/jeonglee/epics/1.1.1/debian-12/7.0.7/modules/seq-2.2.9/lib/linux-x86_64/libpv.so (0x00007f0dfcc58000)
	libevent_core-2.1.so.7 => /lib/x86_64-linux-gnu/libevent_core-2.1.so.7 (0x00007f0dfcc22000)
	libevent_pthreads-2.1.so.7 => /lib/x86_64-linux-gnu/libevent_pthreads-2.1.so.7 (0x00007f0dfcc1d000)
	libtinfo.so.6 => /lib/x86_64-linux-gnu/libtinfo.so.6 (0x00007f0dfc684000)
	libkrb5.so.3 => /lib/x86_64-linux-gnu/libkrb5.so.3 (0x00007f0dfc5aa000)
	libk5crypto.so.3 => /lib/x86_64-linux-gnu/libk5crypto.so.3 (0x00007f0dfc57d000)
	libcom_err.so.2 => /lib/x86_64-linux-gnu/libcom_err.so.2 (0x00007f0dfc577000)
	libkrb5support.so.0 => /lib/x86_64-linux-gnu/libkrb5support.so.0 (0x00007f0dfc569000)
	libkeyutils.so.1 => /lib/x86_64-linux-gnu/libkeyutils.so.1 (0x00007f0dfc562000)
	libresolv.so.2 => /lib/x86_64-linux-gnu/libresolv.so.2 (0x00007f0dfc54f000)
This output shows that the jeonglee-Demo executable depends on various EPICS Base libraries (libdbCore.so, libCom.so, libca.so) and module libraries (libasyn.so, libstream.so, etc.), confirming that these components are linked into the final IOC binary.
IOC Configuration Files
These files define the specific behavior and data points (PVs) of your IOC instance. They are typically generated during the build process and/or created manually. Key configuration file types include:
db: [Build] Contains EPICS database instance (.db, .template, .substitutions) and other associated files (like StreamDevice protocol files).dbd: [Build] Contains Generated IOC Database Definition (.dbd) files.iocBoot: [Build, Template, Manual] Directory containing startup scripts (st.cmd,.iocsh) and often site-specific configuration files. Generated initially by templates but frequently updated manually.iocsh: [Build] Often contains local.iocshsnippet files, which are reusable portions of startup scripts.
These directories and files contain the instructions and data that the IOC binary loads at runtime to configure itself.
Anatomy of the st.cmd
The st.cmd script acts as the central script that brings together the binary capabilities and the configuration data. It tells the IOC binary what definitions to load, what hardware to configure, and what records to instantiate and run. The script’s structure can be broadly categorized based on the iocInit() command.
An EPICS IOC startup script will cover these two major components (Binary Capabilities and Configuration Files) at some level within categories such as Environment, Device / System Configuration, and Database Configuration executed before iocInit().
Then the predefined EPICS core iocInit() command will perform the core initialization work. After this, we can add additional commands for post-initialization tasks, diagnostics, or starting other runtime components.
The Role of iocInit()
The iocInit() command is the central pivot of the IOC startup. Its significance lies in triggering the core initialization routines of the EPICS runtime environment. Before iocInit(), the IOC shell is primarily loading definitions and configuring resources. After iocInit(), the EPICS kernel becomes fully active, starting threads for record processing, enabling Channel Access server functionality, and initializing the loaded records.
Think of it like powering up a complex machine:
-
Before
iocInit(): You’re plugging in the components, connecting the wires, and loading the operating instructions. The system is assembled but not yet running. -
iocInit(): You press the main power button. The system boots up, performs internal checks, and gets ready to execute its tasks. -
After
iocInit(): The machine is running, performing its intended operations, and responding to external commands.
Before iocInit(): Configuration and Loading
The commands placed in st.cmd before the iocInit() call are responsible for preparing the environment and loading the foundational elements required by the IOC. This phase ensures that all necessary software support is loaded and configured before the system attempts to initialize records and interact with hardware.
Looking at your example st.cmd:
#!../../bin/linux-x86_64/jeonglee-Demo

#-- Environment
< envPaths

epicsEnvSet("DB_TOP", "$(TOP)/db")
epicsEnvSet("STREAM_PROTOCOL_PATH", "$(DB_TOP)")
epicsEnvSet("EPICS_DB_INCLUDE_PATH", "$(DB_TOP)")

epicsEnvSet("PREFIX_MACRO", "MYDEMO:")
epicsEnvSet("DEVICE_MACRO", "TC32:")

epicsEnvSet("IOCNAME", "training-jeonglee-Demo")
epicsEnvSet("IOC", "ioctraining-jeonglee-Demo")

dbLoadDatabase "$(TOP)/dbd/jeonglee-Demo.dbd"
jeonglee_Demo_registerRecordDeviceDriver pdbbase

cd "${TOP}/iocBoot/${IOC}"

#-- Device / System Configuration
epicsEnvSet("ASYN_PORT_NAME", "LocalTCPServer")
epicsEnvSet("TARGET_HOST",    "127.0.0.1")
epicsEnvSet("TARGET_PORT",    "9399")
drvAsynIPPortConfigure("$(ASYN_PORT_NAME)", "$(TARGET_HOST):$(TARGET_PORT)", 0, 0, 0)
asynOctetSetInputEos("$(ASYN_PORT_NAME)", 0, "\n")
asynOctetSetOutputEos("$(ASYN_PORT_NAME)", 0, "\n")

#-- Device Database Configuration
dbLoadRecords("$(DB_TOP)/TC-32.db", "P=$(PREFIX_MACRO),R=$(DEVICE_MACRO),PORT=$(ASYN_PORT_NAME)")

#-- iocInit
iocInit

#-- After iocInit, commands and others...
ClockTime_Report
Here are the typical types of commands found in this phase, illustrated by your example:
- Environment Setup:
< envPaths: This is a common convention to source theenvPathsfile. This file, usually generated during the build process (as seen in yourenvPathsexample below), defines essential environment variables likeTOP,EPICS_BASE, and paths to included EPICS modules.
#-- IOC Unique Identity
epicsEnvSet("IOC","ioctraining-jeonglee-Demo")
#-- TOP : runtime TOP folder for your IOC applications
epicsEnvSet("TOP","/home/jeonglee/gitsrc/EPICS-IOC-demo")
#-- Variables defined in configure/RELEASE
epicsEnvSet("MODULES","/home/jeonglee/epics/1.1.1/debian-12/7.0.7/base/../modules")
epicsEnvSet("ASYN","/home/jeonglee/epics/1.1.1/debian-12/7.0.7/base/../modules/asyn")
epicsEnvSet("CALC","/home/jeonglee/epics/1.1.1/debian-12/7.0.7/base/../modules/calc")
epicsEnvSet("STREAM","/home/jeonglee/epics/1.1.1/debian-12/7.0.7/base/../modules/StreamDevice")
epicsEnvSet("PVXS","/home/jeonglee/epics/1.1.1/debian-12/7.0.7/base/../modules/pvxs")
epicsEnvSet("EPICS_BASE","/home/jeonglee/epics/1.1.1/debian-12/7.0.7/base")
epicsEnvSet("VAR_NAME", "value"): Used to define additional environment variables specific to the application or IOC instance. This includes defining paths (DB_TOP,STREAM_PROTOCOL_PATH), or macro values (PREFIX_MACRO,DEVICE_MACRO,IOCNAME). These variables and macros make thest.cmdscript more flexible and easier to manage.
- Database Definition and Support Registration:
-
dbLoadDatabase "$(TOP)/dbd/jeonglee-Demo.dbd“: Loads the compiled database definitions (.dbd) file. Note that.dbdfile contains any type of definition except record instances defined in a.dbfile. EPICS has teh following database defintionns such asMenu,Record Type,Device,Driver,Registrar,Variable,Function, andBreakpoint Table. -
jeonglee_Demo_registerRecordDeviceDriver pdbbase: This command (wherejeonglee_Demois typically derived from your application name) registers the device and driver support routines that were linked into your IOC executable with the EPICS database processing core. This is crucial so that records can find and connect to the low-level code that interacts with hardware. The source file will be generated automatically through the building procedure. You can check it injeonglee-DemoApp/src/O.linux-x86_64/jeonglee-Demo_registerRecordDeviceDriver.cppand the file is defined injeonglee-DemoApp/src/Makefileas well.
- Changing Directory:
cd "${TOP}/iocBoot/${IOC}": Changes the current working directory to the IOC’s specific boot directory. This is a common convention and simplifies the paths used for loading subsequent configuration files.
- Hardware and Driver Configuration:
-
drvAsynIPPortConfigure("LocalTCPServer", "127.0.0.1:9399", ...): Commands specific to hardware drivers or communication modules (like Asyn) are placed here. This configures the low-level interface used to communicate with external devices. -
asynOctetSetInputEos(...), asynOctetSetOutputEos(...): Configuration specific to the communication protocol, such as setting end-of-string terminators for serial or TCP communication.
- Record Instance Loading:
dbLoadRecords("$(DB_TOP)/TC-32.db", "P=$(PREFIX_MACRO),R=$(DEVICE_MACRO),PORT=$(ASYN_PORT_NAME)"): Loads the actual record instances (the PVs) using database files (.db).
At the end of this phase, the IOC shell has loaded all the necessary definitions, configured the communication interfaces, and created the record instances in memory, but the records are not yet actively processing or interacting with the hardware in a real-time loop.
iocInit(): Bringing the IOC to Life
The iocInit() command is the turning point. When executed, it performs the vital initialization steps that transition the IOC from a configured state to an active, running system. This involves initializing the EPICS kernel, starting background tasks, initializing loaded records (including resolving links and calling device support init routines), setting up scanning and access security, processing records with PINI=YES, and starting the Channel Access server.
Once iocInit() completes, the IOC is “live.” Records configured for scanning will begin processing, Channel Access clients can connect and interact with the PVs, and the IOC is actively monitoring and controlling the connected hardware.
For a detailed explanation of the internal steps performed by iocInit(), including the distinction between iocBuild and iocRun phases and the sequence of calls to various EPICS subsystems and initialization hooks, please refer to the separate documentation on Advanced iocInit() 1.
After iocInit(): Post-Initialization Actions
Commands placed after iocInit() are executed in the context of a fully initialized and running IOC. These commands are typically used for tasks that rely on the IOC’s real-time environment and the active processing of records.
In your example st.cmd, there is one command after iocInit():
ClockTime_Report
Typical actions in this phase include:
-
Starting Sequence Programs (SNC Programs): Sequence programs, which implement complex state machine logic using SNL, are commonly started after
iocInit()using theseqcommand. This ensures that the PVs the sequence program interacts with are already loaded and initialized. -
Performing Post-Startup Configuration: While most configuration is done before
iocInit(), sometimes specific settings or actions that depend on the IOC being live are performed here. -
Running Diagnostic or Utility Commands: Commands for reporting status, health checks, or other utilities that are relevant after the IOC is fully operational can be placed here, such as the
ClockTime_Reportin your example. These might provide confirmation that the IOC started successfully and is functioning as expected. -
Setting Initial PV Values: While initial values are often handled during record initialization via device support, in some cases, commands might be used here to set specific PVs to a desired state after startup, although this is less common than setting values before iocInit or relying on device support init.
-
Based on the EPICS Application Developer’s Guide ↩
iocInit() for For advanced or challenge users
The iocInit() command is the critical point in the startup script. While you typically just call iocInit, it’s actually implemented as two distinct phases internally: iocBuild and iocRun. The iocInit command executes both of these phases sequentially to bring the IOC fully online. Understanding these phases provides a deeper insight into the startup sequence.
The initialization process, as performed by iocInit (which encompasses iocBuild followed by iocRun), consists of the following detailed steps:
Phase 1: iocBuild (Building the IOC’s Structure - Still Quiescent)
This phase sets up the core environment and loads/initializes the static configuration but does not yet start the main processing or I/O threads.
-
Configure Main Thread:
- The main thread’s execution environment is prepared.
initHookAtIocBuildis announced (allowing registered functions to run at this specific point).- The message “Starting iocInit” is logged.
- On Unix, signals like
SIGHUPare configured to be ignored, preventing unexpected shutdown. initHookAtBeginningis announced.
-
General Purpose Modules:
coreReleaseis called, typically printing the EPICS Base version.taskwdInitis called to start the task watchdog system, which monitors other tasks.callbackInitis called to start the general-purpose callback tasks.initHookAfterCallbackInitis announced.
-
Channel Access Links:
dbCaLinkInitinitializes the module for handling database channel access links. Its task is not started yet.initHookAfterCaLinkInitis announced.
-
Driver Support:
initDrvSupis called. This routine find all the hardware drivers so they are ready to use. The initDrvSup function finds each driver’s info and runs its setup code.initHookAfterInitDrvSupis announced.
-
Record Support:
initRecSupis called. This routine finds each record support entry table and calls the init routine for each record type.initHookAfterInitRecSupis announced.
-
Device Support (Initial Call):
initDevSupis called for the first time. This routine looks up each device support entry table and calls their init routine, indicating this is the initial call.initHookAfterInitDevSupis announced.
-
Database Records:
initDatabaseis called, making three passes over the database performing the following:- Pass 1: Initializes record fields (like
RSET,RDES,MLOK,MLIS,PACT,DSET) for each record and calls record support’sinit_record. - Pass 2: Converts
PV_LINKinto eitherDB_LINK(if the target PV is in the same IOC) orCA_LINK(if the target is remote) and call any extended device support’sadd_recordroutine. - Pass 3: Calls record support’s
init_recordfunction again (second pass).
- Pass 1: Initializes record fields (like
- An exit routine
epicsAtExitis registered to handle database shutdown when the IOC exits. dbLockInitRecordsis called to set up the database lock sets.dbBkptInitinitializes the database debugging module.initHookAfterInitDatabaseis announced.
-
Device Support (Final Call):
initDevSupis called for a second and final time. This allows device support to perform any final setup that requires the database records to be fully initialized and linked.initHookAfterFinishDevSupis announced.
-
Scanning and Access Security:
scanInitinitializes the periodic, event, and I/O event scanners, but the scan threads are created in a state where they cannot process records yet.asInitinitializes the access security. If this fails, IOC initialization is aborted.dbProcessNotifyInitinitializes support for process notification.- After a short delay,
initHookAfterScanInitis announced.
-
Initial Processing:
initialProcessprocesses all reacords that havePINIset toYESinitHookAfterInitialProcessis announced.
-
Channel Access Server (Initial Setup):
rsrv_initis called to start the Channel Access server, but its tasks are not yet allowed to run, so it doesn’t announce its presence on the network.initHookAfterCaServerInitis announced.
At this point, the iocBuild phase is complete. So, the IOC has been fully initialized, but it is still in a quiescent state. initHookAfterIocBuilt is announced. If you had started with iocBuild, the command would finish here.
Phase 2: iocRun (Bringing the IOC Online)
This phase activates the threads and processes that allow the IOC to actively monitor hardware, process records, and communicate via Channel Access.
-
Enable Record Processing:
initHookAtIocRunis announced.scanRunis called, which starts the scan threads and sets the global variableinterruptAccepttoTRUE. This variable acts as a flag indicating that the IOC is ready to handle I/O interrupts.dbCaRunis called, which enables the Channel Access link processing task.initHookAfterDatabaseRunningis announced.- If this is the first time
iocRun(oriocInit) is executed,initHookAfterInterruptAcceptis announced.
-
Enable CA Server:
rsrv_runis called. This allows the Channel Access server tasks to begin running and announce the IOC’s presence to the network.initHookAfterCaServerRunningis announced.- If this is the first time,
initHookAtEndis announced. - A command completion message is logged, and
initHookAfterIocRunningis announced.
Once iocInit() (completing both iocBuild and iocRun) finishes, the IOC is “live.” Records configured for scanning will begin processing, Channel Access clients can connect and interact with the PVs, and the IOC is actively monitoring and controlling the connected hardware.
Chapter 5: Understanding IOC Application Configuration
An EPICS Input/Output Controller (IOC) application requires configuration to define its behavior, load databases, initialize hardware interfaces, and set various parameters. The primary file responsible for the initial setup of an IOC instance is the startup script, typically named st.cmd. Additionally, other files like configure/RELEASE, configure/CONFIG_SITE, and system.dbd play crucial roles in defining dependencies, site-specific settings, and the overall database definition.
This chapter covers the following topics:
- Style of
st.cmd: Style ofst.cmdCommands RELEASEfile: Deep Insight onconfigure/RELEASECONFIG_SITEfile:configure/CONFIG_SITE- Controlling Application-Specific Build Optionssystem.dbdfile: Whatsystem.dbdfile is
5.1 Style of st.cmd Commands
The st.cmd file is a sequence of commands executed by the EPICS IOC shell during startup. These commands can call built-in EPICS functions, functions registered by loaded modules, or execute shell commands prefixed with <.
You might have noticed different styles of writing commands in st.cmd. EPICS supports variations in how arguments are passed, primarily related to the use of parentheses and commas versus simple space separation.
Let’s look at the common styles:
-
Style 1: Function-like syntax with parentheses and commas
This style looks like a function or command call you might see in programming. You put the command name, then arguments inside parentheses, separated by commas.
command("arg1", "arg2", ...) -
Style 2: Space-separated syntax
This style looks more like commands you type directly into a simple computer command line. You put the command name, then the arguments with spaces between them.
command "arg1" "arg2" ...
Both styles are generally accepted by the EPICS IOC shell for most commands, though specific commands might have preferences or require quotes around arguments containing spaces or special characters.
Let’s look at examples you already saw:
-
Setting up EPICS environment value (
epicsEnvSet): You can write it as:epicsEnvSet("STREAM_PROTOCOL_PATH", "$(DB_TOP)")Or just using spaces:
epicsEnvSet "STREAM_PROTOCOL_PATH" "$(DB_TOP)" -
Loading the device definitions (
dbLoadRecords): This also typically uses spaces for the main parts, even though the stuff inside the quotes has commas:dbLoadRecords("$(DB_TOP)/TC-32.db", "P=$(PREFIX_MACRO),R=$(DEVICE_MACRO),PORT=$(ASYN_PORT_NAME)")or, less commonly seen for
dbLoadRecords’s macro argument but technically possible for the command itself:dbLoadRecords "$(DB_TOP)/TC-32.db" "P=$(PREFIX_MACRO),R=$(DEVICE_MACRO),PORT=$(ASYN_PORT_NAME)"
Here is the comparision st.cmd between st2.cmd in CH4/db_templates.md and st4.cmd with the following style epicsEnvSet "STREAM_PROTOCOL_PATH" "$(DB_TOP)"
st2.cmd : Mixed but more `epicsEnvSet(..,..,..) Style
#!../../bin/linux-x86_64/jeonglee-Demo

< envPaths

epicsEnvSet("DB_TOP", "$(TOP)/db")
epicsEnvSet("STREAM_PROTOCOL_PATH", "$(DB_TOP)")
epicsEnvSet("PREFIX_MACRO", "MYDEMO:")
epicsEnvSet("DEVICE_MACRO", "TC32:")
epicsEnvSet("IOCNAME", "training-jeonglee-Demo")
epicsEnvSet("IOC", "ioctraining-jeonglee-Demo")

dbLoadDatabase "$(TOP)/dbd/jeonglee-Demo.dbd"
jeonglee_Demo_registerRecordDeviceDriver pdbbase

cd "${TOP}/iocBoot/${IOC}"

epicsEnvSet("ASYN_PORT_NAME", "LocalTCPServer")
epicsEnvSet("TARGET_HOST",    "127.0.0.1")
epicsEnvSet("TARGET_PORT",    "9399")
drvAsynIPPortConfigure("$(ASYN_PORT_NAME)", "$(TARGET_HOST):$(TARGET_PORT)", 0, 0, 0)

asynOctetSetInputEos("$(ASYN_PORT_NAME)", 0, "\n")
asynOctetSetOutputEos("$(ASYN_PORT_NAME)", 0, "\n")

dbLoadRecords("$(DB_TOP)/TC-32.db", "P=$(PREFIX_MACRO),R=$(DEVICE_MACRO),PORT=$(ASYN_PORT_NAME)")

iocInit

ClockTime_Report
In st2.cmd, the epicsEnvSet and asyn configuration commands use the function-like syntax with parentheses and commas. dbLoadDatabase and dbLoadRecords use space separation for their primary arguments.
st4.cmd : All epicsEnvSet .. .. .. Style
#!../../bin/linux-x86_64/jeonglee-Demo

< envPaths

epicsEnvSet "DB_TOP" "$(TOP)/db"
epicsEnvSet "STREAM_PROTOCOL_PATH" "$(DB_TOP)"
epicsEnvSet "PREFIX_MACRO" "MYDEMO:"
epicsEnvSet "DEVICE_MACRO" "TC32:"
epicsEnvSet "IOCNAME" "training-jeonglee-Demo"
epicsEnvSet "IOC" "ioctraining-jeonglee-Demo"

dbLoadDatabase "$(TOP)/dbd/jeonglee-Demo.dbd"
jeonglee_Demo_registerRecordDeviceDriver pdbbase

cd "${TOP}/iocBoot/${IOC}"

epicsEnvSet "ASYN_PORT_NAME"  "LocalTCPServer"
epicsEnvSet "TARGET_HOST"     "127.0.0.1"
epicsEnvSet "TARGET_PORT"     "9399"
drvAsynIPPortConfigure "$(ASYN_PORT_NAME)" "$(TARGET_HOST):$(TARGET_PORT)" 0 0 0

asynOctetSetInputEos "$(ASYN_PORT_NAME)" 0 "\n"
asynOctetSetOutputEos "$(ASYN_PORT_NAME)"  0  "\n"

dbLoadRecords "$(DB_TOP)/TC-32.db" "P=$(PREFIX_MACRO),R=$(DEVICE_MACRO),PORT=$(ASYN_PORT_NAME)"

iocInit

ClockTime_Report
st4.cmd consistently uses the space-separated style for epicsEnvSet, drvAsynIPPortConfigure, asynOctetSetInputEos, and asynOctetSetOutputEos. dbLoadDatabase and dbLoadRecords remain space-separated for their main arguments, which is standard.
Which style to use?
Both styles are valid. The choice often comes down to personal preference or adhering to a consistent style within a project or laboratory. The function-like style might feel more familiar to programmers, while the space-separated style is closer to shell scripting. Consistency within your st.cmd file is generally recommended for readability.
The core purpose of st.cmd remains the same regardless of the chosen style: to load necessary database definitions (.dbd files), register drivers, configure hardware ports, load record instances (.db files) with appropriate macros, and finally start the IOC with iocInit.
Assigment
You can run st4.cmd and how the IOC with st4.cmd works to compare it with the behavior of the IOC when using st2.cmd.
5.2 Deep Insight on configure/RELEASE
The configure/RELEASE file is a critical configuration file for the EPICS build system (which uses GNU Make). Its primary role is to tell the build system where to find EPICS Base and any external support modules your application depends on. While the syntax might look a bit unusual if you’re not familiar with Makefiles, its function is straightforward: defining paths. The ALS-U EPICS environment uses a specific folder structure relative to EPICS_BASE, which is reflected in how module locations are defined here.
Let’s look at the example RELEASE file divided into areas:
### AREA 1
MODULES = $(EPICS_BASE)/../modules

ASYN = $(MODULES)/asyn
CALC = $(MODULES)/calc
STREAM = $(MODULES)/StreamDevice

### ALS-U Default Module
PVXS=$(MODULES)/pvxs

# EPICS_BASE should appear last so earlier modules can override stuff:
EPICS_BASE = /home/jeonglee/epics/1.1.1/debian-12/7.0.7/base

### AREA 2
#-- https://epics.anl.gov/tech-talk/2024/msg00460.php
#-- When PVXS is included in RELEASE, then PVXS_MAJOR_VERSION will be defined
#-- Here, we use the installed ALS-U EPICS Environment PVXS Version
-include $(PVXS)/configure/CONFIG_PVXS_VERSION

### AREA 3
#-- These lines allow developers to override these RELEASE settings
#-- without having to modify this file directly.
-include $(TOP)/../RELEASE.local
-include $(TOP)/../RELEASE.$(EPICS_HOST_ARCH).local
-include $(TOP)/configure/RELEASE.local
AREA 1: Modules and EPICS_BASE Definitions
This section defines Make variables like EPICS_BASE, MODULES, ASYN, CALC, etc. The value assigned to each variable is the path to the top-level directory of that module or EPICS Base installation. These paths tell the build system where to find the necessary files (headers, libraries) for compiling and linking your application.
The MODULES variable is a common convention to simplify paths when many modules reside in a common parent directory relative to EPICS_BASE in the ALS-U EPICS environment.
The line defining EPICS_BASE is intentionally placed last. This is a standard Makefile practice. If any of the other module’s configuration files (which your build might include later) define a variable that is also defined in EPICS_BASE’s Makefiles, defining EPICS_BASE last ensures that the module’s definition of that variable takes precedence within that module’s build context. More importantly, placing it here allows it to be easily overridden by the RELEASE.local files included in AREA 3.
### AREA 1
MODULES = $(EPICS_BASE)/../modules

ASYN = $(MODULES)/asyn
CALC = $(MODULES)/calc
STREAM = $(MODULES)/StreamDevice

### ALS-U Default Module
PVXS=$(MODULES)/pvxs

# EPICS_BASE should appear last so earlier modules can override stuff:
EPICS_BASE = /home/jeonglee/epics/1.1.1/debian-12/7.0.7/base
AREA 2: Optional Module Includes
This area uses the -include directive to pull in additional configuration files from specific modules, if they exist. The hyphen - before include is crucial. It tells GNU Make not to stop the build with an error if the specified file is not found. This is useful for optional components or files that might only exist in certain versions or configurations of a module. For example, CONFIG_PVXS_VERSION likely defines Make variables indicating the version of the PVXS library only within the ALS-U EPICS enviornment or your own PVXS location, which your application’s Makefiles might use for version-specific build logic.
If there is the location of the PVXS and CONFIG_PVXS_VERSION in your EPICS environment, it will include your EPICS IOC application. However, they cannot find it, it will ignore it without returning error messages. For ALS-U EPICS environment, this is the default module, so you can ignore it.
### AREA 2
-include $(PVXS)/configure/CONFIG_PVXS_VERSION
AREA 3: Local Overrides
This is a very important area for development and user-specific configuration. The -include directives here bring in local files (RELEASE.local and RELEASE.$(EPICS_HOST_ARCH).local). Because Make processes instructions sequentially, any variable definitions in these local files will override definitions made earlier in the main configure/RELEASE file (like the EPICS_BASE definition in AREA 1). We also ignore .local files within our git environment.
-
$(TOP)/../RELEASE.local: Includes aRELEASE.localfile located one directory level above your application’s top directory ($(TOP)). This is a common place for site-wide or user-specific overrides that apply to multiple IOC applications within a larger development area. -
$(TOP)/../RELEASE.$(EPICS_HOST_ARCH).local: Similar to the above, but specific to the target architecture ($(EPICS_HOST_ARCH)) you are building for (e.g.,RELEASE.linux-x86_64.local). This is useful for architecture-dependent settings or module versions. However, for ALS-U we don’t need mostly. -
$(TOP)/configure/RELEASE.local: Includes aRELEASE.localfile directly within this IOC application’sconfiguredirectory. This is typically used for overrides specific only to this particular IOC application build.
Using these local override files allows developers to, for example, switch which EPICS_BASE installation they build against without modifying the main configure/RELEASE file that everyone shares. This helps prevent merge conflicts and simplifies managing different development or deployment environments.
## AREA 3
-include $(TOP)/../RELEASE.local
-include $(TOP)/../RELEASE.$(EPICS_HOST_ARCH).local
-include $(TOP)/configure/RELEASE.local
As you demonstrated, you can easily create a configure/RELEASE.local file to override settings, for instance, specifying a different EPICS_BASE path:
$ echo "EPICS_BASE=/path/to/your/local/epics/base" > configure/RELEASE.local
$ make
When you run make, the build system will read your configure/RELEASE, include the other local files if they exist, and because configure/RELEASE.local is included last, the EPICS_BASE path you specified in it will be used, overriding the one defined in AREA 1 of the main configure/RELEASE file. The paths defined in RELEASE ultimately determine where the build system finds components and influences where the resulting IOC executable and its dependencies are installed, which is then used by the st.cmd startup script at runtime (often via the envPaths file).
5.3 configure/CONFIG_SITE - Controlling Application-Specific Build Options
While configure/RELEASE defines where your application finds its dependencies (EPICS Base and other modules), configure/CONFIG_SITE controls how your application is built. This file allows you to override default build settings defined in standard EPICS configuration files, including those from EPICS Base, support modules, and site-specific configurations (configure/CONFIG, configure/os/CONFIG.* files). The settings in CONFIG_SITE influence aspects like compiler flags, optimization levels, enabled features, and installation locations.
Let’s examine the typical contents of a CONFIG_SITE file, broken down into logical areas:
# Make any application-specific changes to the EPICS build
#   configuration variables in this file.
#
# Host/target specific settings can be specified in files named
#   CONFIG_SITE.$(EPICS_HOST_ARCH).Common
#   CONFIG_SITE.Common.$(T_A)
#   CONFIG_SITE.$(EPICS_HOST_ARCH).$(T_A)

### AREA 1
# CHECK_RELEASE controls the consistency checking of the support
#   applications pointed to by the RELEASE* files.
# Normally CHECK_RELEASE should be set to YES.
# Set CHECK_RELEASE to NO to disable checking completely.
# Set CHECK_RELEASE to WARN to perform consistency checking but
#   continue building even if conflicts are found.
CHECK_RELEASE = NO

# Set this when you only want to compile this application
#   for a subset of the cross-compiled target architectures
#   that Base is built for.
#CROSS_COMPILER_TARGET_ARCHS = vxWorks-ppc32


### AREA 2
# To install files into a location other than $(TOP) define
#   INSTALL_LOCATION here.
#INSTALL_LOCATION=</absolute/path/to/install/top>

# Set this when the IOC and build host use different paths
#   to the install location. This may be needed to boot from
#   a Microsoft FTP server say, or on some NFS configurations.
#IOCS_APPL_TOP = </IOC's/absolute/path/to/install/top>


### AREA 3
# For application debugging purposes, override the HOST_OPT and/
#   or CROSS_OPT settings from base/configure/CONFIG_SITE
#HOST_OPT = NO
#CROSS_OPT = NO

# USR_CPPFLAGS += -fPIC
# USR_CPPFLAGS += -DUSE_TYPED_RSET
#
# USR_CFLAGS += `net-snmp-config --cflags`
# USR_CFLAGS += -DNETSNMP_NO_INLINE
#
# USR_LDFLAGS += `net-snmp-config --libs`

### AREA 4
# These allow developers to override the CONFIG_SITE variable
# settings without having to modify the configure/CONFIG_SITE
# file itself.
-include $(TOP)/../CONFIG_SITE.local
-include $(TOP)/configure/CONFIG_SITE.local
AREA 1: Build Checks and Target Architectures
This area contains settings that affect the build process’s checks and the target platforms.
-
CHECK_RELEASE: Controls how strictly the build verifies the paths and dependencies defined in yourRELEASEfiles. You can set it toYES,NO, orWARN. For the ALS-U environment, we have the clear paths and dependencies. Therefore, we use NO as the default option. -
CROSS_COMPILER_TARGET_ARCHS: If you are cross-compiling for multiple architectures, this lets you specify which subset of those architectures this particular application should be built for. For ALS-U IOC application, it is rare to use this option for our typical application.
AREA 2: Installation Paths
Settings here relate to where the built components of your application will be installed.
#INSTALL_LOCATION=</absolute/path/to/install/top>
#IOCS_APPL_TOP = </IOC's/absolute/path/to/install/top>
-
INSTALL_LOCATION: Overrides the default installation path, which is typically a subdirectory within your application’s source tree ($(TOP)). Useful for installing to a shared or deployment directory. This is a significant option, however, currently we don’t typically use this option. For your own local IOC, you don’t need to set this, then your built IOC application will stay in the same folder where your source files will be. -
IOCS_APPL_TOP: This is used in more complex deployment scenarios, particularly with network booting (like NFS or FTP) or when the path to the installed application differs between the build machine and the target IOC. It sets a variable used by theenvPathsscript to tell the running IOC where to find the installed application files, even if that path is different from the path used during the build (INSTALL_LOCATIONif set, or$(TOP)by default). You don’t need to define this option as well.
AREA 3: Compiler and Linker Options
This area controls flags passed to the compiler and linker, affecting optimization, debugging, and feature flags.
-
HOST_OPT/CROSS_OPT: Control compiler optimization levels for host and cross-compiled builds.HOST_OPTdetermines if compiler optimization is desired for host builds, whileCROSS_OPTdoes the same for cross-compiled targets. These typically default to no optimization (NO). You can set them toYEShere to enable optimization. You can leave these commented out to use the default behavior. -
USR_CPPFLAGS/USR_CFLAGS/USR_LDFLAGS: Allow adding custom flags to the preprocessor, C compiler, and linker respectively. Using+=appends your flags to existing ones. This is where you’d add things like-fPICor link against external libraries using backticks. Configuring these flags here allows you to apply them consistently across your application’s source files without needing to modify the individual Makefile in each*App/srcdirectory.
AREA 4: Local Overrides
This crucial area includes local CONFIG_SITE.local files. The -include directive (with the preceding hyphen) attempts to include these files, but the build does not fail if they are missing. Definitions in these local files override settings in the main CONFIG_SITE, allowing developers or site administrators to customize build options without modifying the shared configure/CONFIG_SITE file.
Similar to configure/RELEASE, configure/CONFIG_SITE supports including local override files.
-include $(TOP)/../CONFIG_SITE.local
-include $(TOP)/configure/CONFIG_SITE.local
These lines mean that if CONFIG_SITE.local files exist in the parent directory $(TOP)/.. or within the application’s configure directory $(TOP)/configure, their contents will be included. Any variable definitions in these local files will override definitions made earlier in the main CONFIG_SITE.
Just like RELEASE.local, these CONFIG_SITE.local files are added to .gitignore within the ALS-U EPICS Environment, to keep local build customizations out of the shared version control repository.
Assignment
1. INSTALL_LOCATION
Please add INSTALL_LOCATION into configure/CONFIG_SITE.local, and build your IOC. Please check your installation location about the directory structure, and what kind of files you can see during make, make clean, make install and make distclean.
$ echo "INSTALL_LOCATION=${HOME}/new_location" > configure/CONFIG_SITE.local
$ make
$ tree ~/new_location
$ make distclean
$ tree ~/new_location
$ make install
$ tree ~/new_location
$ make clean
$ tree ~/new_location
$ make
Even with make distclean, the installation folder will not be removed. Thus, you should remove it manually if you don’t need it. Please check TOP definition in envPaths:
$ cat iocBoot/*/envPaths
2. iocBoot
You observe that the iocBoot folder and its contents are not automatically installed to the INSTALL_LOCATION. With this fact, can you develop your own deployment plan for each IOC application? The answer is typically “it depends”. However, please think and develop an architecture by yourself. The ALS-U EPICS Environment doesn’t currently have such an architecture design, since at this moment we will not use INSTALL_LOCATION at the IOC application level. Please check TOP definition in envPaths under the iocBoot folder:
$ cat iocBoot/*/envPaths
3. IOCS_APPL_TOP
Okay, we can use IOCS_APPL_TOP. Note the use of >> during creating CONFIG_SITE.local to append to the file:
$ echo "INSTALL_LOCATION=${HOME}/new_location" > configure/CONFIG_SITE.local
$ echo "IOCS_APPL_TOP=${HOME}/new_location2" >> configure/CONFIG_SITE.local
$ ls ~/ |grep new_location
$ ls ~/new_location*
$ tree ~/new_location
$ make install
$ tree ~/new_location
$ make clean
$ tree ~/new_location
Please check the TOP definition in the envPaths file located in your source directory’s iocBoot folder again:
$ cat iocBoot/*/envPaths
Can you explain what difference you see in the envPaths file compared to before?
4. IOC
For both cases (after Part 2 and after Part 3), try running the IOC executable from the source location, the installation location, or elsewhere, and observe what happens. In what way can you make the IOC run correctly in both cases?
5.4 What system.dbd file is
The system.dbd file is a specific type of database definition file within the EPICS framework. Its primary function is to enable the system command within the IOC shell. This command grants the capability to execute arbitrary commands on the underlying operating system where the IOC is running. It’s an important point that this feature is not available on all operating systems.
The mechanism by which system.dbd enables this is by including the necessary directive, typically registrar(iocshSystemCommand), which registers the function that provides the system command functionality with the IOC shell during startup.
How to use it
In the ALS-U EPICS environment, the use of system.dbd is standardized and largely automated through the application template generator.
- Inclusion in the Build: For each IOC application, the
xxxApp/src/Makefileautomatically includes the line:
Common_DBDs += system.dbd
This line makes sure that the system.dbd file is included in the list of database definition files that are processed when the IOC application is built. This processing is what generates the necessary C/C++ code to incorporate the system command functionality into the final IOC executable.
-
Automatic Availability: Because
system.dbdis included by default via the Makefile template, the system command is automatically available within your IOC’s iocsh environment once the IOC starts. -
Purpose in ALS-U: The decision to make
system.dbda default inclusion in ALS-U is strategic. As you pointed out, it is frequently necessary to execute system commands from within the IOC during its operation for various tasks, such as:
- Integrating with the autosave module to trigger saving or restoring configuration.
- Performing file system operations.
- Interacting with other system-level utilities or scripts.
Since ALS-U standardizes on the Linux OS architecture, where the system command support is available in EPICS Base, enabling this functionality by default across all IOC applications provides a consistent and necessary capability for common control system tasks.
Assignment
- Check your IOC application
makefile: Can you find thesystem.dbddefintion inxxxApp/src/Makefile?
This step verifies the build configuration discussed above. You should look for the line Common_DBDs += system.dbd or an include statement that leads to its inclusion, confirming that your application is set up to use the system command functionality provided by system.dbd.
- Check
systemcommand: Can you see what different you can see in your IOC console (you can usesoftIoc, sincesoftIoccontainssystem.dbdfile as a default):
pwdorsystem pwdorsystem(pwd)orsystem("pwd")
This explores how the system command works. The versions like system pwd, system(pwd), and system("pwd") explicitly tell the IOC to execute the standard operating system’s pwd command. You should see the current working directory of the IOC process printed to the console. Typing just pwd might behave differently; it could either be an internal iocsh command or fail if the system command is the only way to access external commands. Note the syntax variations, especially the use of quotes, which are important for commands with spaces or special characters.
- Check additional system command:
mkdir test_folderorsystem mkdir testfolderorsystem(mkdir testfolder)orsystem("mkdir testfolder")
Similar to the previous point, this demonstrates using the system command for a different OS command (mkdir). The versions using system will attempt to create a directory named testfolder in the IOC’s current working directory by calling the OS mkdir command. After executing these, you should verify outside the IOC (using your regular terminal or file explorer) that the testfolder directory was indeed created in the location where you launched softIoc. Again, observe how typing mkdir without the explicit system command behaves.
Short Summary on EPICS Environment Variables
This is a short reminder which we forget frequently.
Channel Access
EPICS_CA_ADDR_LIST
EPICS_CA_ADDR_LISTdetermines where to searchEPICS_CA_ADDR_LISTis a list (seperated by spaces):"123.45.1.255 123.15.2.14 123.45.2.108"- The default of
EPICS_CA_ADDR_LISTis broadcast addresses of all interfaces on the host: It works when IOC servers are on the same subnet as IOC clients. - Broadcast address goes to all servers on a subnet, for example,
123.45.1.255
ifconfig -a |grep broadcast
        inet 172.17.0.1  netmask 255.255.0.0  broadcast 172.17.255.255
        inet 192.168.1.180  netmask 255.255.255.0  broadcast 192.168.1.255

ip addr show |grep -E 'inet' |grep -E 'brd'
    inet 192.168.1.180/24 brd 192.168.1.255 scope global dynamic noprefixroute wlo1
    inet 172.17.0.1/16 brd 172.17.255.255 scope global docker0
EPICS_CA_AUTO_ADDR_LIST
YES: it will include default addresses above in searchesNO: it does not search on default addresses- If you set
EPICS_CA_ADDR_LIST, usually set this toNO
PV Access
[copy from https://epics-base.github.io/pvxs/netconfig.html]
A PV Access network protocol operation proceeds in two phases: PV name resolution, and data transfer. Name resolution is the process is determining which PVA server claims to provide each PV name. Once this is known, a TCP connection is open to that server, and the operation(s) are executed.
The PVA Name resolution process is similar to Channel Access protocol.
EPICS_PVA_ADDR_LIST and EPICS_PVA_NAME_SERVERS, EPICS_PVA_AUTO_ADDR_LIST
When a name needs to be resolved, a PVA client will begin sending UDP search messages to any addresses listed in EPICS_PVA_ADDR_LIST and also via TCP to any servers listed in EPICS_PVA_NAME_SERVERS which can be reached.
UDP searches are by default sent to port 5076, subject to EPICS_PVA_BROADCAST_PORT and port numbers explicitly given in EPICS_PVA_ADDR_LIST.
The addresses in EPICS_PVA_ADDR_LIST may include IPv4/6 unicast, multicast, and/or broadcast addresses. By default (cf. EPICS_PVA_AUTO_ADDR_LIST) the address list is automatically populated with the IPv4 broadcast addresses of all local network interfaces.
Searches will be repeated periodically in perpetuity until a positive response is received, or the operation is cancelled.
Reference
[1] https://controlssoftware.sns.ornl.gov/training/2019_USPAS/Presentations/06%20Channel%20Access.pdf [2] https://epics-base.github.io/pvxs/netconfig.html
Potential Advanced Lessons List
Here is the future lessons list, which I would like to develop.
-
Chapter 4:
iocsh: explain how it works within the ALS-U EPICS IOC template generator, and a simple handon excise based on the existing simulator -
Chapter 4:
st.cmdfor multiple same devices afteriocsh -
Chapter 4:
st.cmdafter and before iocInit -
Chapter 4:
DB_INSTALLandDBrelated with other modules db template -
Chapter 4:
template,substitutionand flatting database filesDb/Makefile -
Chapter 4: Expand the simulator (1st level) - multiple instance
-
Chapter 4: Expand the simulator (2nd level) - complicate signals process
-
INSTAL_LOCATIONinCONFIG_SITE -
EPICS Variables in
CONFIG_SITE -
Chapter 5:
system.dbd -
DB record process (very simple,….)
-
common modules integration
iocStats,autosave,recsync, and so on -
sequencer example,
APPNAMEAPP/src/Makefile modification -
autosave
-
pvaEPICS environment -
External Services : screen, run, and so on
-
External Services :
procServ, unix domain, con -
External Services : systemd integration
-
Software Requirement Specification
Contributors
Here is a list of the contributor(s)
- Jeong Han Lee, Dr.rer.nat. https://git.als.lbl.gov/jeonglee
If you feel you’re missing from this list, feel free to add yourself in a PR.